Delightful Bake Cheesy Olive Rolls for Every Occasion

- Let’s look into into Bake Cheesy Olive Rolls - Savory Appetizer!
- The Ultimate Essential Ingredients Guide to Bake Cheesy Olive Rolls
- Mastering the Art of Professional Cooking: Tips and Techniques
- Pro Tips & Secrets to Perfect Bake Cheesy Olive Rolls
- Perfect Presentation: Making It Eye-Catching
- Storage & Make-Ahead: Keeping Cozy and Fresh
- Creative Variations: Spice It Up
- Complete Nutrition Guide: What’s Cooking Inside?
- Frequently Asked Questions
- 📝 Recipe Card
Let’s look into into Bake Cheesy Olive Rolls - Savory Appetizer!
Have you ever been to a family gathering or a party where the food was just mind blowingly good? picture this: the chatter is lively, the laughter fills the air, and in the center of it all, there’s this glorious platter of bake cheesy olive rolls - savory appetizer .
Yeah, that’s right! these warm, fluffy rolls filled with gooey cheese and briny olives have a way of becoming the star of the show.
Trust me when i say that once you try these, you’ll be that person everyone fights to get a roll from!
A Little History Behind the Rolls
So, where did these tasty bites come from? the olive roll recipe has roots that stretch back to mediterranean kitchens where flavor is king.
Olive trees have been around for centuries, and they are sprinkled throughout a lot of classic mediterranean appetizer recipes . these rolls, mixing the rich history of cheese and olives into a delightful dough, have become increasingly popular in modern times.
The beauty of these cheesy bread rolls is that they fit right in with a brunch appetizer or standing near the main course at any gathering.
What You Need to Know
Now, if you’re thinking of whipping these up, let’s lay out the facts. the difficulty level is medium, mainly because of the kneading and rising process.
But don’t sweat it! with a little patience, you’ll have it down in no time. you’re looking at about 30 minutes of prep and a total time of around one hour, which includes the dough’s rise.
And guess what? if you’re looking for budget friendly snack ideas for gatherings, the ingredient list won’t break the bank! this recipe yields about 12 delicious rolls plenty to share!
Why You Need to Bake These Rolls
Okay, here’s where it gets really exciting. these rolls are not just tasty; they’re downright beneficial too. filled with cheese, they're rich in protein, while the olives contribute healthy fats.
Who doesn’t want a savory cheese snack that's not just comforting but also easy on the waistline? plus, imagine presenting this homemade savory roll at your next party! you’ll wow your friends, and secretly, they’ll be asking for your “secret” recipe.
These rolls are versatile, perfect for a party appetizer recipe , or cozy evenings on the couch sprinkled with your favorite netflix show.
They pair beautifully with a nice cheese and olive dip or even a simple tomato salad. and hey, if you’re like me, it’s the bite sized cheese snacks that keep you going, right?
Transitioning to Ingredients
So now that you’re convinced, let’s roll right into what you’ll need to make these comforting cheesy rolls . make sure to grab a notepad, ‘cause it’s time to gather those ingredients! you’ll need just a few essentials to create the magic.
Stay tuned, ‘cause the next part is where we break it down, step-by-step, to get you rolling in the kitchen! Let’s bake up some love with these Bake Cheesy Olive Rolls !
The Ultimate Essential Ingredients Guide to Bake Cheesy Olive Rolls
Oh my gosh, friends! if there's one recipe that can transport your taste buds right to the sunny mediterranean, it's these bake cheesy olive rolls - savory appetizer .
They're warm, fluffy, and come packed with the delightful combo of gooey cheese and briny olives. but before we get to the baking magic, it’s all about having the right essential ingredients on hand.
Premium Core Components
Let’s kick things off with the nitty gritty of our ingredients. You know, those premium core components that transform ordinary recipes into unforgettable dishes?
For the dough, you’ll need 2¾ cups (350g) of all-purpose flour and 1 packet (2¼ teaspoons) of instant yeast. pro tip: active ingredients should be stored in a cool, dry place.
Keep an eye on the expiration dates, folks!
Salt and sugar elevate flavors, so one teaspoon of salt and a tablespoon of sugar are your new best friends.
They actually help with the dough's growth too! and trust me, dough rising tips can make or break your rolls!
When it comes to storage, the dough can sit in your fridge for a couple of days if you wrap it tightly just make sure to let it warm up before using.
Freshness tips? Always choose your olives wisely. Look for the ones that are firm and not overly mushy. And honestly, if they smell like the ocean, you’re golden!
Signature Seasoning Blend
Now, what’s a roll without some flavor? The signature seasoning blend we’re using here is as simple as it is flavorful.
You gotta have oregano ! Just 1 teaspoon in the filling enhances everything. Pair it with freshly ground black pepper to taste for that extra kick.
Feel free to throw in some other herb selections or spices that tickle your fancy. Perhaps some dried basil? The olive and cheese combination is super versatile, so get creative!
Smart Substitutions
But hey, sometimes we run out of stuff, right? No worries! Here’s where the smart substitutions come into play.
If you're missing green olives, use black olives instead. Or if you’re vegan, swap the cheeses for a dairy-free alternative. It’s all about making it work for you!
You want to jazz it up? use herbed cheese rolls or even throw in some sun-dried tomatoes to the filling! these emergency replacements could take your cheesy bread rolls to the next level.
Kitchen Equipment Essentials
Alright, let’s talk about the kitchen equipment essentials . We’re keeping it simple here.
You’ll need a mixing bowl, a rolling pin, and a baking sheet. if you don’t have a pastry brush, you can sub it with your fingers for spreading oils or butter.
Totally chill, right?
Not to mention some parchment paper to line your baking sheet. It saves the hassle of cleaning!
And don't forget, proper storage of your tools makes baking feel less like a chore. Organize those drawers, people!
Ready, Set, Bake!
By now, you're all stocked up and ready to dive into the world of bake cheesy olive rolls - savory appetizer.
Honestly, whipping these up is a breeze once you have your essentials gathered.
So, why wait? roll up those sleeves and let’s jump into the fun part turning those ingredients into delicious, bite sized cheese snacks that will wow your friends and family.
You'll totally impress them with these mediterranean appetizer recipes that scream comfort food while being totally gourmet!
Now that you know what you need, let's move on to the step-by-step instructions that'll have your dough rising beautifully and that cheesy aroma wafting through your kitchen.
Time to take those ingredients and make some magic happen!
Mastering the Art of Professional Cooking: Tips and Techniques
Cooking like a pro might seem daunting. but honestly, with the right steps, it’s totally doable! today, we’re diving into some essential preparation steps and breaking down the process of baking, particularly focusing on bake cheesy olive rolls - savory appetizer .
Trust me, these rolls are a hit at any gathering, and you’ll be the star of the show!
Essential Preparation Steps
Let's start with a little thing called mise en place . this fancy term just means having everything ready to rock before you start.
Think chopped ingredients, measured spices, and everything lined up as if you’re about to put on a show! it makes cooking smoother, saves time, and, believe me, prevents last minute panic over missing things.
Speaking of time management, you want to plan out your prep. keep your prep time around 30 minutes and your cooking time under 25 minutes .
Multitask wherever you can! for example, while your dough is rising for those cheesy olive rolls, you can prep the filling.
It’s all about maximizing that time!
Now, organization is key. keep your workspace clean and tidy. i like to clear everything off my counter except what i'm currently using.
Plus, having bowls for each ingredient looks super professional and it stops the mess from getting out of hand!
And let’s not forget safety! always chop away from yourself, and if you’re using really hot ingredients (think melted cheese), let things cool a bit.
No one needs a trip to the er during your cooking adventure!
Step-by-step Process
Alright, let’s break it down into easy steps. Here’s how you can whip up those heavenly cheesy bread rolls :
Make your dough : mix warm water (around 110° f ) with sugar and yeast. let it foam for about 5- 10 minutes .
Then, combine with flour and salt, and knead for about 8- 10 minutes until it’s smooth.
First rise : pop the dough into a greased bowl, cover it, and let it rise. you want it to double in size this should take about 1 hour .
Just grab a book or binge something for an hour; you’ve earned it!
Prepare Your Filling : While the dough is rising, mix your cheeses, olives, and seasonings in a bowl. The combo of feta and mozzarella is seriously unbeatable.
Roll Out and Fill : Punch down the dough and roll it out. Spread your filling evenly (watch those edges!). Roll it up tightly and slice into 12 rolls.
Second Rise : Let those babies rise for another 30 minutes ; they’ll get fluffy and gorgeous.
Bake : preheat your oven to 375° f and bake for about 20- 25 minutes until they're golden brown.
The smell? oh my gosh, it’ll have everyone flocking to your kitchen!
Expert Techniques
Using professional methods doesn’t require a culinary school degree. A few critical tips can elevate your game.
First, don't rush the rising. Seriously, let that dough rise properly; it's about building flavor and texture. No one wants flat rolls!
Next, for cheese filled goodness, opt for the best cheese for baking. i love mixing mozzarella with a kick of parmesan.
Just divine! and remember, if you’re unsure about when they’re done, give the bottom a little tap it should sound hollow.
Success Strategies
Here’s where we talk about common pitfalls. don’t skip the dough rising tips ! if you’re in a rush and skip this step, your rolls will be a sad, dense mess.
We want fluffy rolls, not doorstops!
For quality assurance, always check your ingredients’ freshness especially those olives! fresh ingredients mean flavorful appetizers! and if you can, make some ahead of time.
Freeze the rolls before baking for later! just thaw and bake when you're ready.
So, there you have it! master these steps, and you’ll be whipping up breakfast rolls or beautiful homemade savory rolls like a pro.
And if you sprinkle in a bit of love and patience, you’re bound to impress everyone at the brunch table.
Now, keep reading for a bit more Additional Information on perfecting your cooking skills or exploring more delicious Mediterranean cheese rolls!
Pro Tips & Secrets to Perfect Bake Cheesy Olive Rolls
Alright y’all, let’s chat about how to make your bake cheesy olive rolls - savory appetizer even more delicious and foolproof.
These rolls are already a winner, but with a few insider tips, you can elevate them to a whole new level.
Chef's personal insights: i've made these rolls countless times, and i’ve learned a thing or two about the dough. make sure your water is warm, but not too hot aim for about 110° f.
Too hot can kill your yeast, and trust me, you don’t want to waste your time kneading a dud!
Time saving techniques: if you're in a pinch, you can buy pre-made dough, but where's the fun in that? if you need some time, prep your filling the night before.
Just let it chill in the fridge until you’re ready to roll it up.
Flavor enhancement tips: don’t be shy with spices. adding a dash of red pepper flakes gives these cheesy bread rolls a lovely kick! or consider mixing fresh herbs into the filling.
Oregano is great, but some fresh basil or thyme tossed in will have your taste buds dancing.
Presentation Advice: Serving is just as important as cooking. After they bake up golden brown and fluffy, brush the tops with a little olive oil and sprinkle with sea salt right before serving for a gorgeous finish!
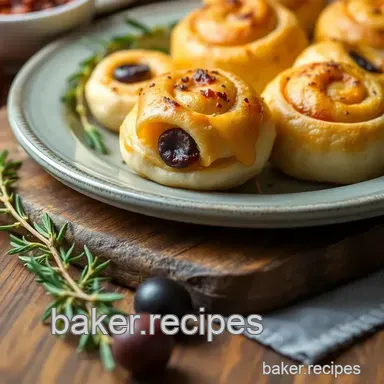
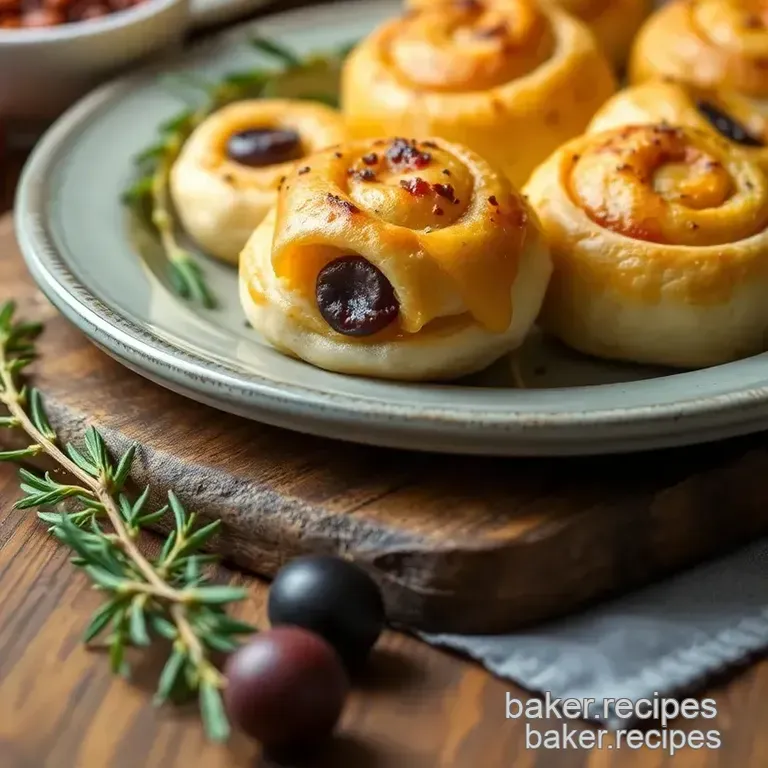
Perfect Presentation: Making It Eye-Catching
Alright, let’s talk about how to make those savory cheese snacks look irresistible on the table!
Plating Techniques: Choose a nice platter or wooden board to serve these warm rolls. They look super inviting in a casual setting when all piled up.
Garnish Ideas: Sprinkle some fresh parsley or a drizzle of balsamic glaze for that gourmet vibe. It'll be like a little edible confetti!
Color Combinations: The golden color of the rolls paired with some vibrant greens from a salad can really pop. Think about serving with a side of roasted veggies or a colorful dip.
Visual Appeal Tips: Use bite sized cheese snacks to your advantage. Arrange them in clusters. This not only looks plentiful but also invites folks to grab and go!
Storage & make-ahead: Keeping Cozy and Fresh
Now, if you’re planning ahead (which you should, ‘cause these are that good!), here’s how to store and get the most out of your olive roll recipe .
Storage Guidelines: Once they’re cooled, keep your rolls in an airtight container. They’ll last about 3 days at room temperature or up to a week in the fridge.
Preservation Methods: If you want to keep them longer, freeze them. Lay them out on a baking sheet until they’re fully frozen first, then transfer them to a freezer safe bag.
Reheating Instructions: For the best results, pop them in the oven at 350° F for about 10 minutes. This will help retain that warm yummy goodness.
Freshness Duration: For the best flavor, try to enjoy them within the first few days. The texture can change slightly after freezing, but they remain tasty!
Creative Variations: Spice It Up
Let’s get creative! Here are some fun twists to this comfort food recipe that you won’t want to miss.
Flavor Adaptations: Feeling adventurous? Swap out the mozzarella for something more punchy like cheddar, or mix feta with goat cheese for a tangy flavor explosion!
Dietary Modifications: If you're gluten-free, sub in a gluten-free blend for the flour. You can still enjoy those fluffy bread rolls without the gluten!
Seasonal Twists: In the summer, add in some diced sun-dried tomatoes and a sprinkle of fresh basil. It’s like bringing a little Italian summer into your kitchen.
Regional Variations: Turn these rolls into a Southern delight by swapping olives for pickled jalapeños. Y’all, it’s a game changer!
Complete Nutrition Guide: What’s Cooking Inside?
Finally, let’s break down what’s in your rolls and how they can fit into your meal plans.
Detailed Breakdown: Each roll has around 180 calories, which isn’t bad for a savory bite sized treat!
Health Benefits: Olives are packed with antioxidants and healthy fats, while the cheese provides a source of protein.
Dietary Considerations: Be mindful of sodium if you’re watching your intake. Use low-sodium olives and cheese to keep things balanced.
Portion Guidance: One or two rolls should satisfy any snack craving, but hey, I won’t judge if you want a few more!
Lastly, don’t forget to enjoy the process. Cooking is all about having fun in the kitchen and creating something delicious! So roll-up your sleeves, gather your ingredients, and let's make the beloved Bake Cheesy Olive Rolls - Savory Appetizer which will surely impress your friends and family at your next gathering!
You got this!
Frequently Asked Questions
What is the best way to serve Bake Cheesy Olive Rolls - Savory Appetizer?
These rolls are best served warm, straight from the oven. They pair wonderfully with a side of tzatziki or a light salad for a great appetizer. You can also serve them as a snack at gatherings or enjoy them with a glass of crisp white wine.
Can I make Bake Cheesy Olive Rolls - Savory Appetizer ahead of time?
Yes! You can prepare the dough and filling in advance, then assemble the rolls and let them rise before baking. Alternatively, you can bake them and store the rolls in an airtight container in the fridge for up to 2 days or freeze them for longer storage.
Just reheat in the oven before serving to restore their freshness.
What substitutions can I make for ingredients in the Bake Cheesy Olive Rolls - Savory Appetizer?
You can use black olives instead of green olives for a different flavor, or swap the mozzarella with cheddar or goat cheese for variety. If you don't have all-purpose flour, bread flour can work well, providing a chewier texture.
How do I ensure my Bake Cheesy Olive Rolls turn out fluffy?
Make sure your warm water isn't too hot, as this can kill the yeast. Allowing the dough to rise properly is essential; it should double in size. Knead the dough thoroughly to develop gluten, which contributes to its fluffiness.
Can I customize the filling for the Bake Cheesy Olive Rolls?
Absolutely! Consider adding sun-dried tomatoes for a burst of flavor or mixing in fresh herbs like basil or rosemary. Feel free to experiment with different cheeses or even add ingredients like chopped roasted red peppers for additional depth.
What are the nutritional considerations for Bake Cheesy Olive Rolls?
Each roll is roughly 180 calories, with 6g of protein and 8g of fat. While they can be a delicious part of a balanced diet, be mindful of portion sizes if you are watching your caloric intake. To make them lighter, consider using reduced fat cheese or whole grain flour.
Cheesy Olive Delight Rolls