Cake Baking: Perfect Victoria Sponge Technique
- The Queen’s Teatime Treat: Mastering the Victoria Sponge
- The Science Behind Perfect Sponge Cake Baking
- Essential Pantry Staples: Ingredients and Preparation Notes
- Methodical Steps to Constructing Your Victoria Sponge
- Expert Troubleshooting for Flawless Cake Layers
- Preserving Freshness: Storage and Advanced Freezing Techniques
- Elevating Teatime: Presentation and Pairing Ideas
- Recipe FAQs
- 📝 Recipe Card
The Queen’s Teatime Treat: Mastering the Victoria Sponge
That first moment the Victoria Sponge comes out of the oven? Pure heaven. The delicate vanilla scent fills the whole house, promising perfect, fluffy layers, and that's when you know your afternoon of Cake Baking is going to pay off big time.
This is more than just a cake; it’s a standard, a kitchen benchmark you absolutely must nail.
Look, I know many people find this style of traditional British baking intimidating, but this recipe is the ultimate confidence builder because the ingredient ratios are dead simple (equal weights!).
It relies entirely on meticulous technique, making it one of the most rewarding easy baking recipes desserts you can master quickly.
Forget everything you thought you knew about difficult Cake Baking ; we’re breaking down the science so your sponge layers are always flawless, light, and ready for that luxurious layer cake filling of jam and cream.
Mastery of Cake Baking starts right here with the Victoria Sponge.
The Science Behind Perfect Sponge Cake Baking
Mastery of Cake Baking isn't magic; it’s chemistry, specifically how we incorporate air. This specific Victoria Sponge Recipe relies on the High Ratio Creaming Method, which is the secret sauce for that delicate, pillowy texture.
The Royal History of the Victoria Sandwich
The history is delicious! Named after Queen Victoria, who favored a slice with her afternoon tea, this cake was originally known as the Victoria Sandwich. It perfectly captures the elegance and simplicity of traditional British Baking. Honestly, if it's good enough for royalty, it's good enough for Sunday afternoon.
Defining the Perfect Sponge Texture
The goal here is a truly light, airy sponge not a dense, tight crumbed loaf cake. We need that structure to be sturdy enough to hold the filling but tender enough to practically melt in your mouth. This level of tasty baking requires that the fat (butter) holds maximum air before the flour ever touches it.
What Makes This Recipe a British Benchmark
This recipe uses the 7 ounce rule (or 200g), meaning the weights of the four main ingredients butter, sugar, flour, and eggs are all equal. This consistency is essential to successful Cake Baking because it ensures the perfect balance of structure and richness, leading to a consistently moist, high rising sponge every time.
Achieving the Ideal High Ratio Creaming Method
This is the most crucial step in all Cake Baking . We are whipping air into the fat and sugar until the mixture dramatically changes color and volume. It should look almost white and feel like light, creamy clouds not grainy. If you rush this process, your cake will be heavy and dense.
The Role of Room Temperature Ingredients
If your butter and eggs are cold, they cannot successfully incorporate air and emulsify. Cold ingredients seize up, leading to a curdled batter, which means your beautiful sponge will likely sink later. Trust me, take the time to let everything come to a comfortable room temperature.
Balancing the Sugar and Fat Ratio
Using caster sugar (superfine granulated) is key here because it dissolves faster, avoiding that sandy texture and allowing the butter to reach maximum aeration before the dry ingredients are introduced. The high fat content ensures the cake stays moist without needing extra liquid.
Essential Pantry Staples: Ingredients and Preparation Notes
When preparing for Cake Baking , gathering your tools and ingredients first is half the battle. This simple list yields spectacular results, provided you use quality staples.
| If you don't have... | You can use... | Notes |
|---|---|---|
| Self Raising Flour | Plain (AP) Flour + 2 level teaspoons of Baking Powder. | Sift these together thoroughly. |
| Caster Sugar | Granulated Sugar | Cream it for 2 3 extra minutes to help dissolve the larger crystals. |
| Unsalted Butter | Baking Margarine or Vegetable Shortening | This often yields an exceptionally light sponge structure, though the flavor is slightly less rich. |
Choosing the Right Butter and Sugar (The Caster Sugar Question)
We need unsalted butter, softened until you can easily press a dent in it with one finger. Caster sugar, which is finer than standard granulated sugar, is non-negotiable for this particular Cake Baking method.
If you only have regular sugar, blitz it in a food processor for 30 seconds to make it finer.
Flour Power: Self Raising vs. All-Purpose Mixes
Self raising flour already contains a perfect measure of leavening agents. If you must use All-Purpose (Plain) flour, you absolutely must add 2 teaspoons of baking powder per 7 ounces of flour. Make sure you sift it all together thoroughly to distribute the lift evenly.
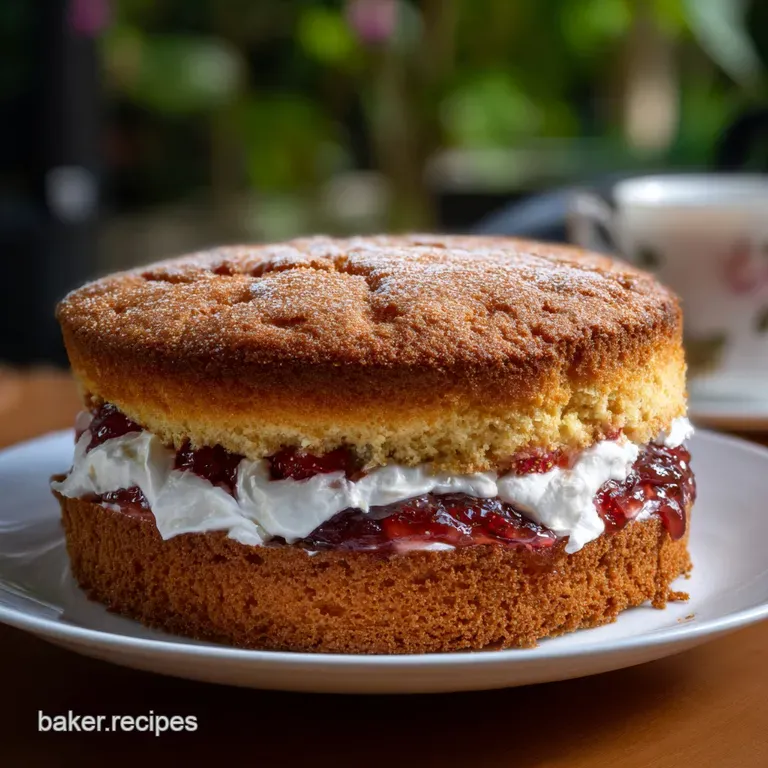
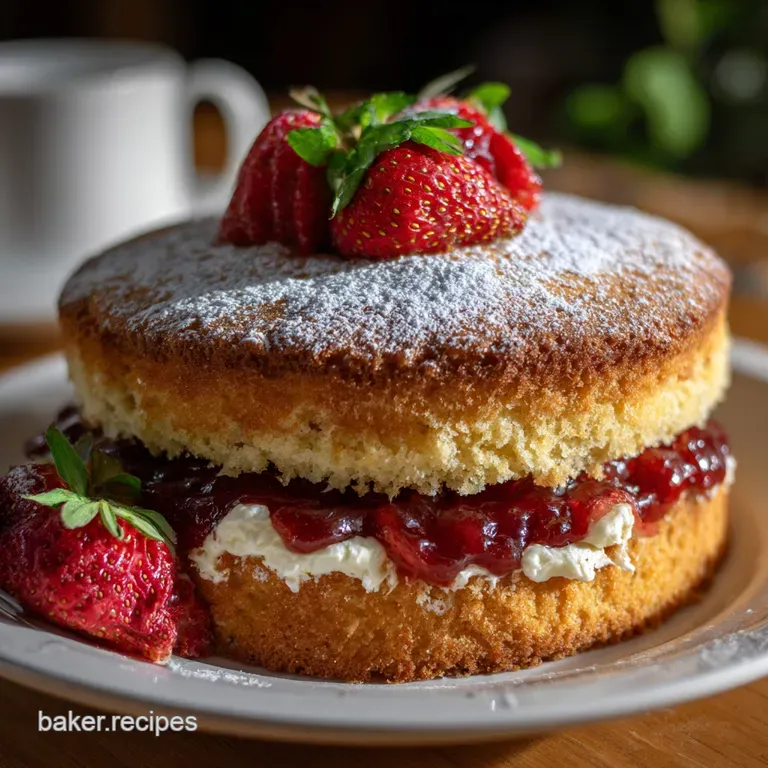
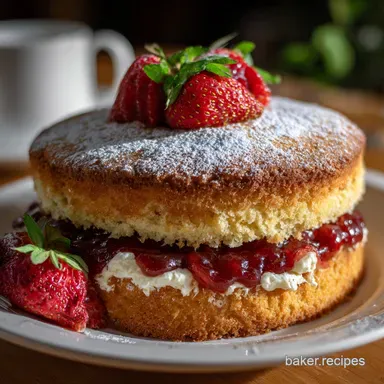
The Classic Filling: Raspberry Jam and Fresh Cream
A traditional Victoria Sponge demands a quality jam raspberry or strawberry is classic. For the cream, use chilled heavy whipping cream (double cream), whipped just until soft, billowy peaks form. Do not take it to stiff peaks, or it will feel heavy.
Adjusting for Dietary Needs (gluten-free Sponge Considerations)
If you need a gluten-free option, substitute a commercial gluten-free self raising blend cup-for-cup. I have found GF flours absorb moisture slightly differently, so you might need that optional splash of milk mentioned in the ingredients list to reach the right batter consistency.
Methodical Steps to Constructing Your Victoria Sponge
Let's crack on with the hands-on Cake Baking ! These steps are where precision matters most.
Preparing the Tins and Preheat Protocol
Preheat your oven to 350°F (180°C). Crucially, line the bottoms of two 8 inch tins with parchment paper circles don't just grease them! This prevents the sticky bottom surface from adhering. A crucial tip for baking flat cakes is to prepare your oven temperature correctly from the start.
If you want more tips on maintaining layer integrity, check out my [Strawberry Cheesecake Recipe: Silky, Crack Free Baking Method], as those principles apply here too.
The Four Minute Creaming Process
In your stand mixer, beat the room temperature butter and caster sugar on medium high speed. Set a timer for four minutes minimum. You are listening for the sound to change from a grainy churn to a dull, velvety whoosh. Stop when the mixture is pale, light, and looks like whipped frosting.
Gentle Folding: Combining the Dry and Wet
Add the vanilla to the creamed mix, then gradually beat in the eggs, one spoonful at a time, scraping down the sides often. Now, remove the bowl from the mixer! We are folding the flour by hand.
Add the sifted flour in two batches, cutting through the center and folding the base over the top, gently, like you're tucking in a small child. Stop immediately when no streaks of dry flour remain. This key to successful sponge Cake Baking prevents gluten development.
Baking and Cooling: The Crucial Final Stage
Divide the batter evenly between the two prepared tins. Use a scale if you have one! This ensures both layers bake uniformly. Bake for 25– 30 minutes. The cakes are done when they are golden brown, smell nutty, and the center springs back when lightly pressed.
Remove them, let them sit in the tins for five minutes, then turn them out onto a wire rack. Peel off the parchment and let them cool completely before attempting assembly.
Chef’s Note: Never, ever slice or assemble a cake that is even slightly warm. The cream will melt instantly, and the layers will tear. Patience is required for quality Cake Baking !
Expert Troubleshooting for Flawless Cake Layers
Many people find layer Cake Baking intimidating because small mistakes show up so dramatically. Let's fix the two most common failures immediately.
Avoiding the Dome: How to Bake Flat Cakes
Domes happen when the outside edges cook and set too fast while the center continues to rise rapidly. To fix this, first, ensure your oven temperature is accurate (see below!). Second, try reducing the oven temperature by 15°F and extending the baking time by 5 minutes.
If you want consistently flat tops, try using a cake strip soaked in water wrapped around the tin, which insulates the edge and slows down the cooking.
Why Did My Sponge Sink? (Dealing with Over Mixing)
Sinking is usually caused by insufficient creaming (not enough air incorporated) or over mixing once the flour is added. The best Cake Baking videos often skip this crucial warning: Once you see the gluten develop, the delicate air pockets collapse in the oven, leading to a tough cake that sinks dramatically as it cools.
Always fold the flour gently.
Temperature Control: Calibrating Your Oven
This is essential for precise home Cake Baking . Most ovens run hot or cold by as much as 50°F! Buy a cheap oven thermometer and use it. If your cakes are browning too fast or not rising properly, your actual temperature is likely off.
The Importance of Accurate Ingredient Weight
I cannot stress this enough: for European style Cake Baking , measuring cups are often insufficient. Use digital kitchen scales. The weight of eggs varies, and flour compacts differently. Equal weights ensure the correct structure every single time.
Preserving Freshness: Storage and Advanced Freezing Techniques
If you plan on advanced Cake Baking , knowing how to store your layers is key for efficiency.
Storing Unfilled Sponge Layers
Once completely cooled, the sponge layers can be wrapped tightly in plastic wrap (cling film) and stored at room temperature for up to three days. Keep them away from moisture or heat. If you need to store them longer, freezing is better.
How Long Does the Assembled Cake Last?
Because this recipe uses fresh whipped cream, the assembled cake must be refrigerated. It will keep well for 2 to 3 days, stored loosely covered. The cream acts as a barrier, protecting the cake from drying out.
Reheating (The Secret Trick)
You generally don't reheat a Victoria Sponge, but you can serve it slightly less cold. Take the assembled cake out of the fridge 30 minutes before serving. This allows the butter in the cake and the fat in the cream to soften just slightly, improving both the flavor and texture dramatically.
Elevating Teatime: Presentation and Pairing Ideas
This is where you make the classic feel special. True mastery of Cake Baking includes presentation!
Dust the top heavily with powdered sugar, using a fine sieve for a snowy, elegant look. You can also trace a subtle pattern on top using a small doily before dusting. I love to serve this alongside something slightly brighter, maybe slices of my [Orange Creamsicle Cake: Bakery Quality Vanilla Citrus Layers] for contrast.
For an American twist on the British classic, you could swap the jam for a peanut butter cream the technique is similar to my approach in the [Peanut Butter Cheesecake: Silky Uncracked Recipe]. Every successful Cake Baking journey starts with mastering a few staples like this!

Recipe FAQs
Why did my Victoria Sponge turn out dense instead of light and fluffy?
This is often caused by overmixing the batter once the flour has been added, which develops the gluten too much and results in a tough crumb. Ensure your butter and eggs are at true room temperature; cold ingredients prevent proper emulsification and air incorporation necessary for a light rise.
My cake sank in the middle after I took it out of the oven. What went wrong?
Sinking usually indicates that the cake was either underbaked or suffered a sudden, drastic temperature change. Avoid opening the oven door during the first 20 minutes of baking, and always ensure a skewer inserted into the center comes out completely clean before removal.
Can I use self raising flour instead of plain flour and baking powder?
Yes, you can substitute plain flour and baking powder with self raising flour, but you must omit the added baking powder in the recipe. Using self raising flour may slightly change the texture, but it is a common convenience hack for sponge cakes.
Is it possible to make this Victoria Sponge dairy-free or vegan?
While the traditional recipe relies on butter and eggs, you can achieve a vegan version by using plant based butter alternatives and an egg substitute like aquafaba or a commercial binder. Note that the texture will be slightly different, often resulting in a moister, slightly denser crumb.
How long can I store the assembled cake, and does it need to be refrigerated?
Because this cake is traditionally filled with fresh cream (or buttercream) and jam, it must be stored in the refrigerator and is best consumed within 2 days. For optimal flavor and texture, let the cake sit at room temperature for about 30 minutes before serving.
Can I freeze the sponge layers for later use?
Absolutely; sponge layers freeze very well. Once completely cooled, wrap each layer tightly in plastic wrap, followed by a layer of aluminum foil, and they will keep fresh for up to 3 months. Thaw them fully at room temperature before filling and decorating.
My sponges formed a high dome in the middle. How do I get flat layers?
A high dome usually means your oven temperature is slightly too hot, causing the outer edges to set before the center has fully risen. Try reducing the temperature by 10 15°C (25 30°F) and increasing the baking time slightly.
Alternatively, use wet baking strips around the outside of the tins to ensure even heat distribution.
Classic Victoria Sponge Cake Baking
Ingredients:
Instructions:
Nutrition Facts:
| Calories | 1165 kcal |
|---|---|
| Protein | 13.9 g |
| Fat | 69.1 g |
| Carbs | 122.1 g |
