How to Cook Chuck Roast
- Time: Active 15 minutes, Passive 3 hours, Total 3 hours 15 minutes
- Flavor/Texture Hook: Deeply savory, fall apart tender beef with a silky, wine infused reduction.
- Perfect for: Slow Sunday afternoons, meal prep, or a cozy family gathering.
- Learn the Best Way how to cook chuck roast
- Why This Braising Method Works
- Essential Kitchen Precision Checkpoints
- Core Components and Smart Substitutions
- Tools for Low and Slow
- Step-by-Step Braising Instructions
- Solving Common Pot Roast Issues
- Adapting for Different Dietary Needs
- Longevity and Leftover Utilization
- Perfect Pairings and Presentation
- Debunking Braising Myths
- High in Sodium
- Recipe FAQs
- 📝 Recipe Card
Learn the Best Way how to cook chuck roast
You know that feeling when you walk into a house and the air is thick with the scent of slow simmered beef, wine, and onions? It is the ultimate kitchen hug. I used to think a chuck roast was just something you threw in a pot and hoped for the best, but after a few dry, stringy disasters, I realized there is a specific rhythm to getting it right.
This isn't just about heat; it is about patience and knowing how to handle a cut of meat that basically wants to fight you until the very last second.
Getting a chuck roast to that buttery, melt in-your mouth stage requires a bit of a mindset shift. We are moving away from the "quick sear and serve" world of steaks and into the realm of slow motion cooking.
I have spent years tweaking this method, moving between the oven and the stove, and honestly, the stovetop to oven transition is the secret. It gives you that deep, dark crust while letting the gentle oven heat do the heavy lifting of breaking down the connective tissue.
If you have ever felt intimidated by a massive hunk of beef or wondered why your pot roast always ends up tough despite hours of cooking, you are in the right place. We are going to skip the shortcuts that sacrifice flavor and focus on the steps that actually move the needle.
From the sizzle of the initial sear to the moment you drag a piece of bread through the finished sauce, every part of this process is designed to be straightforward and reliable for a busy cook.
Why This Braising Method Works
The magic of this recipe lies in the steady application of moist heat over a long period. When we cook chuck roast, we aren't just heating the meat; we are fundamentally changing its structure through two main chemical events.
- Collagen Hydrolysis: Tough connective tissue, known as collagen, dissolves into rich, silky gelatin when held at low temperatures for several hours, providing that signature mouthfeel.
- Maillard Reaction: Searing the meat at high heat before braising creates hundreds of flavor compounds that eventually dissolve into the liquid, deepening the overall savory profile.
- Acidic Tenderization: The inclusion of dry red wine provides acidity that helps weaken the muscle fibers, allowing the braising liquid to penetrate deeper into the meat.
- Thermal Buffering: Using a heavy pot ensures the temperature remains constant, preventing the protein from seizing up and becoming dry or rubbery.
The Science of Why it Works
This process relies on the conversion of tough collagen fibers into smooth gelatin through sustained thermal energy. Simultaneously, the Maillard reaction between amino acids and reducing sugars creates the complex, browned flavors essential for a hearty sauce.
Essential Kitchen Precision Checkpoints
To ensure success every single time, I rely on these three specific benchmarks. They take the guesswork out of the process and keep you on track.
| Metric | Target | Significance |
|---|---|---|
| Internal Temp | 203°F - 205°F | The sweet spot where collagen has fully melted into gelatin |
| Meat Weight | 1.5 kg | Optimized size for even heat penetration without drying the exterior |
| Oven Temp | 325°F | High enough to simmer but low enough to prevent protein toughening |
A quick tip from my kitchen to yours: if you have a little extra time, try to add a teaspoon of instant espresso powder to the braising liquid. It does not make the beef taste like coffee; instead, it acts as a flavor anchor that makes the beef taste twice as "beefy." Also, always rest your meat directly in the liquid for at least 20 minutes before serving.
This prevents the steam from escaping and keeps every fiber juicy and velvety.
Core Components and Smart Substitutions
The beauty of a chuck roast is its simplicity, but the quality of your aromatics matters. We are using a base of beef bone broth and red wine to create a sauce that is thick enough to coat a spoon without needing a heavy flour roux. It is a more modern, cleaner approach to the classic pot roast.
- 1.5 kg beef chuck roast: The star of the show. Look for "choice" or "prime" for the best marbling.
- 15g coarse sea salt: Essential for drawing out moisture to create a better crust. Why this? Coarse grains provide better coverage and won't over salt as easily as table salt.
- 5g freshly cracked black pepper: Adds a floral heat that pre ground pepper just can't match.
- 30ml high smoke point oil: Think avocado or grapeseed oil.
- 500ml beef bone broth: Low sodium is key so the sauce doesn't become a salt lick as it reduces.
- 250ml dry red wine: Use a Cabernet or Merlot. If you wouldn't drink it, don't cook with it.
- 30g tomato paste: This provides the "umami" backbone and helps thicken the liquid.
- Aromatics: 1 large yellow onion, 4 large carrots, 5 smashed garlic cloves, 3 sprigs thyme, and 2 bay leaves.
| Original Ingredient | Substitute | Why It Works |
|---|---|---|
| Dry Red Wine (250ml) | Extra Bone Broth + 15ml Balsamic | Provides the necessary acidity without the alcohol content. |
| Beef Bone Broth | Chicken Stock | Sounds odd, but high-quality chicken stock has great gelatin. Note: Lighter flavor. |
| Avocado Oil | Ghee | Ghee has a very high smoke point and adds a subtle buttery richness. |
If you are looking for something with a bit more of a French flair, you might want to try a Rustic Beef Bourguignon recipe which uses a similar technique but adds mushrooms and bacon for a different flavor profile. Both are fantastic, but the chuck roast we are making today is a bit more of a purist's comfort food.
Tools for Low and Slow
You don't need a kitchen full of gadgets for this. In fact, keeping it simple usually yields the best results. The one non negotiable for me is a heavy bottomed pot, preferably cast iron with an enamel coating. It holds heat like a champ and transitions from the stove to the oven without a second thought.
- Dutch Oven: A 5 to 7 quart size is ideal for a 1.5 kg roast. It allows the air to circulate while keeping the moisture trapped.
- Tongs: Sturdy metal tongs are better than a fork for searing. You don't want to pierce the meat and let juices out while you are trying to build a crust.
- Meat Thermometer: Digital is best. It is the only way to know for sure if the collagen has done its job.
- Large Chef’s Knife: For handling those large carrot chunks and quartering the onion.
step-by-step Braising Instructions

1. Achieving the Perfect Sear
Pat the 1.5 kg beef chuck roast completely dry with paper towels. Rub the 15g coarse sea salt and 5g pepper into all sides of the meat. Note: Surface moisture is the enemy of a good sear; it creates steam instead of a crust.
2. Searing the Meat
Heat 30ml high smoke point oil in your Dutch oven over medium high heat. Place the roast in the pot and sear for 5 minutes per side until a dark, mahogany crust forms. Remove the meat and set it aside on a plate.
3. Building the Aromatic Base
In the same pot, add the quartered yellow onion and 4 large carrots. Sauté for 4 minutes until the edges of the onions are charred and fragrant. Add the 5 smashed garlic cloves for the last 60 seconds.
4. Deglazing the Pan
Pour in 250ml dry red wine. Use a wooden spoon to scrape up all the brown bits (the fond) from the bottom of the pot. Note: This is where the majority of your sauce's flavor lives.
5. Integrating the Tomato Paste
Stir in 30g tomato paste and let it cook for 2 minutes. This "browns" the paste, removing the metallic tinny taste and deepening the color.
6. Introducing the Liquids
Pour in the 500ml beef bone broth. Add the 3 sprigs of fresh thyme and 2 bay leaves. Return the beef to the pot, along with any juices that collected on the plate.
7. Mastering the Braise
Cover the pot with a tight fitting lid and transfer it to a preheated 325°F oven. Bake for 3 hours until the meat is tender enough to shred with a spoon.
8. Executing the Finish
Remove the pot from the oven. Carefully lift the beef onto a cutting board and tent it with foil. Let the liquid sit for 5 minutes, then skim any excess fat from the surface.
9. Refining the Sauce
If the liquid is too thin, simmer it on the stovetop for 10 minutes until it reaches a velvety, coat your spoon consistency.
10. The Final Serve
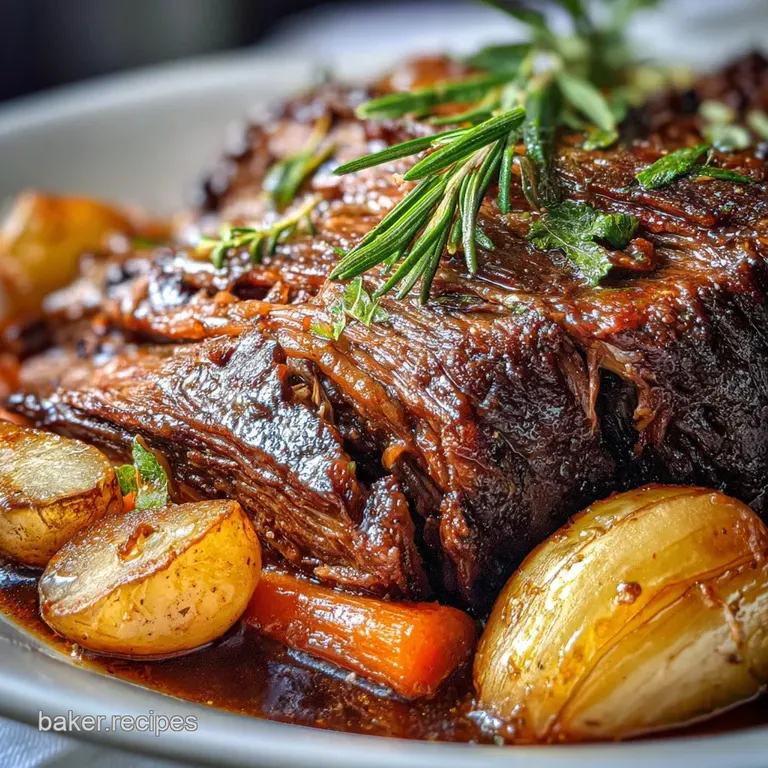
Slice or shred the beef and return it to the pot to coat it in the sauce. Serve immediately while the steam is still rising.
Solving Common Pot Roast Issues
Sometimes things don't go exactly to plan. Beef can be temperamental, but almost every issue has a quick fix. The most important thing is not to panic. If the meat is tough, it usually just needs more time.
Overcoming Tough Texture
If your roast is still tough after 3 hours, the most likely cause is that the internal temperature hasn't reached the point where collagen breaks down. Simply put the lid back on and give it another 30 to 45 minutes.
It is very hard to "overcook" a braised chuck roast in terms of tenderness; usually, "tough" just means "not done yet."
Rescuing a Thin Sauce
A watery sauce can be disappointing. This happens if your lid wasn't tight enough or if the vegetables released more moisture than expected. You can fix this by whisking a teaspoon of cornstarch with a tablespoon of cold water and stirring it into the simmering liquid at the very end.
It will clear up the cloudiness and give you a glossy finish.
| Problem | Root Cause | Solution |
|---|---|---|
| Meat is dry/stringy | Oven temp was too high | Slice against the grain and submerge in extra sauce for 15 mins. |
| Sauce is bitter | Wine didn't cook off | Stir in a pinch of sugar or a teaspoon of butter to mellow it. |
| Veggies are mushy | Added too early | Cut carrots into larger 3 inch chunks next time. |
If you find yourself with extra sauce but no meat, you should definitely learn how to make recipe style gravy using the leftovers. It is a zero waste way to ensure none of that liquid gold goes to waste.
Adapting for Different Dietary Needs
This recipe is naturally quite friendly to various diets, but a few small tweaks can make it work for everyone at your table.
Implementing a Low Carb/Keto Swap
The base recipe is already very low in carbohydrates. To keep it strictly Keto, ensure your tomato paste has no added sugar and serve the roast over mashed cauliflower or sautéed cabbage instead of potatoes. The carrots add a small amount of sugar, so you can reduce those to two if you are being very strict.
Crafting a Paleo Friendly Version
For a Paleo approach, ensure you are using a high-quality bone broth and swap the red wine for additional broth mixed with a tablespoon of apple cider vinegar. This maintains the acidity needed to tenderize the meat without the grain based alcohol concerns.
Infusing a Mexican Twist
If you want to change the flavor profile entirely, swap the thyme and bay leaves for a cinnamon stick, two dried ancho chiles, and a tablespoon of cumin. This creates a "Birria" style chuck roast that is incredible for tacos.
Longevity and Leftover Utilization
One of the best things about cooking a chuck roast is that it actually tastes better on the second day. As the meat cools in the liquid, it soaks up even more flavor.
- Storage: Keep the beef submerged in its sauce in an airtight container. It will stay fresh in the fridge for up to 4 days.
- Freezing: This freezes beautifully. Place the meat and sauce in a freezer safe bag, removing as much air as possible. It will keep for 3 months.
- Zero Waste: Don't toss the leftover braising liquid! It is essentially a concentrated beef stock. Use it as a base for a French Onion soup or freeze it in ice cube trays to add a "flavor bomb" to your next stir fry or pan sauce.
- Reheating: Always reheat gently on the stovetop over medium low heat. Adding a splash of water or broth helps loosen the sauce without overcooking the beef.
Perfect Pairings and Presentation
When you are ready to serve, think about textures. Since the beef is very soft and rich, you want something to cut through that. A bright, crunchy gremolata (parsley, lemon zest, and garlic) sprinkled over the top at the last second works wonders.
For the side dish, a pile of buttery mashed potatoes is the classic choice for a reason they act as a sponge for the sauce. However, if you want to lighten things up, a simple polenta or even some thick slices of sourdough bread toasted with olive oil are fantastic.
Fresh vs. Shortcut Comparison
| Feature | Fresh Aromatics | Shortcut (Dried/Jarred) |
|---|---|---|
| Flavor Profile | Bright, complex, layered | Muted, singular, salty |
| Texture | Carrots hold their shape | Can become grainy or soft |
| Aroma | Fills the house instantly | Takes longer to develop |
If you want a truly tender result, use a heavy pot. If you want a faster meal, use a pressure cooker (but reduce liquid by half). If you want the most flavor, sear the meat until it's nearly black.
Debunking Braising Myths
There are a lot of old school rules that people still follow that don't actually help your cooking. Let's clear a few of those up so you can cook with confidence.
Searing meat does not "seal in juices." Moisture loss occurs regardless of whether you sear or not. The real reason we sear is for the Maillard reaction, which creates deep, complex flavors that you simply cannot get from boiling or steaming alone.
You don't need to completely cover the meat in liquid. In fact, you shouldn't. A true braise uses a small amount of liquid (usually about halfway up the meat). This allows the top of the roast to roast in the dry heat of the pot while the bottom simmers, giving you the best of both worlds.
More heat does not mean faster cooking. If you turn the oven up to 400°F, you won't get a tender roast faster. You will just get a tough, dry piece of meat because the muscle fibers will contract too quickly and squeeze out all their moisture before the collagen has a chance to melt.
Slow and steady is the only way home.

High in Sodium
907 mg mg of sodium per serving (39% of daily value)
The American Heart Association recommends limiting sodium intake to about 2,300mg per day for overall cardiovascular health.
Tips to Reduce Sodium in Your Beef Chuck Roast
-
Dilute Bone Broth-30%
Even low-sodium bone broth contributes to sodium levels. Try using 250ml of broth and 250ml of water instead, or consider making your own sodium free broth from scratch to have more control over the sodium content.
-
Reduce Salt Usage-25%
Coarse sea salt is a major sodium contributor. Reduce the amount of salt by half, from 15g to 7.5g, or substitute with a sodium free seasoning blend.
-
Tomato Paste Adjustment-15%
Consider using 15g of tomato paste instead of 30g or replace with fresh, pureed tomatoes and a pinch of sugar to balance the acidity. Be sure to adjust other liquids accordingly to keep the desired consistency.
-
Wine Considerations-5%
While wine itself doesn't contain a significant amount of sodium, certain winemaking processes or additions can slightly increase it. If concerned, use a wine that is labeled low sodium.
-
Spice it Up!
Enhance the flavor with fresh herbs and spices like garlic powder, onion powder, smoked paprika, or dried oregano to compensate for less salt. These additions provide flavor without adding sodium.
Recipe FAQs
Which cooking method is best for a chuck roast?
Braising is best. This involves searing the roast first and then cooking it slowly in liquid, either in the oven or on the stovetop. This low-and-slow moist heat method is crucial for breaking down the tough connective tissues in chuck roast, making it fall apart tender.
What's the best way to cook chuck roast in the oven?
Sear first, then braise at 325°F. Pat the roast dry, season generously, and sear it in a hot Dutch oven until deeply browned on all sides. Then, add aromatics and liquid, cover tightly, and cook in a 325°F oven for about 3 hours, or until fork tender.
Is chuck roast better in the oven or crockpot?
Oven braising often yields superior results. While a crockpot is convenient, an oven provides more consistent heat and allows for better browning before and during the braising process. The stovetop-to-oven transition helps develop a richer crust and deeper flavor.
Is it better to cook a chuck roast at 325 or 350?
325°F is generally preferred for chuck roast. This lower temperature allows the connective tissues to break down gradually, resulting in a more tender and moist outcome. A higher temperature like 350°F can cook the roast faster but risks toughening the meat if not carefully monitored.
How do I prevent my chuck roast from being dry?
Ensure sufficient liquid and a tight fitting lid. Overcooking or cooking at too high a temperature can also lead to dryness. Always braise until the meat is fork tender and rests in its own juices before serving.
How long should I cook a chuck roast?
Typically 3 to 4 hours at 325°F. The exact time depends on the size of the roast and your oven's calibration. The key is to cook it until it easily shreds with a fork, indicating the collagen has broken down into gelatin.
Can I make chuck roast ahead of time?
Yes, it's even better made ahead. Chuck roast often improves in flavor and texture when made a day in advance and reheated gently. This allows the flavors to meld and the meat to reabsorb some of the delicious sauce.
Cook Chuck Roast

Ingredients:
Instructions:
Nutrition Facts:
| Calories | 564 calories |
|---|---|
| Protein | 44g |
| Fat | 36g |
| Carbs | 7g |
| Fiber | 2g |
| Sugar | 3g |
| Sodium | 907mg |
