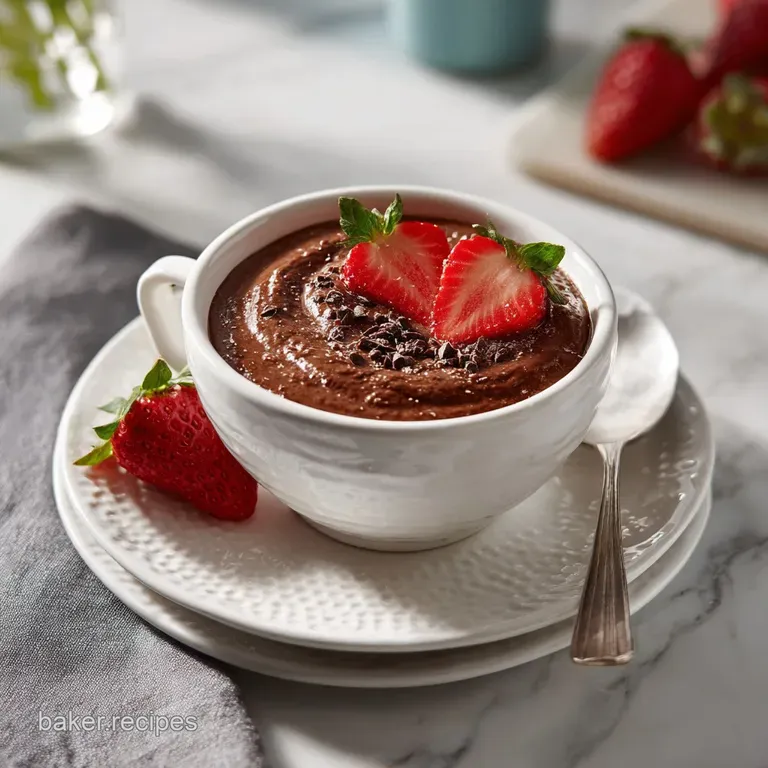
Creamy Stovetop Hot Chocolate
- Time: Active 2 minutes, Passive 3 minutes, Total 5 minutes
- Flavor/Texture Hook: Velvety, rich, and deeply chocolatey with a mahogany sheen
- Perfect for: Cold rainy afternoons, holiday gatherings, or a quick evening treat
- How to Make the Best Hot Chocolate
- Key Techniques for Silky Texture
- Essential Metrics and Recipe Specifications
- Sourcing the Best Ingredients
- Minimal Kitchen Tools Required
- Mastering the Method with Visual Checkpoints
- Navigating Texture and Temperature Problems
- Customizing Your Mug with Creative Flavors
- Preserving Freshness and Zero Waste Tips
- Myth: You Need Expensive Bar Chocolate
- Myth: Boiling the Milk Makes It Hotter
- Delicious Treats and Snacks for Your Pairing
- Recipe FAQs
- 📝 Recipe Card
How to Make the Best Hot Chocolate
The air in the kitchen completely transforms the moment the cocoa hits the warm maple syrup. It starts as a faint, dusty sweetness, but as you whisk it into that thick paste, the aroma becomes heavy and dark, like walking into an old-fashioned candy shop.
I remember the first time I ditched the powder packets for this real deal version. It was a freezing Tuesday night, and the wind was rattling the windowpanes so hard I thought they might crack.
I wanted something that felt like a hug in a mug, something substantial enough to actually make me feel warm from the inside out.
We’ve all had those watery, sad mugs of cocoa that leave a grainy residue at the bottom. This isn't that. This recipe is about texture as much as it is about taste. When you pour that stream of heavy cream into the steaming milk, the liquid takes on a weight and a gloss that catches the light.
It's the kind of drink you want to wrap both hands around, letting the steam soften your face while you take that first, cautious sip.
This isn't just a drink, it's a small ritual of comfort. Whether you're making it for kids who just spent three hours shivering in the snow or you're treating yourself after a long shift, the process is fast but the results feel high end.
We're talking about five minutes from start to finish to get a result that looks and tastes like it came from a professional chocolatier. Right then, let's get into what actually makes this stovetop version so much better than the rest.
Key Techniques for Silky Texture
Most people just toss everything into a pot and hope for the best, but that's how you end up with those annoying little lumps of dry cocoa powder floating on top. To get that professional, glossy finish, you have to understand how the ingredients interact.
It's not complicated, but a few specific movements make all the difference in the world.
- The Slurry Foundation: Mixing the cocoa powder with a tiny bit of liquid first breaks down the surface tension of the powder, ensuring no dry clumps remain.
- Controlled Evaporation: Heating the milk until just steaming, rather than boiling, preserves the delicate proteins in the dairy, keeping the texture light instead of cooked or "funky."
- Residual Heat Melting: Adding the chocolate chips after removing the pan from the heat prevents the chocolate from seizing or becoming grainy from direct burner contact.
- Fat Emulsification: The heavy cream acts as a bridge between the water based milk and the fat heavy chocolate chips, creating a stable, silky liquid.
What Actually Makes It Silky
When we talk about that luxurious mouthfeel, we're really talking about fat suspension. By starting with a thick paste of maple syrup and cocoa, you are essentially coating each tiny particle of cocoa in a sticky, liquid barrier.
When you slowly add the milk, those particles stay separated and suspended rather than clumping together. This is why the texture stays consistent from the first sip to the very last drop at the bottom of the mug.
| Method | Time | Texture | Best For |
|---|---|---|---|
| Stovetop | 5 minutes | Velvety and thick | The ultimate gourmet experience |
| Microwave | 2 minutes | Thin and bubbly | Quick fixes and single servings |
| Slow Cooker | 2 hours | Deeply infused | Large holiday parties and crowds |
Adding the chocolate chips at the very end is another trick that most people overlook. Chocolate is temperamental. If you boil it, the cocoa solids and fats can separate, leaving you with an oily film on top.
By whisking them into the hot liquid off the heat, they melt gently, which preserves their glossy finish and creates that "shatter" of flavor that happens when the drink hits your tongue.
Essential Metrics and Recipe Specifications
Precision matters even in a simple drink like this. If you use too much cocoa, it becomes bitter and chalky. Too much syrup, and it's cloying. These specs are designed to give you a balanced, dark chocolate forward experience that feels decadent but not overwhelming.
You'll notice we use a mix of cocoa powder and actual chocolate chips; the powder provides the deep, earthy base notes while the chips provide the creamy, buttery finish.
The timing is also critical. You only have a three minute window of actual cooking time before the milk starts to take on a "cooked" flavor. We want to reach the "scald" point where small bubbles just begin to ring the edge of the saucepan but we never want to see large, rolling bubbles.
That gentle heat is enough to dissolve the sugars and prepare the milk to receive the solid chocolate without damaging the dairy.
| Component | Science Role | Pro Secret |
|---|---|---|
| Dutch Process Cocoa | Provides PH neutral chocolate base | Sift it first for zero clump insurance |
| Pure Maple Syrup | Acts as a liquid sweetener and thickener | Use Grade A for a cleaner chocolate taste |
| Heavy Cream | Increases fat content for "coating" effect | Pour it in cold to temper the hot milk |
| Semisweet Chips | Adds cocoa butter and sugar for body | Chop them smaller for an instant melt |
Using a pinch of sea salt might seem strange for a sweet drink, but it’s actually the most important "hidden" ingredient. Salt suppresses bitterness and enhances the perception of sweetness.
In this recipe, it makes the chocolate taste "more like chocolate" by cutting through the richness of the heavy cream and milk.
Sourcing the Best Ingredients
To get that top tier flavor, you want to be picky about what goes into the pot. Since there are so few ingredients, each one has a big job to do. If you have some salted toffee crunch left over from another project, crushing a bit on top is a brilliant move, but the base itself needs to be solid.
- Whole Milk (2 cups): Don't bother with skim here. The fat in whole milk is necessary to carry the chocolate flavors.
- Substitute: Oat milk (extra creamy version) - works great but adds a slight toasted grain flavor.
- Dutch process cocoa powder (2 tbsp): This is darker and less acidic than natural cocoa. Why this? It provides a smoother, more "mellow" chocolate flavor that blends perfectly with dairy.
- Substitute: Natural cocoa powder - adds a more fruity, acidic punch.
- Pure Maple Syrup (1.5 tbsp): A natural liquid sweetener that adds a hint of caramel. Why this? It dissolves instantly unlike granulated sugar, ensuring no grittiness.
- Substitute: Honey - though it will add a distinct floral note to the drink.
- Sea salt (1 pinch): Vital for balance.
- Substitute: Kosher salt - use a slightly larger pinch.
- Heavy cream (1/4 cup): This is the secret to that "restaurant style" thickness. Why this? It adds enough fat to make the drink feel substantial and luxurious.
- Substitute: Half and half - slightly less rich but still better than just milk.
- Semisweet chocolate chips (1/4 cup): Provides the "melted bar" flavor.
- Substitute: Dark chocolate (60% cocoa) - makes the drink much more intense and less sweet.
- Pure vanilla extract (1/2 tsp): Rounds out the flavors.
- Substitute: Almond extract - use only a drop, as it is very strong.
Minimal Kitchen Tools Required
You really don't need much to make a world class cocoa, which is part of the charm. I've made this in tiny apartment kitchens with nothing but a fork and a small pot, though a whisk does make it much easier. The key is to use a heavy bottomed saucepan.
Thin, cheap pots tend to have "hot spots" that will scorch the milk before the rest of the liquid even gets warm.
A good balloon whisk is your best friend here. You aren't trying to whip air into the drink; you just want to keep everything moving. If you happen to have a handheld milk frother, you can use that at the very end to create a bit of foam on top, but it’s totally optional.
The natural fats in the cream and whole milk will create a beautiful, slight froth just from regular whisking as the liquid heats up.
| Original Ingredient | Substitute | Why It Works |
|---|---|---|
| Whole Milk | Coconut Milk (Full Fat) | Similar viscosity. Note: Adds a strong tropical flavor profile to the cocoa. |
| Maple Syrup | Agave Nectar | Very neutral sweetness and dissolves just as easily in cold liquids. |
| Semisweet Chips | Chopped Baking Chocolate | Better quality fat (cocoa butter) than chips. Note: Melts even faster. |
If you are scaling this up for a crowd, a larger Dutch oven is actually a great tool. The cast iron holds heat incredibly well, meaning once you get the cocoa to temperature, it will stay hot on the table for much longer than a standard stainless steel pot would.
Just make sure to give it a stir every few minutes so a skin doesn't form on the surface.
Mastering the Method with Visual Checkpoints
Follow these steps exactly, and you'll avoid the common pitfalls of homemade cocoa. The total cook time is only 3 minutes, so stay close to the stove. It moves fast once the heat is on!
- Create the base. Place the cocoa powder, maple syrup, sea salt, and 2 tablespoons of the milk in a small saucepan over medium low heat.
- Whisk the slurry. Continue whisking until a thick, glossy mahogany paste forms and no dry powder remains. Note: This ensures a lump free final drink.
- Incorporate the liquids. Slowly pour in the remaining milk and the heavy cream while you keep whisking.
- Heat gently. Increase the heat to medium and stir frequently.
- Watch for steam. Heat until steaming and small bubbles appear at the edges. Note: Do not let it reach a full, rolling boil or the milk will taste scorched.
- Remove from heat. Take the pan off the burner immediately once it's steaming.
- Add the chocolate. Drop in the chocolate chips and vanilla extract.
- Final whisking. Whisk vigorously until the chips are completely melted and the mixture is smooth.
- Serve immediately. Pour into two mugs and enjoy while the temperature is at its peak.
Navigating Texture and Temperature Problems
Even the simplest recipes can go sideways if the heat is too high or the whisking is too slow. The most common issue people face is "graininess." This usually happens for one of two reasons: either the cocoa powder didn't hydrate in the slurry phase, or the chocolate chips were poor quality and contained too many stabilizers.
If your drink looks "broken" or oily, it usually means it got too hot and the fats separated.
But what about the skin that forms on top? That’s actually just proteins in the milk drying out as they hit the air. It’s perfectly safe to eat, but most people find the texture off putting.
To prevent this, just keep a lid on the pot if you aren't serving it the second it's done, or give it one last vigorous whisk right before pouring.
Why Your Hot Chocolate Is Grainy
If you skip the slurry step and just dump the powder into a big pot of milk, the powder will form tiny "armor shells" of wet cocoa around a dry center. No amount of whisking later will break those down completely. Always make that paste first.
If you've already made the mistake, you can try pouring the whole thing through a fine mesh strainer to catch the lumps, but the flavor will be slightly weaker.
Why the Milk Scorched
Milk has sugars (lactose) that caramelize and then burn very quickly on the bottom of a pot. If you see brown bits floating in your cocoa, your heat was too high. You have to use medium or medium low and keep the liquid moving.
If you smell something burning, stop immediately and pour the top, un scorched part into a new pot. Don't scrape the bottom!
| Problem | Root Cause | Solution |
|---|---|---|
| Oily Film | Chocolate overheated/separated | Whisk in a splash of cold cream to re emulsify |
| Weak Flavor | Not enough cocoa/salt | Whisk in an extra teaspoon of cocoa mixed with syrup |
| Too Thick | Too much cream or over reduction | Thin it out with a tablespoon of warm milk |
Common Mistakes Checklist
- ✓ Never leave the pot unattended; milk boils over in a heartbeat.
- ✓ Use a whisk, not a spoon, to ensure the chocolate chips fully integrate.
- ✓ Don't skip the salt; it's the key to making the chocolate "pop."
- ✓ Check that your cocoa powder is "Dutch process" for the best color and flavor.
- ✓ Avoid using "low-fat" or "skim" milk if you want a truly creamy result.
Customizing Your Mug with Creative Flavors
Once you have the base down, you can start playing with the profile. I love adding a pinch of cinnamon and a tiny dash of cayenne for a Mexican style cocoa. The heat from the pepper against the cold cream is an incredible contrast.
If you're looking for something more dessert like, you can try different types of chocolate chips. White chocolate chips with a bit of peppermint extract create a "Peppermint Bark" version that is always a hit in December.
For an adult version, a splash of bourbon or aged rum adds a smoky depth that pairs beautifully with the maple syrup. Just remember to add the alcohol at the very end, off the heat, so you don't cook off all the flavor. If you want something truly decadent, try serving this alongside some Stout Brownies. The bitterness of the stout in the brownies balances the sweetness of the hot chocolate perfectly.
The Power Breakfast Twist
Believe it or not, you can make this feel a bit more like a "meal" by whisking in a tablespoon of almond butter or peanut butter into the slurry phase. It makes the drink incredibly thick and gives it a salty, nutty finish that is surprisingly good on a cold morning.
It’s basically a liquid Reese’s cup, and I am not apologizing for how good it is.
The Spiced Winter Version
If you want that cozy, mulled feeling, add a cinnamon stick and two whole cloves to the milk while it’s heating up. Let them steep for about two minutes before you add the chocolate chips, then fish them out.
The spices infuse into the fats of the milk and cream, giving you a warm, aromatic finish that lingers on the palate.
Preserving Freshness and Zero Waste Tips
If you find yourself with leftovers though that’s rare in my house don't throw them out! You can store the cooled liquid in a glass jar in the fridge for up to 3 days. When you’re ready for round two, just pour it back into a saucepan.
Reheating in the microwave is okay, but do it in 30 second bursts and stir in between to avoid that dreaded "milk explosion" or skin formation.
- Fridge: Up to 3 days in an airtight container.
- Freezer: You can actually freeze this in popsicle molds! It makes the most incredible "fudgsicle" you've ever had because of the high fat content from the heavy cream.
- Zero Waste: If you have just a small amount left, use it as a "creamer" for your morning coffee. It creates an instant mocha that is way better than anything from a coffee shop.
Myth: You Need Expensive Bar Chocolate
A lot of "gourmet" recipes insist that you must chop up a 10 dollar bar of artisan chocolate to get a good result. That’s just not true. Because we are using high-quality Dutch process cocoa powder as the base, standard semi sweet chips (like Nestle or Ghirardelli) provide plenty of richness and fat.
Save the expensive bars for eating plain; the nuances of "single origin" beans are often lost once you mix them with maple syrup and heavy cream anyway.
Myth: Boiling the Milk Makes It Hotter
Actually, boiling milk just changes the molecular structure of the proteins, making them taste "cooked" and flat. Steaming milk (around 160°F or 70°C) is the sweet spot.
It's hot enough to melt the chocolate and warm your soul, but cool enough that you can actually taste the complexity of the cocoa without burning your taste buds off.
Delicious Treats and Snacks for Your Pairing
What you serve with your cocoa is just as important as the drink itself. Since this recipe is quite rich and "heavy," I usually opt for something with a bit of crunch or a sharp contrast. A simple plate of salty pretzels is my go to when I'm just hanging out on the couch.
The salt on the pretzels makes the maple syrup notes in the drink stand out even more.
If you're going for a full on dessert spread, shortbread cookies are the classic choice. Their buttery, crumbly texture is the perfect vehicle for dipping. Unlike a soft cookie that might fall apart, a firm shortbread holds its shape even after a long dunk in the warm liquid.
For a more modern pairing, try a slice of toasted sourdough with a thin layer of salted butter. The tang of the bread cuts right through the velvet texture of the cocoa.
The Afternoon Pick Me-Up
If you're having this as a mid day break, pair it with a handful of toasted almonds or walnuts. The earthy, roasted flavors of the nuts complement the deep notes of the Dutch process cocoa. It turns a simple drink into a satisfying snack that will actually keep you full until dinner.
Honestly, don't even bother with low-fat options here; the whole point of a stovetop hot chocolate is to embrace the indulgence. Trust me on this, your afternoon self will thank you.

Recipe FAQs
How to do hot chocolate on the stove?
Whisk the cocoa powder, maple syrup, sea salt, and two tablespoons of milk in a saucepan over medium low heat until a smooth paste forms. Slowly whisk in the remaining milk and heavy cream, heating until steaming, then remove from heat to stir in chocolate chips and vanilla until melted.
Is hot chocolate ok for diabetics?
No, this recipe is not suitable for a diabetic diet. It contains significant amounts of sugar from the maple syrup and semisweet chocolate chips, which will cause a sharp rise in blood glucose levels.
Can you heat milk on the stove for hot chocolate?
Yes, it is the best way to achieve a professional texture. Heating the milk gently ensures the chocolate and cocoa emulsify properly, creating the same velvety mouthfeel you might find in our decadent treats.
Can lactose intolerant drink hot chocolate?
No, this recipe is not lactose free. The base requires whole milk, heavy cream, and semisweet chocolate chips, all of which contain dairy.
Is it true you should boil the milk for hot chocolate?
No, this is a common misconception. You should only heat the mixture until it is steaming with small bubbles at the edges, as a rolling boil can scald the milk and create an unpleasant film on the surface.
How to keep hot chocolate from getting clumpy?
Create a thick, glossy mahogany paste by whisking the cocoa powder with just a small amount of milk first before adding the rest of the liquid. This ensures the cocoa is fully hydrated and dispersed before you introduce the bulk of the milk and cream.
How to store leftover hot chocolate?
Transfer any leftovers to an airtight container and keep it in the refrigerator for up to 48 hours. Gently reheat it on the stovetop over low heat, whisking constantly until it reaches the desired serving temperature.
Creamy Stovetop Hot Chocolate

Ingredients:
Instructions:
Nutrition Facts:
| Calories | 404 kcal |
|---|---|
| Protein | 10.5 g |
| Fat | 25.8 g |
| Carbs | 39.3 g |
| Fiber | 2.8 g |
| Sugar | 31.2 g |
| Sodium | 145 mg |
