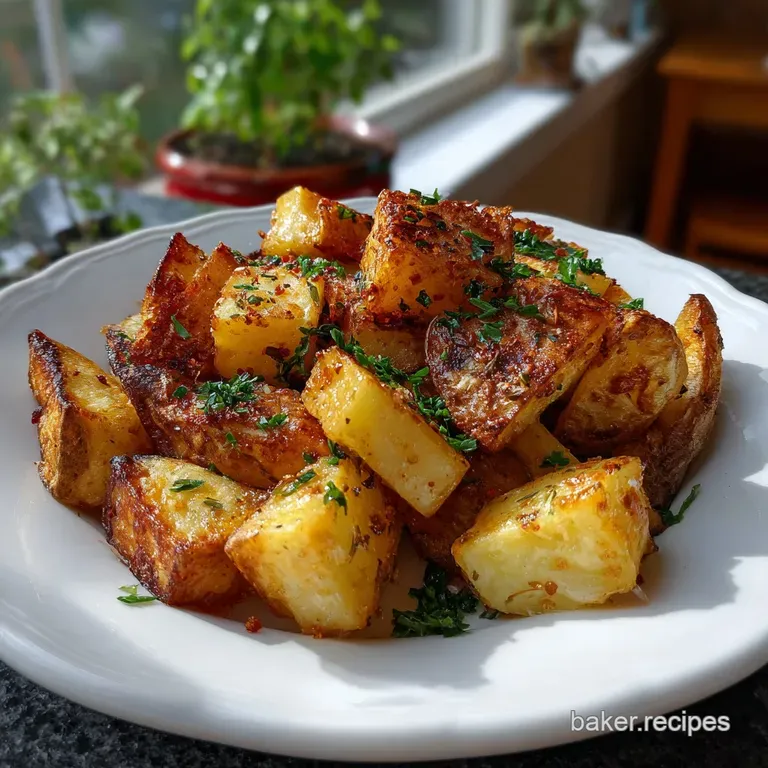
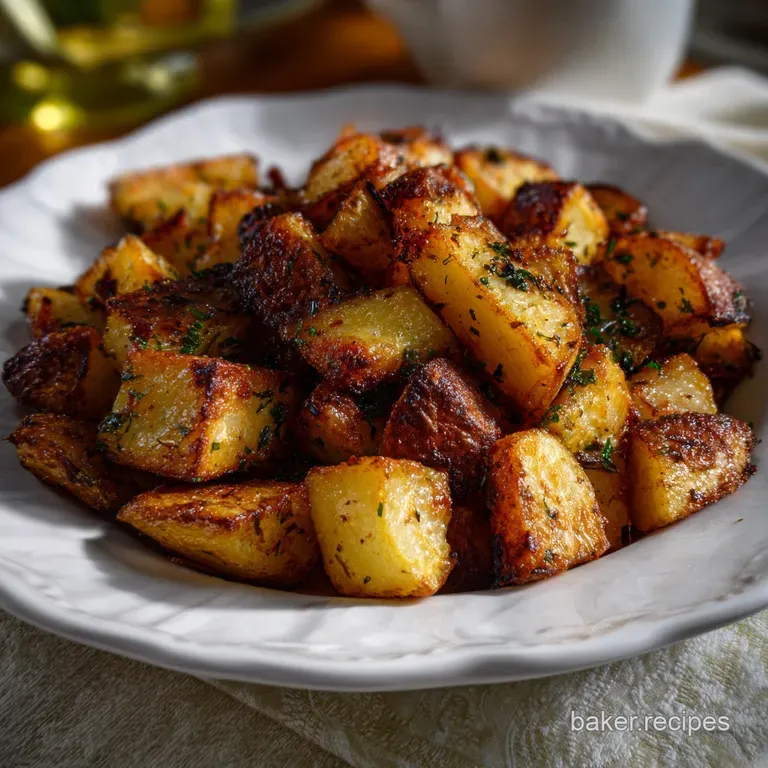
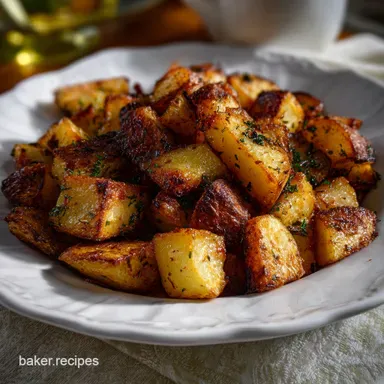
The Home Fries Recipe with Glass-Like Crust
- Time: Active 10 minutes, Passive 20 minutes, Total 30 minutes
- Flavor/Texture Hook: Shattering crisp edges with a velvety, buttery interior
- Perfect for: Weekend brunch or a high energy weekday breakfast
- Discovering the Ultimate Home Fries Recipe
- Planning Your Cooking Timeline
- Selecting Essential Raw Materials
- Necessary Tools for Success
- Executing the Perfect Sear
- Refined Techniques and Hazards
- Creative Flavor Profile Shifts
- Smart Storage and Leftovers
- Delicious Breakfast Pairing Ideas
- Solving Common Texture Issues
- Kitchen Myths Debunked
- Recipe FAQs
- 📝 Recipe Card
Discovering the Ultimate Home Fries Recipe
Have you ever wondered why diner potatoes have that incredible, teeth shattering crunch while the ones you make at home often turn into a mushy, oil soaked disappointment? I spent years chasing that specific texture, throwing away pans of scorched onions and limp spuds before realizing the secret isn't just high heat.
It’s chemistry. Most people just toss raw cubes into a skillet and hope for the best, but that’s a one way ticket to frustration.
This home fries recipe changes the game by treating the potato surface like a canvas for texture. We aren't just cooking them; we’re re engineering the starch. By the time these hit your plate, they’ll have a crust so thick you can hear it across the room.
It’s the kind of breakfast that makes you want to cancel all your morning plans just to sit with another serving.
We're going to use a two stage approach that balances internal fluffiness with an external sear. Forget those frozen bags of pre cut cubes that taste like cardboard. We’re using fresh Yukon Golds, a bit of kitchen science, and a heavy skillet to reach breakfast nirvana.
Trust me, once you try this method, you’ll never look at a potato the same way again.
Planning Your Cooking Timeline
Getting the timing right is the difference between a synchronized meal and cold eggs. You want to focus on the potatoes first because they hold heat remarkably well, especially with that thick crust we're building.
While the water comes to a boil, you can get your aromatics ready, making the whole process feel like a smooth dance rather than a frantic scramble.
| Phase | Duration | Goal |
|---|---|---|
| Prep & Boil | 12 minutes | Soften the exterior and build the starch slurry |
| The Great Sear | 10 minutes | Develop the Maillard reaction and deep golden color |
| Flavor Infusion | 8 minutes | Soften peppers and onions without burning the spices |
Selecting Essential Raw Materials
The Science of Why it Works
Starch Gelatinization: Boiling the potatoes with baking soda breaks down the pectin and draws starch to the surface. This creates a fuzzy layer of "mashed potato" on the outside of each cube which dehydrates and crisps into a massive surface area in the oil.
Maillard Reaction: The addition of alkali (baking soda) raises the pH level on the potato surface. This accelerates the browning reaction between amino acids and sugars, giving you a deep, savory crust in half the usual time.
Component Analysis
| Ingredient | Science Role | Pro Secret |
|---|---|---|
| Yukon Gold Potatoes | Medium starch content provides structural integrity. | These stay creamy inside while the outside shatters. |
| Baking Soda | Breaks down pectin to create surface starch. | Don't skip this; it's the key to the entire texture. |
| Avocado Oil | High smoke point prevents acrid flavors at high heat. | Use a fat that can handle the sizzle without smoking. |
| Unsalted Butter | Adds milk solids for flavor and extra browning. | Add this halfway through so the solids don't burn. |
Necessary Tools for Success
You don't need a professional kitchen, but a few specific items make this home fries recipe significantly easier to execute. I always reach for my Lodge Cast Iron Skillet. The heavy metal retains heat so well that the temperature doesn't plummet when you add the potatoes.
If you use a thin non stick pan, the potatoes will likely steam rather than fry, leaving you with a pale imitation of the real deal.
A solid stainless steel spider or slotted spoon is also a must have for moving the potatoes from the boiling water to the colander without breaking them. You've worked hard to get that surface starch just right; you don't want to smash the cubes before they hit the oil.
Finally, a sharp Victorinox Chef’s Knife ensures those 1.9 cm (3/4 inch) cubes are uniform, which is the only way to guarantee they all finish cooking at the exact same moment.
Executing the Perfect Sear
- Prep potatoes. Peel and cut 900g (2 lbs) of Yukon Gold potatoes into 1.9 cm (3/4 inch) cubes. Note: Uniformity ensures even cooking.
- Boil water. Bring a large pot of water to a boil with 15ml (1 tbsp) white vinegar, 3g (1/2 tsp) baking soda, and 6g (1 tsp) Diamond Crystal Kosher Salt.
- Simmer cubes. Add potatoes and cook for 8 to 10 minutes until the edges are softened but the centers are still firm.
- Drain and rough. Drain the potatoes and shake them vigorously in the pot for 30 seconds until a thick, starchy paste coats the outside.
- Heat oil. In a large Lodge Cast Iron Skillet, heat 30ml (2 tbsp) avocado oil and 14g (1 tbsp) unsalted butter over medium high heat until the butter stops foaming and starts to sizzle.
- Initial sear. Add the potatoes in a single layer and leave them alone for 5 minutes until the bottom side is deeply browned and releases easily.
- Flip and fry. Turn the potatoes and continue cooking for another 5 minutes until multiple sides are golden and crispy.
- Add aromatics. Toss in the diced yellow onion and red bell pepper. Note: Adding these late prevents them from carbonizing.
- Season well. Sprinkle in the smoked paprika, garlic powder, onion powder, black pepper, and cayenne. Cook for 3 minutes until the spices smell toasted.
- Final touch. Remove from heat and toss with fresh parsley. Serve immediately while the crust is at its most audible.
Chef's Tip: If you want a deeper color, grate the cold butter directly into the pan using a microplane right before you add the onions. The tiny shreds of butter melt instantly and coat every crevice of the potato crust.
Refined Techniques and Hazards
Preventing Soggy Bottoms
The biggest enemy of this home fries recipe is overcrowding. If you pile the potatoes on top of each other, the steam escaping from the bottom layer will soften the top layer. Always use a pan large enough to keep the potatoes in a single, airy layer. If you're doubling the recipe, use two pans or cook in batches.
It takes more time, but the results are actually edible.
Avoiding Burnt Spices
Dried spices like paprika and garlic powder have very little moisture. If you add them at the beginning of the frying process, they will turn bitter and black long before the potatoes are done. Always add your seasonings in the last three to four minutes of cooking. This "toasts" the spices, blooming their oils without destroying their flavor profile. It's similar to the technique used in this Perfectly Crispy Homemade Fries recipe.
Stovetop vs Oven Comparison
| Feature | Stovetop Method | oven-roasted |
|---|---|---|
| Texture | Crispier, localized searing | Even browning, less "crunch" |
| Active Time | High (needs flipping) | Low (set and forget) |
| Flavor | Deeply buttery/fried | Concentrated potato flavor |
Creative Flavor Profile Shifts
Adapting for the Air Fryer
If you want to use less oil, you can take the par boiled and roughed up potatoes and toss them in the air fryer. Set it to 200°C (400°F) and cook for 15 to 20 minutes, shaking the basket every 5 minutes. You won't get that same heavy butter crust flavor, but the baking soda trick still works to create a shattering exterior. For another great potato variation, check out this The Homemade Fries recipe.
Substitution Table
| Original Ingredient | Substitute | Why It Works |
|---|---|---|
| Unsalted Butter | Ghee | Higher smoke point but keeps the nutty milk solid flavor. |
| Red Bell Pepper | Poblano Pepper | Adds a mild, earthy heat instead of sweetness. |
| Smoked Paprika | Chipotle Powder | Increases the heat level and adds a deeper smokiness. |
Smart Storage and Leftovers
Leftover home fries are a tragedy if not handled correctly. In the fridge, they will last about 3 to 4 days in an airtight container. However, the starch will retrogradate, meaning they will get hard and lose that "shatter" factor. To revive them, do not use a microwave. The microwave will just make them chewy and sad.
Instead, toss them back into a dry skillet over medium heat for 5 minutes, or use a toaster oven.
For a zero waste approach, don't throw away the potato peels if you decide to peel them! Toss the peels with a little oil and salt and bake them at 200°C (400°F) for 10 minutes.
They make an incredible chef's snack while you're waiting for the main dish to boil. Also, if you have leftover onions and peppers, they are the perfect base for a quick omelet the next morning.
Delicious Breakfast Pairing Ideas
These potatoes are the undisputed kings of the breakfast plate, but they need the right court. I love serving them alongside over easy eggs, where the runny yolk acts as a rich sauce for the crispy potato crust.
If you're looking for a protein boost, some thick cut bacon or spicy chorizo crumbles folded in at the very end will turn this from a side dish into a full meal.
If you want a lighter pairing, a simple arugula salad with a lemon vinaigrette provides a sharp, acidic contrast to the fatty, salty potatoes. This helps "cut" through the richness and keeps your palate fresh.
Honestly, don't even bother with low-fat condiments; a dollop of full fat sour cream or a splash of hot sauce is all you really need.
Solving Common Texture Issues
Why did my potatoes turn into mashed potatoes in the pan?
This usually happens if you over boil them in the first step. You want them "fork tender" on the outside but still resisting in the middle. If they are falling apart before they hit the oil, they will just turn into a pan-fried mash.
Troubleshooting Table
| Problem | Root Cause | Solution |
|---|---|---|
| Potatoes Sticking | Pan wasn't hot enough | Wait for the oil to shimmer before adding spuds. |
| No Crunch | Too much moisture | Ensure potatoes are drained and steam dried after boiling. |
| Dark but Raw | Heat was too high | Lower the flame; let the internal heat catch up to the crust. |
How to fix a bland flavor?
Potatoes are starch sponges; they need more salt than you think. If they taste flat, it’s almost always a salt issue. Add a pinch of flaky sea salt right as they come out of the pan. The heat will help the salt crystals adhere to the residual oil, giving you a pop of flavor in every bite.
3 Step Decision Shortcut
- If you want maximum crunch: Use the baking soda boil and a cast iron skillet.
- If you want a healthier version: Use the air fryer at 200°C for 18 minutes.
- If you are feeding a crowd: Roast them on a pre heated sheet pan at 230°C.
Kitchen Myths Debunked
Many people believe that soaking potatoes in cold water for hours is the only way to get them crispy. While soaking removes surface starch to prevent sticking, it actually works against the goal of this specific home fries recipe. We want that surface starch to stay put so it can gelatinize and create that thick crust.
The vinegar in our boil also helps keep the potato pieces intact so they don't disintegrate into a mess.
Another common myth is that you should keep the lid on the pan to help the potatoes cook faster. Covering the pan traps steam, which effectively "washes" away any crispness you've started to develop. high-quality home fries require an open environment where moisture can escape freely.
If you're worried about them being raw in the middle, that's what the par boiling step is for. Trust the process and keep that lid in the drawer.

Recipe FAQs
how to make home fries?
Par boil, roughen, then sear. The key is to boil cubed potatoes with a little baking soda to create a starchy surface slurry, which you then shake off before searing them hard in hot oil or fat until golden brown on all sides.
how to make home fries in air fryer?
Yes, you can use an air fryer after par boiling. After you par boil and vigorously shake the potatoes to create that essential rough surface, toss them lightly with oil and air fry at 200°C (400°F) for 15-20 minutes, shaking every 5 minutes.
how to make home fries crispy?
Maximize surface area roughness. After boiling, you must aggressively shake the potatoes in the dry pot to create a fuzzy, mashed potato-like coating on the exterior of each cube; this coating fries into the signature crunch.
how to make home fries in the oven?
Yes, but texture will differ from stovetop searing. Preheat your oven and a baking sheet to a high temperature, then toss your par boiled and roughed-up potatoes with oil and roast until deeply browned.
how to make home fries crispy in oven?
Preheat your pan very high to mimic frying. To achieve superior crispness in the oven, use a preheated sheet pan and ensure the potatoes are not overcrowded, as steam is the enemy of crispness.
What is the role of baking soda in home fries?
It accelerates surface browning and texture creation. The alkali helps break down the pectin in the potato cell walls, forcing starch to the surface, which allows for a faster, deeper Maillard reaction when frying.
Can I skip the boiling step entirely?
No, skipping the boil results in a less desirable texture. While you can attempt to cook raw potatoes in a skillet, the internal cook time required will burn the exterior before the inside softens properly; the boil is crucial for proper internal fluffiness, similar to how we manage moisture when attempting How to Make Oven Fried French Fries: The Best Crispy Recipe.
Crispy Home Fries Recipe
Ingredients:
Instructions:
Nutrition Facts:
| Calories | 284 kcal |
|---|---|
| Protein | 5.4 g |
| Fat | 10.2 g |
| Carbs | 44.8 g |
| Fiber | 5.8 g |
| Sugar | 3.2 g |
| Sodium | 645 mg |
