Half Baked Ben & Jerry's Cookie Dough Ice Cream Recipe
Oh my gosh, have you ever had one of those days that just calls for ice cream? you know the kind: it’s hot outside, and the air is thick with humidity.
And honestly, who can resist a scoop (or two) of half baked ben & jerry's ? i remember the first time i tried it.
I was at a friend’s birthday party, and it was like pure happiness in a tub! but let's be real.
Who wants to run to the store when you can whip up this dreamy homemade version right in your kitchen? trust me, you’re gonna want to stick around for this one!
Recipe Overview
So, what’s the story behind this ice cream magic? the original half baked ice cream from ben & jerry's combines their rich chocolate fudge brownie ice cream and the wonderfully sinful cookie dough ice cream.
It's become hugely popular in recent years, with fans raving about its creamy chocolate goodness and chewy cookie dough bites.
Making this decadent dessert at home means you get to control what goes inside, and guess what? you can skip the machine if you want no-churn cookie dough ice cream !
Now, let’s break it down. this recipe might seem a bit involved it's a medium difficulty level but don’t sweat it! some things take a little time, like chilling and freezing (think of it as an ice cream meditation!).
It’ll take about 5 hours total, but the actual hands-on time is just around 45 minutes. not too shabby!
As for cost? if you’re a savvy shopper, you can keep it under $25. and you'll have enough to serve 6-8 people .
Perfect for summer gatherings, or just a night on the couch with your favorite flick!
Key Benefits
Let's talk about why making this homemade version is totally worth it. first off, you know what goes into your homemade cookie dough ice cream .
This divine treat is loaded with not just flavor, but also a bit of health with rich dairy and sweet treats that you can adjust to your taste.
That luscious blend of cream, milk, and just the right sweetness makes it a crowd pleasing dessert .
And you know what? it’s perfect for any special occasion! serving this up at a birthday party or a summer barbecue? your guests will be in ice cream heaven! plus, there's something magical about creating your own gourmet ice cream at home .
It’s like having restaurant style desserts at your fingertips!
Not to mention, who wouldn’t love the indulgent combination of fudgy brownie chunks and chewy cookie dough bites? when you compare it to store-bought versions, this one stands out in terms of freshness and flavor.
Honestly, it’s a foolproof way to impress fellow ice cream lovers!
If you've got kids or friends who love to cook, this can be a fun activity to do together! you're creating homemade treats while making memories.
Who knew getting messy in the kitchen could be so rewarding?
As we dive into the ingredients, get ready to experience the joy of cooking with chocolate, blending in some chocolate chip cookie dough , and treating everyone to a delicious, cold dessert for hot days! Now, let’s check out what you’ll need!
Your Essential Ingredients Guide for Delectable Ice Cream
Getting the right ingredients is like laying the foundation for a sweet masterpiece. Premium Core Components make all the difference.
Understanding Your Premium Core Ingredients
Let’s chat about the essentials . Here are some detailed measurements you’ll need. For our Half Baked ice cream adventure, grab:
- 2 cups (480 ml) heavy cream
- 1 cup (240 ml) whole milk
- ¾ cup (150 g) granulated sugar
- 1 teaspoon vanilla extract
- ½ teaspoon salt
These ingredients are the magic that makes the ice cream creamy and delicious. when choosing your ingredients, look for fresh milk, and high fat cream.
It should be thick and luscious! and don’t skimp on the vanilla extract make sure it’s pure for the best flavor.
Store your cream and milk in the coldest part of your fridge; they’ll last about 5-7 days after opening.
Freshness is key! When you’re picking your ingredients, check the expiration dates . You know don’t be that person who ends up with expired dairy!
Get Seasoned: Our Signature Blend
Next up is the signature seasoning blend . it's all about those spice combinations that elevate an ice cream recipe. for our half baked ben & jerry's-inspired creation, we focus on vanilla and a pinch of salt.
But don't forget fresh herbs can surprise you! ever tried basil in a sweet dish? it’s a game changer, trust me!
Now, if you add in some chocolate fudge brownie chunks like in the original, you’re taking flavor to a whole other level.
That rich chocolate cozies up so well with our homemade cookie dough bites. if you're feeling adventurous, swap in some cinnamon for that extra kick, or even a smidge of espresso powder for a fun twist.
Who says ice cream can’t be gourmet?
Smart Substitutions: Keep It Flexible
Learning to make smart substitutions can save the day especially if you run out of something. vanilla too expensive? you can use almond extract, but just half the amount.
No cream? try coconut milk for a dairy-free twist. it gives a slightly different flavor, but hey, it’s still tasty!
If you’re all about keeping it healthier, that granulated sugar can be swapped for honey or maple syrup, which gives a unique flavor dimension .
Food safety alert: if you're using raw cookie dough, consider heat treated flour to avoid any raw flour risks. safety comes first, friends!
Kitchen Equipment Essentials
Now, let’s chat about tools. you’re gonna want a few must have tools . an ice cream maker ? definitely helps if you want that soft, creamy texture.
Don’t fret if you don’t have one building a no-churn cookie dough ice cream is totally doable! just mix and freeze!
You’ll need mixing bowls, an electric mixer (or whisk if you’re feeling strong), and some baking pans for brownies. if you don’t have a cookie scoop, don't sweat it! a spoon works just fine.
Make it work! oh, and don’t forget that storage container for all that rich goodness. an airtight one is best to prevent icy crystals from forming.
Transitioning to Our Delicious Instructions
So, now that we've got the lowdown on ingredients and tools, it’s time to dive into creating that ultimate half baked ben & jerry's treat.
Get your apron on and let’s make the best ice cream you’ve ever tasted! you’ll be scooping up creamy chocolate goodness and indulging in chewy cookie dough bites in no time.
Get ready for some serious crowd pleasing desserts! you’re gonna love it!
Professional Cooking Method: Crafting Ben & Jerry’s Half Baked Cookie Dough Ice Cream at Home
Ever had a craving for ben & jerry's half baked ice cream? you know, that divine combination of creamy chocolate ice cream stuffed with chunks of cookie dough and fudge brownie bits? yeah, that's the one!
I'm about to spill the beans on how to make this beloved dessert at home, using professional cooking methods that even a home cook can master.
Don’t worry; i've got your back with all the insider tips and tricks. let’s dive in!
Essential Preparation Steps
First off, let’s talk about mise en place . it’s a fancy term for getting everything prepped and in place before you start cooking.
Measure out all your ingredients and have them ready to go. it makes the whole process a breeze!
Next, consider time management . this recipe involves multiple components (ice cream base, cookie dough, and brownies), so taking it step by step is crucial.
Break it down, and you'll feel less overwhelmed.
Now, let’s chat about organization strategies . keep your work area tidy. have mixing bowls for each stage and a clean counter.
Trust me, a cluttered space can lead to a cluttered mind.
Lastly, remember safety considerations . since we’re using raw flour for the cookie dough, heat treat it first! bake it at 350° f ( 175° c) for about 5 minutes to kill any nasty bacteria.
Always better safe than sorry!
Step-by-step Process
Prepare the Ice Cream Base:
- In a mixing bowl, throw together 2 cups of heavy cream, 1 cup of whole milk, ¾ cup of granulated sugar, 1 tsp vanilla extract, and ½ tsp salt. Whisk it until the sugar dissolves and then chill this beauty in the fridge for 4 hours or overnight.
Make the Cookie Dough:
- Cream ½ cup unsalted butter with ½ cup brown sugar and ¼ cup granulated sugar until it looks fluffy. Add in 1 tsp vanilla extract and slowly mix in 1 cup heat treated flour and ¼ tsp salt. Stir in ½ cup chocolate chips. Roll ‘em into balls and stick ‘em in the fridge.
Bake the Brownies:
- Preheat your oven to 350° F ( 175° C) . Melt ½ cup of unsalted butter in a bowl, mix in 1 cup of sugar, then beat in 2 large eggs and 1 tsp of vanilla. Whisk in ⅓ cup cocoa powder, ½ cup flour, and ¼ tsp salt. Spread this chocolaty batter in a greased baking pan and bake for 20- 25 minutes . Cool, cut them into bite sized pieces, and pop them in the fridge.
Churn the Ice Cream :
- Pour that chilled ice cream base into your ice cream maker and churn according to the manufacturer's instructions. When it starts to thicken, gently fold in your cookie dough balls and brownie chunks (you’ll want to devour this by the spoonful, but hold on!).
Freeze the Ice Cream :
- Scoop the churned ice cream into a freezer safe container and freeze for at least 4 hours until solid.
Expert Techniques
Let’s be real; no one wants a bowl of ice cream that’s a hot mess. A few quality checkpoints can help avoid that:
- Chill Thoroughly : Chill that ice cream base for maximum creaminess.
- Temperature Control : The ice cream should be thickened but not rock solid when you’re folding in the cookie dough and brownies.
If you find it’s not coming out smooth after blending, hang tight! Just give it another spin in the mixer.
Success Strategies
Now, we’ve got the basics down, but you're probably wondering how to make this a wow-factor dessert. Here are some success strategies :
- Avoiding Common Mistakes : Don’t rush the chilling. Ice cream needs its time to solidify.
- Quality Assurance Tips : Taste everything! At every stage, give it a taste. Adjust sweetness with sugar or a pinch of salt if it needs it.
Finally, if you're looking ahead, consider make-ahead options . you can prepare the cookie dough and brownies days in advance! just keep them in the fridge, and you’ll be ready to churn whenever the craving hits.
And there you have it a recipe that brings the famous half baked ben & jerry's experience right into your kitchen.
Your friends and family will be raving about your homemade treats for days.
Additional Information
As you embark on this delicious journey to make your very own ben & jerry's ice cream recipe , remember that practice makes perfect.
Don’t stress the little things; cooking, especially when it comes to easy ice cream recipes , should be fun! so roll with it, enjoy those cookie dough bites and fudge brownie chunks , and get ready to impress.
Now, go grab those ingredients, and let’s turn your kitchen into the ultimate ice cream parlor. You’ll have all your loved ones asking for your secrets in no time! Happy ice-cream making!
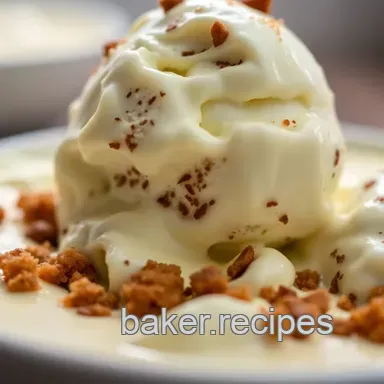
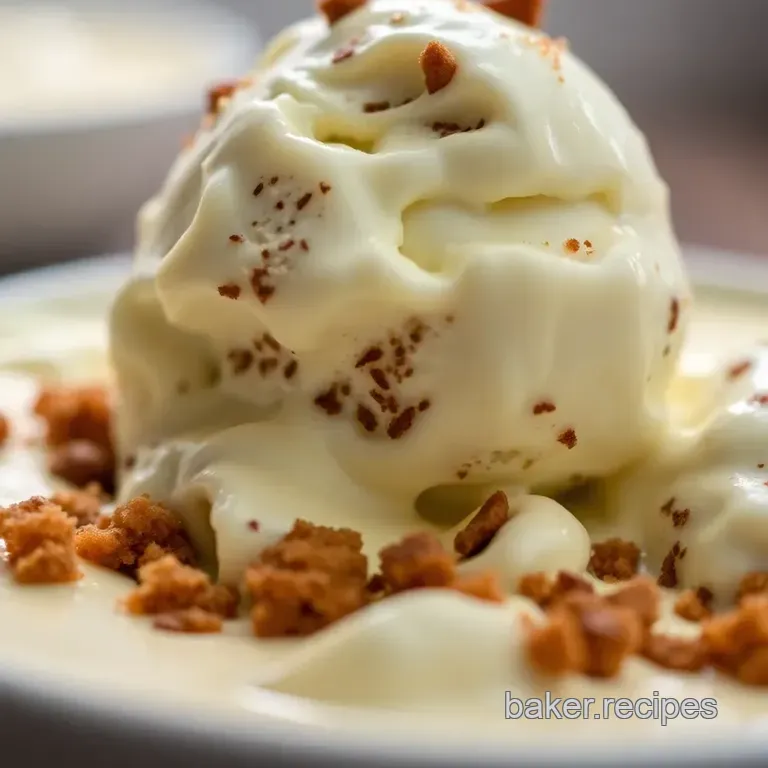
Look into Into Deliciousness: Half Baked Ben & Jerry's Cookie Dough Ice Cream
Oh my gosh, if you’re a fan of cool, creamy treats, you have to try this homemade half baked ben & jerry’s cookie dough ice cream .
Seriously, it's like a party in your mouth! this recipe takes you on a super tasty journey, blending rich chocolate fudge brownie bits with chunks of raw cookie dough .
It’s the perfect bite for ice cream lovers and totally replicates that classic ben & jerry’s vibe right in your kitchen.
Let’s break it down and dive into some extra tidbits!
Pro Tips & Secrets to Make Your Ice Cream Dreams Come True
Chill, Chill, Chill: When you're mixing your ice cream base, don’t rush it. Chill it overnight if you can. It ensures a smoother texture and makes your ice cream extra creamy.
Cookie dough magic: make sure you heat treat your flour before mixing your cookie dough. just spread it on a baking sheet and put it in the oven at 350° f for about 5 minutes.
This eliminates any risk of raw flour, making your cookie dough bites safe to eat. trust me, it's worth it!
Flavor Boost: Wanna up the ante? Add a pinch of sea salt to the brownie mix. It enhances the chocolatey flavor, making it so much richer.
Presentation is Key: When serving, a little drizzle of chocolate syrup or a sprinkle of flaky salt can take your dessert out of this world. Remember, we eat with our eyes first!
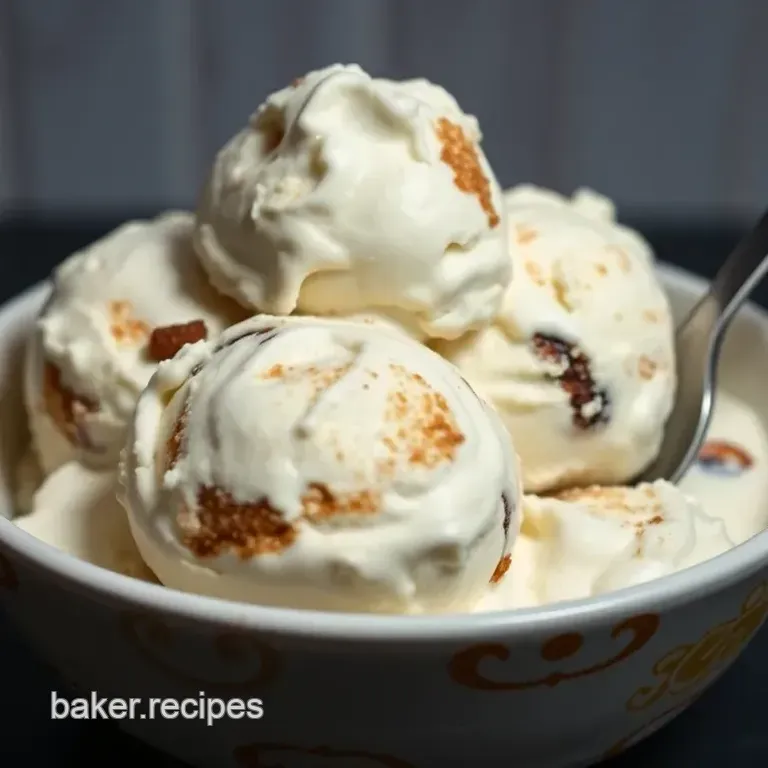
Perfect Presentation: Make It Instagram Worthy
Alright, here’s where it gets fun! Plating your homemade cookie dough ice cream can elevate that indulgent experience.
Get Creative With Colors: Layer your ice cream in a dish with some brownies at the bottom and cookie dough balls peeking out from the top. It’s all about the visual appeal!
Garnish Wisely: A few fresh mint leaves or some berries can lend those beautiful pops of color, making your dessert not just tasty but gorgeous too!
Prep Ahead & Storage Solutions
Now, I get it. Sometimes you crave ice cream but don’t wanna spend your entire day in the kitchen. Here’s how to save time:
make ahead: You can prepare the ice cream base, cookie dough, and brownies in advance. Just store each component separately in the fridge.
Storage tips: if you have leftovers (which is rare!), keep your ice cream in an airtight container. it can last in the freezer for up to two weeks .
Just soften it a bit before scooping; nobody wants to wrestle with rock hard ice cream!
Fun Flavor Variations to Keep It Interesting
Seasonal Swaps: Got some strawberries? Toss them in for a summer twist! Or how about some pumpkin spice in the fall? Make it adaptable!
Dietary Modifications: Want a lower calorie version? Swap heavy cream with coconut cream and use a sugar substitute. Boom, now everyone can indulge!
Complete Nutrition Guide at a Glance
Let’s talk numbers. Each serving of this decadent dessert packs about 400 calories . It includes:
- Fat: 24 g
- Protein: 5 g
- Carbs: 45 g
When treating yourself, balance is key! Enjoy it in moderation to keep the sweet vibes flowing without overdoing it.
Expert FAQ Solutions
Have burning questions? I got you!
Why is my ice cream too hard? If it’s rock solid, you might need to let it sit out for a few minutes before scooping.
Can I make this without an ice cream maker? Absolutely! Just pour your mixture into a freezer safe dish, stir it every 30 minutes for the first few hours, and voilà!
Wrap It Up!
You’re officially ready to whip up some drool worthy half baked ben & jerry's ice cream at home. embrace the cooking challenges and honor that adventurous spirit! this treat is sure to be a crowd pleaser , whether it's summer or a cozy evening in.
Enjoy making this easy homemade ice cream and enjoy all the heavenly cookie dough bites and chocolate fudge brownie chunks you can handle! trust me, every spoonful is worth it.
Now get out there and create some magic in your kitchen!
Half Baked Ben Jerry S Cookie Dough Ice Cream Re