Homemade Granola Bars: Nutty, Chewy, and Irresistibly Delicious!
- The Joy of Homemade Granola Bars: A Personal Journey
- A Little Granola History
- Let’s Break It Down: Time, Difficulty, and Cost
- Why Granola Bars Are the Best
- Essential Ingredients Guide for Homemade Granola Bars
- Mastering Professional Cooking: The Perfect Way to Bake Granola Bars
- Granola Bar Goodness: All You Need to Know!
- Frequently Asked Questions
- 📝 Recipe Card
The Joy of Homemade Granola Bars: A Personal Journey
Oh my gosh, let me tell you about the first time i tried making granola bars from scratch. i was standing in my kitchen, feeling all masterchef ish.
Picture this: my dog, max, with his big eyes watching every move i made, hoping for a crumb to fall.
Honestly, i was just a little bit nervous. would this end in a wild disaster? i had my doubts. but, boy, did it end up being a game changer! ever since that day, i’ve made countless batches, and they keep getting better.
So, here’s the thing: making your own homemade granola bars is not only satisfying but also a great way to stay healthy.
Plus, no more weird ingredients that you can’t pronounce!
A Little Granola History
Now, let’s take a step back. the granola craze kicked off way back in the 1960s when health food was all the rage.
It started out as a superfood for health ensoiasts, and today, you can find granola in every corner of the country.
From trendy cafes to packed snack aisles at the grocery store, granola bars have become a staple.
But you don't have to fall for those store-bought options filled with sugar and preservatives. This is where the baked granola and even no bake granola options come into play! Seriously, who wouldn’t want to whip up a batch at home in an hour?
Let’s Break It Down: Time, Difficulty, and Cost
Thinking you can’t do this? think again! making homemade granola bars is easy peasy . if you can stir and measure, you’re golden.
The whole process takes about 1 hour and 5 minutes . that's just enough time to sip on your favorite iced tea and pretend you’re a kitchen wizard.
Here’s the scoop: For about 12 bars , you usually spend under $10. Talk about a win! Plus, you can customize these bars to your liking while keeping it healthy.
Why Granola Bars Are the Best

So, why should you jump on this granola bandwagon? first off, these beauties are packed with good stuff . oats, nuts, and dried fruits bring a blend of fiber, protein, and healthy fats perfect fuel for your busy day.
And since you’re in control of the ingredients, you can keep it healthy and skip the added junk.
These bars are also perfect for any occasion: backyard bbqs or summer picnics with friends. you want something light, easy to grab, and definitely crowd pleasing? granola bars have got you covered! plus, they shine brighter than average snacks when it comes to nutrition.
Now, if you're looking to wow your friends at your next get-together, trust me— no bake granola bars are a special treat that could even make Martha Stewart raise an eyebrow.
Ready to jump in? Next up, let's take a peek at the ingredient list you’ll need to whip these up. Trust me, you’re going to love how simple and tasty they are!
Overall, dive into the world of homemade granola bars and discover why so many people are falling in love with this snack.
Trust me, once you try them, you’ll never think about store-bought bars the same way again. and hey, let’s hit the kitchen and get rolling!
Essential Ingredients Guide for Homemade Granola Bars
You know, crafting your own granola bars at home isn’t just fun; it’s super satisfying too! I mean, who wouldn’t want to whip up a homemade treat that's not only healthier than store-bought options but also creative and customizable?
So, let’s dive into the essential ingredients and tools you’ll need to get this party started!
Premium Core Components
First things first. You gotta know your ingredients! When it comes to making those chewy, nutty bars, here’s what you’re gonna need:
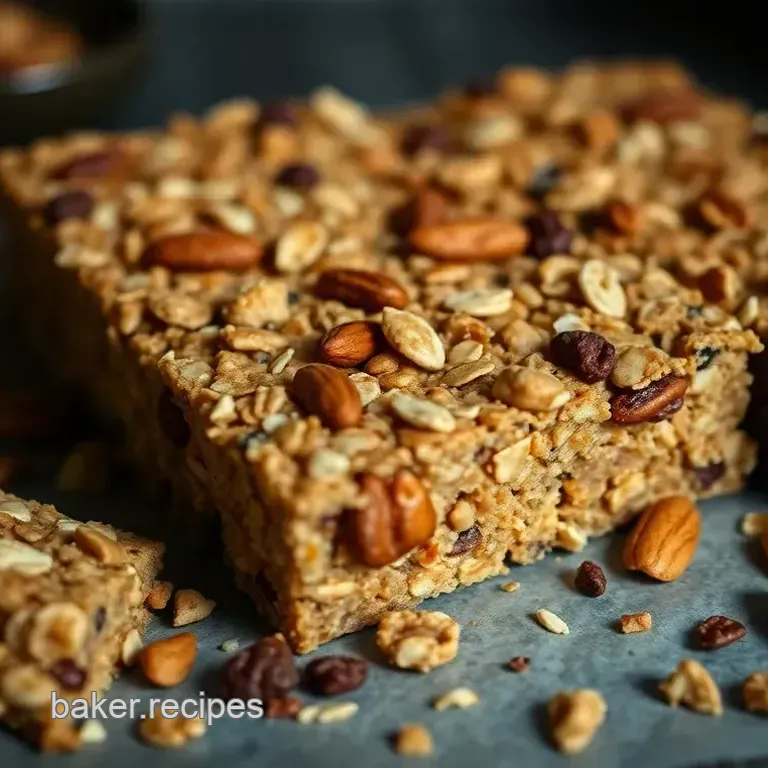
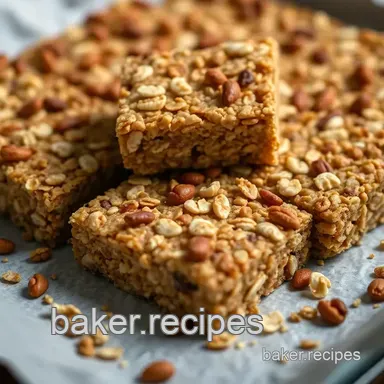
Rolled Oats: 2 cups (180g). These are your base. Look for whole rolled oats, not instant. They keep everything chewy.
Mixed Nuts: 1 cup (120g), chopped. I love using almonds and walnuts. Freshness is key, so check for any weird smells trust your nose!
Honey or Maple Syrup: 1/2 cup (75g). This is what binds everything together. If you’re feeling adventurous, try raw honey for added flavor.
Nut Butter: 1/4 cup (60ml). Almond or peanut butter works wonders. Make sure it’s creamy and not too old; nobody wants a funky taste in their bars.
Vanilla Extract: 1/2 teaspoon (2g). The flavor enhancer that brings everything to life oh my gosh, don’t skip this!
Salt: 1/2 teaspoon (3g). A little salt goes a long way in bringing out the sweetness.
Freshness Tips
Make sure your nuts aren’t stale nothing ruins a good snack faster than that. Store them in the fridge if you're not using them quickly.
Signature Seasoning Blend
Now, let’s jazz things up! Your signature blend can make all the difference. Here’s how:
Essential Spice Combinations: Mix in cinnamon or a pinch of nutmeg for warmth.
Herb Selections: What about some fresh rosemary? It sounds odd, but trust me it adds a unique kick!
Flavor Enhancers: A dash of cocoa powder turns your bars into a chocolate dream.
Regional Variations: Feeling tropical? Toss in some coconut flakes or pineapple!
Smart Substitutions
Life happens, you know? You might not have everything on hand. Here’s how to improvise:
Common Alternatives: No mixed nuts? Use sunflower seeds for a nut-free version.
Dietary Modifications: For a vegan twist, opt for maple syrup and sunflower seed butter.
Emergency Replacements: If you’re out of honey, brown rice syrup will do just fine.
Seasonal Options: Use fresh berries in summer for a burst of flavor.
Kitchen Equipment Essentials
Let’s chat tools! Here’s what you’ll need to tackle your homemade granola bars like a pro:
Baking Pan: Grab a 9x9 inch one. If you don’t have that, any similar sized pan will work.
Parchment Paper: This is your BFF. It’ll keep your bars from sticking. Trust me, you’ll thank me later.
Mixing Bowl: A big one because we all know that mixing can get messy!
Rubber Spatula or Wooden Spoon: Grab a sturdy spatula to mix everything together.
Oven: You’ll want to preheat that baby to 350° F ( 175° C) for the perfect bake.
Tips for Epic Granola Bars
So here’s the lowdown. when baking your homemade granola bars , “ press firmly ” is your mantra! this ensures they’ll hold together.
I made the mistake of not pressing hard enough once, and when i cut them, they crumbled everywhere. total disaster!
Another hot tip ? Let them chill completely in the pan before cutting. It takes some patience, but trust me, it’s worth it!
A Sweet Transition to Recipes
Now that you're armed with the knowledge of what makes those chewy granola bars oh-so-delicious, get ready to dive into the recipe section.
I promise, after making these a few times, you’ll have the confidence to sprinkle in your own special twist. whether you're going for a no-bake version or want to go full-on baked magic, it's all possible.
Let’s get cooking!
Mastering Professional Cooking: The Perfect Way to Bake Granola Bars
Have you ever noticed how a simple snack like granola bars can take you back to your childhood? whether you’re grabbing a bite for breakfast or packing them for a hike, they're just pure joy in a bar.
So, let’s dive into the professional cooking method so you can whip up your own homemade granola bars that’ll knock your socks off!
Essential Preparation Steps
First off, we’re talking about mise en place . french for “everything in its place,” it means you get all your ingredients ready before you start.
Honestly, it saves a ton of time and keeps you from frantically searching for that last bag of mixed nuts.
Now, let’s chat about time management. you’ll want to gather your ingredients and have your baking pan lined with parchment paper.
This whole process takes about 15 minutes , and it’s worth every second spent! also, keep an eye on the clock when you’re baking.
You’ll usually need to bake for around 20 minutes until those edges are golden brown around 350° f ( 175° c) .
step-by-step Process
Okay, here’s how we’re gonna roll:
- Preheat your oven to 350° F ( 175° C) .
- Line a 9x9-inch baking pan with parchment paper so your bars won’t stick.
- Combine the rolled oats and mixed nuts in a bowl. A little bit of salt here goes a long way for flavor.
- In another bowl, whisk together your honey (or maple syrup), nut butter, and a dash of vanilla until it looks all smooth and lovely.
- Next, pour that dreamy mixture over your dry stuff. Seriously, mix it well. You want it all to stick together like friends at a party.
- Now, if you’re feeling spicy, fold in those dried fruits, cranberries, or even chocolate chips!
- Transfer everything into your pan and press it down well. Not hard enough to squish it, but firm enough to keep those bars together.
- Bake for 20 minutes . You’ll know when they’re done because they’ll look golden brown on the edges.
- Let it cool for about 10 minutes in the pan. Use the parchment paper to lift it out and cool it completely on a wire rack.
- Finally, cut it into those beautiful bars and savor your homemade creation.
Expert Techniques
To really nail these healthy granola bars , consider this: don’t rush the pressing step. the more you pack it in, the less crumbly they’ll be.
And check for doneness by looking for those crispy edges.
If you're thinking of storing, they stay fresh in an airtight container for up to a week or frozen for about 3 months . Who doesn’t love a make-ahead option?
Success Strategies
Now, let’s wrap up with what not to do. avoid adding too much liquid this will make your bars soggy instead of perfectly chewy.
Also, don’t skimp on the richness of ingredients. fresh nuts and dried fruits will add that oomph that’ll have your friends asking for the recipe .
Want the perfect crunch? bake that granola for that magical 20 minutes until golden brown. and remember: press firmly into the pan.
It’s the key to staying intact when you slice them.
Closing Thoughts: Additional Information
Before you dive in, just a quick reminder making your own granola bars is not just about the taste and satisfaction; it’s about customizing them to fit your lifestyle.
You could mix it up with tropical ingredients or even make them vegan! dreamy, right?
So there you have it, your guide to crafting the most delicious no bake granola bars or going the full-on baking route.
Whichever way you choose, you’ll end up with something delicious that’s healthy and will keep you energized throughout your busy days.
Stay tuned for more mouthwatering recipes and tips, because who doesn’t want more deliciousness in their life? Let’s keep cooking!
Granola Bar Goodness: All You Need to Know!
Looking to whip up a batch of homemade granola bars ? i’ve got your back! these delights are not just tasty but super customizable.
Whether you’re on the go or need a crowd pleasing snack, granola bars are the way to go. let’s dive into some extra tips, tricks, and ideas to make your granola bar experience unforgettable!
Pro Tips & Secrets to Baking Mastery
First up, my favorite part: the pro tips ! Let’s be real everyone wants to nail their first try. Here’s how you can level up your granola bar game:
- Pressing Down : When you mix your ingredients in the baking pan, press down firmly . This helps avoid crumbly bars that fall apart like your ex’s excuses (we’ve all had those moments, right?).
- Timing is Everything : Bake your granola bars for about 20 minutes but keep an eye on those edges! You want them golden brown, not overdone like that last movie you tried to enjoy.
- Flavor Boosters : Want to amp up that flavor? Add a sprinkle of cinnamon or even a splash of almond extract! The taste will blow your mind.
Plating Tips: Lookin’ Good!
Now comes the fun part: making those granola bars look as good as they taste!
- Slice Like a Pro : Once they’re cooled, cut them into bars or squares. Think of it as cutting cake everyone loves a good looking treat!
- Garnish Ideas : Sprinkle some chopped nuts or drizzle some melted chocolate on top for that Pinterest worthy finish. It’s all in the presentation!
- Color Sets the Mood : Use colorful dried fruits like cranberries or apricots. A pop of color makes everything look more appealing and helps you sell it at family gatherings!
Storage & make-ahead Mastery
So, what about making these delicious treats ahead of time? Here’s what you should know:
- Storing Basics : Keep your bars in an airtight container . Trust me; they will last longer unlike those fleeting moments of summer romance.
- Fridge or Freezer : Pop them in the fridge for about a week or freeze them for up to 3 months . They’ll be like your favorite summer fling always ready when you need a little pick-me-up!
- Reheating Instructions : If you freeze them, just let them thaw on the counter or zap in the microwave for a few seconds. Voila! Freshness restored!
Creative Variations for Everyone
Here’s where you can let your inner chef shine. Granola bars can be a blank canvas!
- Flavor Adaptations : Want something tropical? Go for dried mango and coconut flakes. If you’re a chocolate lover (who isn’t?), try chocolate chips and a scoop of cocoa powder.
- Diet Friendly Options : For a nut-free version, swap those nuts out for seeds. Just as delicious!
- Seasonal Twists : Think about adding pumpkin spice in the fall or cranberry and white chocolate in winter. Who says granola bars can’t be festive?
Complete Nutrition Guide
Now, we gotta talk about nutritional goodness.
- Breakdown : Each bar roughly packs 180 calories with 5g of protein . Not too shabby for a snack, right?
- Health Benefits : Thanks to rolled oats and nuts, you’ll get that crunchy texture plus all those great nutrients to keep you energized.
- Portion Guidance : Stick to one or two bars when you’re munching down. Even though they’re healthy, don’t let carbs sneak up on you!
Let’s Wrap it Up!
So, there you have it everything you need to know about making the best granola bars ever. whether you go for no bake granola bars in the summer heat or choose to bake granola bars with cozy ingredients during the chillier months, remember that the best part is enjoying what you make.
Share with friends, take along to picnics, or just keep them for your late night snacks. honestly, making these bars can feel like creating little bites of sunshine! go on, grab those ingredients, and elevate your snack game like a true pro.
You've got this!
Frequently Asked Questions
How can I make my granola bars softer or chewier?
If you prefer your granola bars to be softer or chewier, try reducing the amount of honey or syrup slightly or adding an extra tablespoon of nut butter. You can also bake them for a shorter time; keep an eye on them to ensure they don't become too crunchy!
Can I customize the ingredients in my granola bars?
Absolutely! One of the best things about homemade granola bars is that you can tailor them to your taste. Feel free to swap in different nuts, seeds, or dried fruits. You can even add spices like cinnamon or nutmeg for an extra flavour boost!
What’s the best way to store homemade granola bars?
To keep your granola bars fresh, store them in an airtight container at room temperature for up to a week. If you want them to last longer, you can wrap them individually and freeze for up to three months. Just thaw them for a few minutes before enjoying!
Are granola bars a healthy snack option?
Granola bars can be a healthy snack option as they're packed with whole ingredients like oats and nuts. You control the sugar content by deciding how much honey or syrup to use. Just be mindful of portion sizes, as they can be calorie dense.
Can I make granola bars without nuts?
Yes, you can make nut-free granola bars by substituting nuts with seeds like pumpkin or sunflower seeds. You might also want to increase the amount of oats or add some extra dried fruit for texture and flavour. There are plenty of delicious options!
How long do homemade granola bars take to make?
Making homemade granola bars is quite quick! With about 15 minutes of active prep and 20 minutes of baking, you can whip them up in just over an hour, including cooling time. Perfect for a quick snack fix!
Homemade Granola Bars Nutty Chewy And Irresistib
Ingredients:
Instructions:
Nutrition Facts:
| Calories | 180 |
|---|---|
| Fat | 7g |
| Fiber | 3g |
