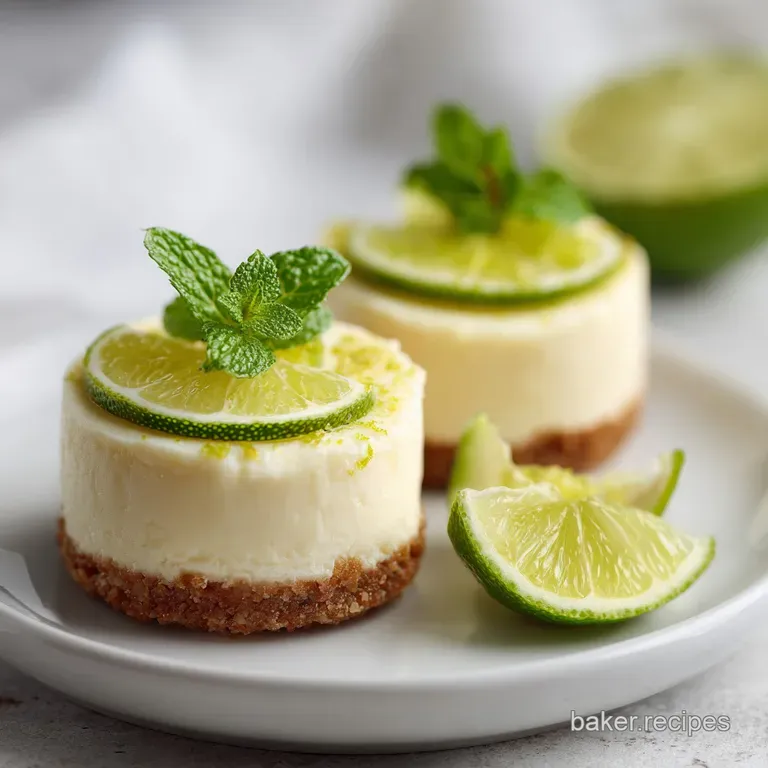
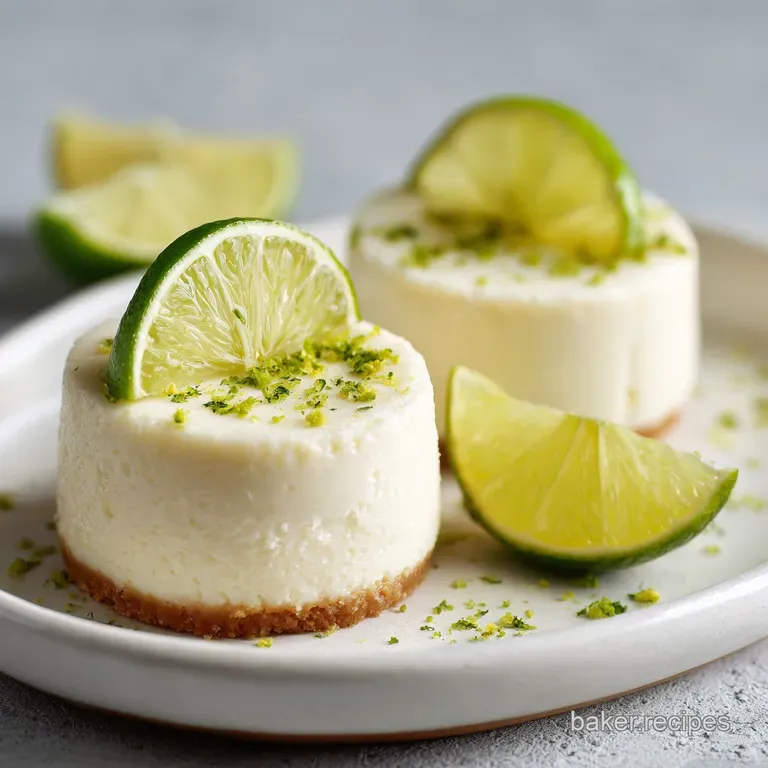
Mini Key Lime Cheesecakes: Zesty and Silky
- Time: Active 15 minutes, Passive 15 minutes, Total 30 minutes
- Flavor/Texture Hook: Zesty, silky filling with a golden, shattering crust
- Perfect for: Summer dinner parties or easy portion controlled weeknight treats
- Why These Bright and Tangy Mini Key Lime Cheesecakes Win Every Time
- The Secret Technique for Achieving Silky Lime Cheesecake Results
- Understanding the Essential Elements for Your Lime Cheesecake Deep Dive
- The Essential Elements Needed for Your Individual Key Lime Cheesecakes
- Gathering the Tools for Flawless Individual Key Lime Cheesecake Batches
- Mastering the Technique for Silky Smooth Mini Key Lime Pie Cheesecake
- How to Keep Your Lime Cheesecake Dessert Perfect Every Time
- Personalizing Your Recipe with Flavorful Twists and Smart Swaps
- Preserving the Freshness and Zest of Your Mini Lime Cheesecake Bites
- Finishing Touches to Make Your Individual Key Lime Cheesecakes Shine
- Debunking Common Kitchen Myths About Lime Cheesecakes
- Recipe FAQs
- 📝 Recipe Card
Why These Bright and Tangy Mini Key Lime Cheesecakes Win Every Time
The moment you press your thumb into a fresh key lime, that sharp, floral aroma hits you like a summer breeze. It's different from a standard grocery store lime. It's more intense, almost tropical, and it’s the absolute soul of these mini key lime cheesecakes.
I remember the first time I tried making these for a backyard barbecue. I thought I could skip the zest and just use bottled juice. Big mistake. The result was flat, one dimensional, and frankly, a bit of a letdown. That was the day I realized the "ingredient hero" isn't just the lime juice, it's the zest.
When you rub that zest into the sugar with your own fingertips, you release the essential oils that juice alone can't provide. This creates a fragrance that fills your entire kitchen before the oven even turns on.
These tiny treats are my go to because they offer that signature shattering crust and velvety center without the stress of a water bath or the four hour bake time of a traditional cheesecake. We’re going for high impact flavor with a much shorter wait time.
You're going to love how the vanilla wafers provide a toasted, honey like base that perfectly offsets the sharp acidity of the citrus. It’s a classic pairing, but done with a few specific tricks to ensure the crust doesn't get soggy and the filling stays incredibly smooth.
Honestly, once you master the "zest rubbing" technique, you'll never go back to plain lime desserts again. Let's get into what actually happens behind the scenes to make these so stable and flavorful.
The Secret Technique for Achieving Silky Lime Cheesecake Results
If you've ever wondered why some cheesecakes feel grainy while others melt on your tongue, it usually comes down to how we handle the fat and the acid. In this recipe, we are using the acidity of the lime juice to help "set" the proteins in the cream cheese and egg, but we have to do it gently.
- Zest Infusion: Rubbing lime zest into sugar isn't just for show. The abrasive sugar crystals tear open the oil sacs in the zest, distributing those aromatic compounds evenly so every bite has a floral lime punch.
- Emulsification Control: Mixing the egg and lime juice on a low speed prevents us from whipping too much air into the batter. Air bubbles expand in the oven and then collapse, which is the number one cause of those annoying cracks on top.
- Starch Free Stability: Unlike some recipes that use flour or cornstarch, we rely on the specific ratio of fat from the cream cheese and the binding power of a single egg to create a dense, custard like texture that stays creamy when chilled.
- Flash Baking the Base: Giving the vanilla wafer crust a 5 minute head start in the oven caramelizes the sugars in the butter and crumbs. This creates a moisture barrier so the filling doesn't turn the bottom into mush.
| Cooking Method | Time | Texture Result | Best For |
|---|---|---|---|
| Standard Oven | 15 minutes | Silky, uniform set with toasted crust | Classic results and traditional flavor |
| Stovetop (Steam) | 20 minutes | Extra dense, almost fudge like filling | Avoiding any risk of surface browning |
| No Bake Prep | 0 minutes | Mousse like, lighter, less stable | Quick prep when you can't use an oven |
Since we are focusing on a baked version, the oven provides a specific "toasted" aroma to the crust that you just can't get with a no bake method. It’s the difference between a simple sweet treat and a professional feeling pastry.
Understanding the Essential Elements for Your Lime Cheesecake Deep Dive
Selecting the right ingredients is half the battle. For instance, using brick style cream cheese is non negotiable here. The stuff in the tub has a higher water content and different stabilizers that will make your mini key lime cheesecakes soupy. We need that thick, fatty structure to hold up against the lime juice.
| Ingredient | Science Role | Pro Secret |
|---|---|---|
| Key Lime Zest | Flavor Catalyst | Rub into sugar first to maximize the citrus oil release and aroma. |
| Cream Cheese | Structural Base | Always use full fat brick style; the lower moisture ensures a dense, velvety set. |
| Large Egg | Protein Binder | Ensure it is room temperature so it emulsifies perfectly without over mixing. |
| Vanilla Wafers | Foundation | These have a lower moisture absorption rate than graham crackers, staying crispier longer. |
Rubbing the zest into the sugar is a technique often used in high end French pastry, and it’s a total game changer for these mini lime cheesecake bites. It transforms the sugar from a simple sweetener into a flavor delivery system.
The Essential Elements Needed for Your Individual Key Lime Cheesecakes
Here is exactly what you need to pull from your pantry and fridge. Make sure that your cream cheese is truly soft leave it out for at least two hours. If it's even slightly cold, you'll end up with tiny lumps that are impossible to whisk out later.
- 1.5 cups (150g) vanilla wafers, finely crushed: Why this? Provides a toasted, buttery flavor that complements lime better than graham crackers. (Check out this Nilla Wafer cheesecake recipe if you want to see this crust in action with other flavors).
- 3 tbsp (42g) unsalted butter, melted: Acts as the "glue" for your crust.
- 1 tbsp (12g) granulated sugar (for crust): Helps the crumbs caramelize and stick together.
- 0.25 tsp (1.5g) salt: Cuts through the sweetness and makes the lime pop.
- 8 oz (225g) full fat brick style cream cheese, softened: The backbone of the filling.
- 0.5 cup (100g) granulated sugar (for filling): Sweetens and provides bulk.
- 1 tbsp (6g) fresh key lime zest: The source of the intense citrus aroma.
- 0.25 cup (60ml) fresh key lime juice: Provides the characteristic tartness and helps set the proteins.
- 1 large egg (50g), room temperature: Binds everything together into a stable custard.
- 1 tsp (5g) vanilla extract: Rounds out the sharp lime notes with a creamy finish.
| Original Ingredient | Substitute | Why It Works |
|---|---|---|
| Key Lime Juice | Regular Persian Lime Juice | Similar acidity, though the flavor is slightly less floral and sharp. |
| Vanilla Wafers | Graham Crackers | Same texture, but adds a honey/cinnamon note instead of toasted vanilla. |
| Granulated Sugar | Light Brown Sugar (Crust only) | Adds a deeper molasses flavor; Note: Makes the crust slightly softer. |
Gathering the Tools for Flawless Individual Key Lime Cheesecake Batches
You don't need a high tech kitchen for this, but a few specific tools make the process much smoother. A standard 12 cup muffin tin is the perfect vessel. I highly recommend using foil liners if you can find them; they peel away from the chilled cheesecake much cleaner than paper ones do.
You'll also want an electric hand mixer. While you can do this by hand with a whisk and a lot of elbow grease, the mixer helps aerate the cream cheese just enough to keep it light without adding too much air after the egg goes in.
A food processor is the quickest way to get those vanilla wafers into a fine, sandy dust, but a zip top bag and a rolling pin work just as well if you need to vent some frustration.
Finally,, grab a small flat bottomed measuring cup or a shot glass. This is the secret to a perfectly packed crust. Pressing the crumbs down firmly ensures the base doesn't crumble apart when you take the first bite.
Mastering the Technique for Silky Smooth Mini Key Lime Pie Cheesecake
- Prep the environment. Preheat your oven to 350°F (175°C) and line a 12 cup muffin tin with your chosen liners.
- Construct the base. Combine your finely crushed vanilla wafers, 3 tablespoons melted butter, 1 tablespoon sugar, and salt in a bowl.
- Pack the liners. Press exactly 1.5 tablespoons of the crumb mixture into the bottom of each liner. Note: Use a flat bottomed glass to get an even, tight seal.
- The first bake. Flash bake the crusts for 5 minutes until they smell like toasted sugar and turn a deep mahogany. Remove and let cool slightly.
- Infuse the sugar. In a large mixing bowl, combine the 1/2 cup sugar and 1 tablespoon lime zest. Rub them together with your fingertips for about 30 seconds until the sugar is damp and smells intensely like a lime grove.
- Cream the base. Add your softened cream cheese to the lime sugar. Beat with your electric mixer on medium for exactly 2 minutes until the mixture looks like smooth, pale green silk.
- Finalize the batter. Add the egg, vanilla extract, and lime juice. Mix on the lowest speed just until combined. Stop as soon as the yellow streaks of egg disappear to avoid adding air.
- Fill the cups. Distribute the filling evenly over the pre baked crusts, filling them almost to the top.
- The final set. Bake for 10 minutes. Watch for the edges to look matte and set while the center still has a slight, jelly like jiggle when you tap the pan.
- Cool and chill. Let them sit at room temperature for 30 minutes, then move to the fridge for at least 4 hours to set completely.
How to Keep Your Lime Cheesecake Dessert Perfect Every Time
Even with a simple recipe, things can go sideways. The most common issue I see is the "sunken center." This usually happens when the cheesecakes are over baked or over mixed. If you see them puffing up like muffins in the oven, you've incorporated too much air, and they will inevitably collapse as they cool.
Why Your Mini Cheesecakes Have Lumps
If your batter looks like cottage cheese, your cream cheese was too cold. The fat molecules won't emulsify with the sugar and egg if they are still firm. You can try to fix this by placing your mixing bowl over a pot of warm water for a minute to gently soften the lumps, then whisking again.
Stopping the "Sunken Center" Effect
A slight dip is normal, but a deep crater means the oven was too hot or they stayed in too long. We want to pull them out while they still look "underdone" in the middle. Carryover heat will finish the job as they sit on the counter. If you want to see a different structural approach, my mini quiche hearts use a similar small batch setting technique but with a savory custard.
| Problem | Root Cause | Solution |
|---|---|---|
| Surface Cracks | Over baking or too much air | Reduce bake time by 2 mins; mix on lowest speed after adding egg. |
| Soggy Crust | Crumb not packed tight enough | Use a flat bottomed tool to compress crumbs firmly before pre baking. |
| Grit in Filling | Zest not rubbed into sugar | Always massage zest into sugar first to break down the fiber and release oils. |
Common Mistakes Checklist
- ✓ Never use "light" or "tub" cream cheese; the water content will ruin the set.
- ✓ Always pre bake the crust for that essential 5 minute window to ensure crunch.
- ✓ Tap the filled muffin tin on the counter 3 times before baking to pop surface bubbles.
- ✓ Don't open the oven door during the 10 minute bake time; a sudden temp drop causes cracks.
- ✓ Ensure the egg is truly room temperature to prevent the cream cheese from seizing up.
Personalizing Your Recipe with Flavorful Twists and Smart Swaps
While the classic mini key lime cheesecakes are hard to beat, sometimes you want to shake things up. You can easily turn these into a "Margarita" version by adding a tiny pinch of flaky sea salt to the top and a teaspoon of tequila to the batter (keep the lime juice the same!).
For a gluten-free version, simply swap the vanilla wafers for gluten-free graham cracker crumbs or even finely crushed pecans mixed with a little extra sugar. The nut base adds a fantastic richness that pairs beautifully with the tart lime.
If you find key limes are hard to source, you can use a mix of regular lime juice and a splash of lemon juice to mimic that extra tart "key lime" profile.
Scaling the Batch: To double (24 cheesecakes): You can double all ingredients exactly. However, keep the salt and vanilla at 1.5x the original amount to avoid overpowering the delicate lime. To halve (6 cheesecakes): This is tricky because of the single egg.
Beat the egg in a small bowl first, then use exactly 2 tablespoons (roughly half) for the half batch. Use a 6 cup muffin tin and check for doneness 2 minutes earlier.
Preserving the Freshness and Zest of Your Mini Lime Cheesecake Bites
Because these are dairy based, they need to stay cold. I actually think they taste better on day two once the lime flavor has had a chance to really permeate the cream cheese.
Storage Guidelines: Store the cheesecakes in an airtight container in the refrigerator for up to 5 days. To prevent condensation from dripping onto the tops, place a paper towel under the lid of the container.
If you aren't serving them all at once, wait to add any whipped cream or extra zest until the moment you eat them.
Zero Waste Tip: Don't throw away those "spent" lime halves after juicing! Toss them into a jar of white vinegar. After two weeks, you'll have a powerful, citrus scented natural cleaner.
Alternatively, you can candy the lime peels in a simple syrup to use as a beautiful, edible garnish for the tops of your cheesecakes.
Freezing: These freeze remarkably well. Place the chilled cheesecakes on a baking sheet to freeze solid, then wrap each one individually in plastic wrap and store in a freezer bag for up to 2 months. Thaw in the fridge for 2 hours before serving.
Finishing Touches to Make Your Individual Key Lime Cheesecakes Shine
Presentation is where you can really make these easy lime desserts look like they came from a high end bakery. A small dollop of whipped cream is standard, but try stabilizing it with a little mascarpone or Greek yogurt for a tangier finish that echoes the cheesecake filling.
A thin, half wheel slice of lime tucked into the cream looks professional, but my favorite trick is to use a microplane to shower the tops with fresh lime zest right before serving. The bright green flecks against the white cream provide a beautiful contrast.
If you want to get fancy, a few crushed toasted macadamia nuts sprinkled over the top add a wonderful tropical crunch that ties back to the buttery vanilla wafer base.
Remember, the aroma is the first thing your guests will notice. That fresh hit of lime zest as you bring the plate to the table sets the stage for the silky, tart experience to follow.
It’s a simple dessert, but when you respect the science of the ingredients and the power of the zest, it’s nothing short of spectacular.
Debunking Common Kitchen Myths About Lime Cheesecakes
There is a lot of misinformation out there about working with citrus and dairy. Let's clear up a few things so you can bake with confidence.
- "Bottled juice is the same as fresh." This is probably the biggest myth in the citrus world. Bottled juice is pasteurized, which kills the volatile flavor compounds that give limes their bright, "zingy" taste. Always squeeze fresh for this recipe; the effort pays off in the aroma alone.
- "You need a water bath for mini cheesecakes." While a water bath is great for large cakes to prevent cracking, these minis cook so quickly that the ambient moisture in the oven is usually enough. As long as you don't over bake them, you'll get a perfect surface every time.
- "Key limes are just small regular limes." Actually, Key limes (Citrus aurantiifolia) have a higher acidity, a thinner skin, and a much more floral aroma than the common Persian lime (Citrus latifolia). They are botanically distinct, which is why the flavor profile is so unique.

Recipe FAQs
Is it true I must use low-fat cream cheese for a lighter version?
No, this is a common misconception. You must use full fat, brick style cream cheese, as the water content in light or tub versions will prevent the cheesecake from setting properly.
How to ensure the crust stays crunchy?
Flash bake the crusts for 5 minutes at 350°F (175°C) before adding the filling. This brief heat exposure ensures the vanilla wafer and butter base remains firm and fragrant.
How to prevent air bubbles from forming in the filling?
Tap the filled muffin tin on the counter three times before placing it in the oven. This simple technique releases trapped air pockets, ensuring a smooth, uniform texture similar to how we achieve delicate textures in our lemon cupcakes.
Is the egg temperature actually that important?
Yes, the egg must be at room temperature. Using a cold egg can cause the softened cream cheese to seize, leading to a lumpy batter instead of the smooth, emulsified consistency required.
How to avoid cracks in the mini cheesecakes?
Keep the oven door closed for the entire 10-minute bake time. Sudden temperature drops caused by opening the door are the primary reason for surface cracks.
How to know when the cheesecakes are perfectly baked?
Remove them from the oven when the edges are set but the centers still have a slight jiggle. The residual heat will finish the setting process during the cooling and refrigeration stages.
Is it true I can speed up the chilling process in the freezer?
No, avoid the freezer for the initial setting phase. Rapid cooling can cause the fats in the cream cheese to separate, ruining the texture; always let them reach room temperature before moving to the refrigerator.
Mini Key Lime Cheesecakes

Ingredients:
Instructions:
Nutrition Facts:
| Calories | 194 kcal |
|---|---|
| Protein | 2.3 g |
| Fat | 11.9 g |
| Carbs | 19.8 g |
| Fiber | 0.1 g |
| Sugar | 11.2 g |
| Sodium | 104 mg |
