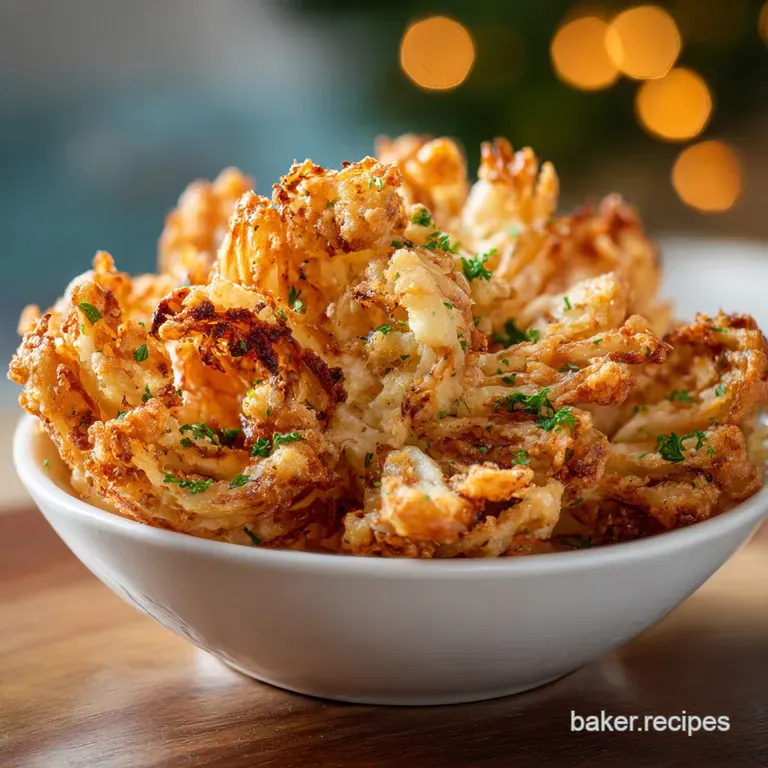
Air Fryer Blooming Onion Recipe
- Time: Active 15 minutes, Passive 25 minutes, Total 40 minutes
- Flavor/Texture Hook: Shatter crisp petals with a velvety zesty dipping sauce
- Perfect for: Game day appetizers or a fun weekend family snack
- The Magic Behind This Golden Air Fryer Blooming Onion Recipe
- Why This Onion Frying Technique Delivers Results
- Analyzing the Components of Your Flour Coating
- Selecting the Best Ingredients for Your Blossom
- The Necessary Tools for a Seamless Prep
- Step by Step Guide to a Flawless Result
- Simple Solutions for Common Kitchen Struggles
- Creative Ways to Customize Your Onion Flavor
- Best Practices for Storing and Reheating Leftovers
- Best Suggestions for Dipping and Enjoying Today
- Recipe FAQs
- 📝 Recipe Card
The Magic Behind This Golden Air Fryer Blooming Onion Recipe
The first time I tried making one of these at home, it was a total disaster. I remember standing over a bubbling pot of oil, clutching a pair of tongs like a weapon, while my kitchen filled with that heavy, greasy fog that lingers for days.
The onion fell apart, the middle stayed raw, and I ended up with what looked like a soggy heap of fried shingles. It was a mess, honestly, and I almost gave up on the idea of ever recreating that fairground magic in my own house.
But then I got my air fryer, and everything changed. I realized that the secret wasn't the oil bath, it was the air movement. When you get those petals to stand up and face the heat directly, they don't just cook - they transform.
Now, when I pull a blossom out of the basket, the aroma of smoked paprika and toasted onion fills the room, and that first "crunch" as someone pulls a petal off is the most satisfying sound in the world.
We're going for that deep golden color and a coating that stays put instead of sliding off the moment you take a bite.
Why This Onion Frying Technique Delivers Results
Hydration Tension: Soaking the cut onion in ice water forces the cells to absorb moisture, which makes the petals curl outward and stand firm during the air frying process.
Starch Barrier: Mixing cornstarch with the flour creates a microscopic shield that prevents the onion's natural juices from making the breading soggy.
Convection Crisp: The air fryer uses high velocity fans to strip moisture from the surface of the batter instantly, creating a "shatter" effect similar to deep frying.
Protein Binding: Using buttermilk and eggs creates a thick, glue like wash that ensures the spices and flour stick to every single nook and cranny of the onion.
| Method | Time | Texture | Best For |
|---|---|---|---|
| Air Fryer | 25 minutes | Ultra crispy and light | Healthy weeknights |
| Traditional Oven | 40 minutes | Softer, roasted petals | Large batches |
| Deep Stovetop Fry | 10 minutes | Very greasy and heavy | Authentic "fair" style |
Choosing the right method depends on how much cleanup you want to deal with later. While the oven is okay, it often fails to get the center of the onion truly cooked before the tips burn. The air fryer hits that sweet spot where the whole thing cooks evenly because the heat can actually get down between the layers.
This is a huge win for anyone who hates biting into a raw, pungent onion core.
Analyzing the Components of Your Flour Coating
Understanding what each part of your dry mix does helps you avoid that powdery, raw flour taste that ruins so many homemade appetizers. It's not just about flavor, it's about the chemistry of the crunch.
| Ingredient | Science Role | Pro Secret |
|---|---|---|
| Cornstarch | Moisture Absorber | Prevents the flour from becoming gummy |
| Buttermilk | Acidic Tenderizer | Softens the onion fibers while acting as glue |
| Smoked Paprika | Color Catalyst | Provides that deep orange "fried" look without oil |
| Sweet Onion | Structural Base | High sugar content helps the edges caramelize |
Leveraging Cold Water Osmosis
When you drop the sliced onion into the 2 cups of ice water mixed with 1 tsp of kosher salt, you aren't just cleaning it. The cold shock causes the onion layers to pull apart naturally, like a flower blooming in slow motion. This is vital because if the petals are stuck together, the flour can't get inside.
If the flour doesn't get inside, you end up with a soggy, steamed center that is frankly disappointing.
Maximizing Surface Area for the Maillard Reaction
The air fryer thrives on surface area. By using the 1.5 cups of all purpose flour and 2 tbsp of cornstarch, you are creating millions of tiny ridges and bumps on the onion. As the hot air hits these bumps, they brown rapidly, creating that complex, toasted flavor we crave.
Using a fine mist of 1 tbsp of avocado oil halfway through ensures those starches fully gelatinize and turn crispy rather than staying dry and dusty.
Selecting the Best Ingredients for Your Blossom
You don't need a pantry full of exotic items to make this happen, but the quality of your onion is the make or-break factor here. I always look for the biggest, heaviest sweet onion I can find, usually around 330g.
A heavy onion means it's full of moisture, which will steam the inside of the petals while the outside crisps up.
For the Onion & Brine
- 1 large Sweet Onion (approx. 330g) Why this? Sweet varieties like Vidalia have lower sulfur and higher sugar.
- 2 cups Ice Water
- 1 tsp Kosher Salt
For the Seasoned Flour (The Dry Mix)
- 1.5 cups All Purpose Flour
- 2 tbsp Cornstarch Why this? This is the key to a light, crispy "shatter" texture.
- 2 tsp Smoked Paprika
- 1 tsp Garlic Powder
- 1 tsp Onion Powder
- 0.5 tsp Cayenne Pepper
- 1 tsp Black Pepper
For the Wet Wash (The Binder)
- 2 large Eggs
- 0.5 cup Buttermilk Why this? The thickness helps the flour adhere to the slick onion.
- 1 tsp Hot Sauce
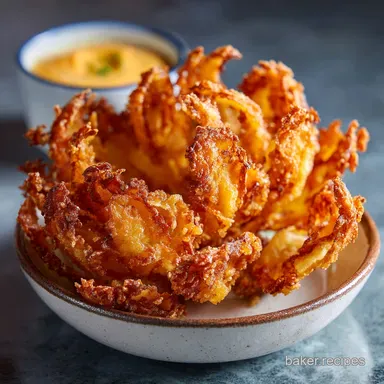
The "Texas Roadhouse" Style Dipping Sauce
- 0.5 cup Greek Yogurt Why this? Adds tang and creaminess with less fat than mayo.
- 2 tbsp Ketchup
- 1 tbsp Creamy Horseradish
- 1 tbsp Avocado Oil (misted on the onion later)
The Necessary Tools for a Seamless Prep

You don't need a specialized "onion blossom cutter" to make this work, though I know they sell them everywhere. A sharp chef's knife and a steady hand are actually better because you can control the thickness of the petals.
If you have an air fryer like a Ninja Foodi or a basket style unit, you're already halfway there.
- Chef's Knife: A sharp 8 inch blade is your best friend here.
- Two Large Bowls: One for the ice water soak and one for the flour dredging.
- Small Sifter or Spoon: Helpful for getting flour deep into the center.
- Air Fryer: Any standard basket or oven style air fryer works.
- Oil Mister: Avoid aerosol cans (like Pam), as they can damage the non stick coating of your basket. Use a refillable mister with avocado oil.
If you are looking for other ways to put your machine to work after this, you might enjoy my Air Fryer Chicken Perfection recipe, which uses a similar "dry to wet" coating method to get that incredible skin. It's a great way to practice your dredging skills before tackling the more intricate onion.
step-by-step Guide to a Flawless Result
Mastering the "Bloom" Cut
Start by peeling the 330g sweet onion and cutting off the top half inch, leaving the root end completely intact. Place the onion cut side down on your board. Make 4 vertical cuts (like a cross) from the top down to within a half inch of the root. Now, make additional cuts between those until you have 16 even sections.
Note: Don't cut through the root or the whole thing will fall apart.
Hydrating the Petals
Flip the onion over and gently use your fingers to fan out the petals. Submerge it in the 2 cups of ice water with 1 tsp salt for at least 15 minutes. This makes the onion firm and helps the "bloom" stay open. Remove and pat it dry very thoroughly with paper towels.
Note: Any lingering water will make the flour clump and turn into dough.
Preparing the Coatings
In one wide bowl, whisk the 1.5 cups flour, 2 tbsp cornstarch, and all the spices (paprika, garlic, onion powder, cayenne, black pepper). In a second bowl, whisk the 2 eggs, 0.5 cup buttermilk, and 1 tsp hot sauce. Note: The hot sauce doesn't make it spicy, it just adds a subtle depth of flavor.
Achieving the Double Dredge
Place the dried onion in the flour bowl. Use a spoon to pour flour over the top and into every single petal. Turn it upside down and shake off the excess. Now, dip it into the egg/buttermilk wash, ensuring every petal is coated. Finally, return it to the flour for a second coating.
Note: This double layering is why the crust doesn't fall off.
Executing the Air Fry
Preheat your air fryer to 350°F (180°C). Place the onion in the basket, petal side up. Mist the entire onion generously with avocado oil until no dry flour spots are visible.
Cook for 25 minutes until the edges are dark golden and the center is tender.
The Finishing Touches
While the onion cooks, whisk the 0.5 cup Greek yogurt, 2 tbsp ketchup, and 1 tbsp horseradish in a small bowl. Once the onion is finished, let it sit in the basket for 2 minutes. This helps the crust set so it doesn't crumble when you move it. Serve it warm with the chilled sauce in the center.
Simple Solutions for Common Kitchen Struggles
The biggest challenge with this dish is getting the flour to actually cook rather than staying white and powdery. If you see white spots halfway through cooking, your onion isn't ruined! It just needs a little extra attention with the oil mister.
Fixing Raw Flour Spots
If you pull the basket out and see patches of dry, white flour, it means the oil didn't reach that area. The starch needs fat to crisp up. Simply give those specific spots a focused spray of avocado oil and put it back in for 3-4 minutes.
Preventing the "Soggy Bottom"
Sometimes the base of the onion stays wet because it's sitting in its own steam. To avoid this, make sure your air fryer basket has good clearance underneath. If you're using a toaster oven style air fryer, put the onion on a wire rack over the baking sheet to allow the air to circle underneath the root.
| Problem | Root Cause | Solution |
|---|---|---|
| Petals falling off | Cut too deep into the root | Stop cuts 0.5 inch from the base |
| Bready or doughy texture | Didn't shake off excess flour | Tap the onion firmly after dredging |
| Burnt tips, raw center | Temperature was too high | Stick to 350°F (180°C) for even cooking |
Chef's Tip: If you really want that "wow" factor, use a small medicine cap or a round measuring spoon to core out a tiny circle in the very center of the onion before fanning the petals. This creates a perfect little "nest" for your sauce container to sit in.
Common Mistakes Checklist
- ✓ Forgot to preheat the air fryer (results in uneven cooking)
- ✓ Using a "moist" onion without drying it (leads to soggy breading)
- ✓ Crowding the basket with other items (blocks the necessary airflow)
- ✓ Skipping the second flour dredge (makes the coating too thin)
- ✓ Using too much oil (makes the petals heavy and limp)
Creative Ways to Customize Your Onion Flavor
While the classic Cajun style spice mix is a crowd pleaser, there are plenty of ways to change the vibe of this dish depending on what you're serving it with. If you're having a barbecue, you might want to lean into more smoky flavors.
| Original Ingredient | Substitute | Why It Works |
|---|---|---|
| All Purpose Flour | Almond Flour | Lower carb. Note: Crumb is much denser and won't be as "shattery" |
| Buttermilk | Plain Yogurt + Milk | Similar acidity. Note: Thickens the wash nicely |
| Avocado Oil | Ghee Spray | Higher smoke point and adds a rich, buttery flavor |
Creating a Zesty Cajun Twist
To really push the Texas Roadhouse vibe, double the cayenne and add a teaspoon of dried oregano and thyme to your flour mix. This gives it that "blackened" herb profile that pairs perfectly with a cold beer. If you're doing this, you might also want to try my Blooming Onion Sauce recipe, which is specifically balanced to handle those extra spices.
Making it gluten-free (Dietary Swap)
You can absolutely make this gluten-free by using a 1:1 gluten-free flour blend. I've found that blends containing rice flour actually crisp up even better than wheat flour in the air fryer. Just make sure the blend has xanthan gum in it, or the breading won't stick to the onion petals as they expand.
Best Practices for Storing and Reheating Leftovers
Storing a blooming onion is tricky because onions naturally release moisture over time. If you put it in a plastic bag, the crust will turn into a sponge within an hour. Instead, place any leftovers in a glass container but leave the lid slightly cracked to let any residual steam escape as it cools in the fridge.
It will stay good for about 2 days.
To reheat, do NOT use the microwave. It will turn your beautiful blossom into a rubbery mess. Put it back in the air fryer at 350°F (180°C) for 4-5 minutes. This will re crisp the coating and warm the center without overcooking the onion. For a zero waste tip, if the onion is too broken to reheat as a whole, chop up the leftover petals and toss them into a salad or use them as a crunchy topping for my Classic Irish Vegetable recipe. The seasoned breading adds a huge flavor boost to any soup.
Best Suggestions for Dipping and Enjoying Today
The way you present this is almost as important as the taste. I like to place the blossom on a large wooden board and put the dipping sauce in a small ramekin right in the center of the "flower." This is definitely a "hands on" food, so make sure you have plenty of napkins nearby.
Beyond the horseradish sauce, you can experiment with different pairings. A spicy ranch or even a honey mustard works surprisingly well with the sweetness of the fried onion. If you're serving this as part of a larger spread, it goes beautifully alongside steak or even grilled portobello mushrooms.
Don't be afraid to get messy with it. The best part of this Air Fryer Blooming Onion Recipe is that it encourages people to gather around and pull it apart petal by petal. It’s a social dish that brings a bit of that "restaurant luxury" to your dining room table without the heavy feeling of deep fried food.
Trust me, once you nail the cutting technique, you'll be making this for every party you host.

Recipe FAQs
How do you cook a blooming onion in an air fryer?
Preheat to 350°F (180°C) and mist heavily with oil. After cutting, soaking, and double dredging the onion, place it in the basket and spray the entire surface until it looks damp. Cook for about 25 minutes, checking halfway to ensure even browning.
What is the secret to a perfect blooming onion?
The secret is an ice water soak followed by a double dredge. Soaking the petals in ice water forces them to curl outward and firm up, while the double coating of seasoned flour ensures a thick, shatteringly crisp crust forms in the air fryer.
Is blooming onion better air-fried compared to deep frying?
Yes, air frying results in a lighter texture without the heavy residue. The intense, dry heat of convection cooks the onion core evenly while crisping the exterior without saturating the coating in oil.
What cannot be fried in an air fryer?
Liquids, batters that are too thin, or very wet ingredients should be avoided. Extremely thin batters run off, and items like loose cereal or very wet vegetables will just burn or steam rather than crisp up properly.
Why do the petals of my onion keep sticking together when I cook it?
You likely didn't cut deep enough or the onion wasn't thoroughly dried post soak. Ensure your cuts stop about half an inch from the root, and pat the entire surface dry before dredging; any lingering water dissolves the initial flour layer.
Should I use a very large onion for this recipe?
No, selecting a medium to large, dense onion (around 330g) works best for even cooking. A massive onion will often lead to burnt tips before the thick center becomes tender, so look for the heaviest one that still fits comfortably in your basket.
What pairs best with the zesty dipping sauce?
This savory appetizer pairs excellently with crunchy, savory sides. If you are serving this as a side dish, you should try making our The Homemade Green recipe for a complete comfort meal experience.
Air Fryer Blooming Onion
Ingredients:
Instructions:
Nutrition Facts:
| Calories | 238 kcal |
|---|---|
| Protein | 9.4 g |
| Fat | 7.2 g |
| Carbs | 33.4 g |
| Fiber | 2.6 g |
| Sugar | 5.1 g |
| Sodium | 645 mg |
