Bake Meyer Lemon Tart with Creamy Filling
- About Lazy Mary’s Lemon Tart Recipe
- Master the Art of Lazy Mary’s Lemon Tart
- The Magic Behind This Recipe
- Health & Nutrition Highlights
- Recipe at a Glance
- Essential Components Guide
- Foolproof Cooking Steps
- Professional Secrets
- Perfect Presentation
- Storage & Make-Ahead
- Creative Variations
- Expert FAQ Solutions
- 📝 Recipe Card
About Lazy Mary’s Lemon Tart Recipe
Lemon tart is a classic dessert that has delighted palates for centuries. With its origins traced back to medieval Europe, this delectable treat has evolved through time while retaining its bright and tangy essence.
The use of citrus in desserts became popular as lemons were introduced to various regions, particularly in France where the lemon tart truly flourished. As you dive into Lazy Mary’s Lemon Tart Recipe, you'll discover not just a dish but an embodiment of culinary history that brings together simplicity and sophistication.
One unique selling point of this recipe is its foolproof approach to creating a perfectly textured pastry crust accompanied by a luscious filling bursting with zesty flavor. This lemon tart stands out due to the use of Meyer lemons, known for their mild sweetness compared to regular lemons making it ideal for those who prefer subtler acidity without sacrificing taste.
The benefits are twofold: you enjoy a delightful dessert that's easy on the palate while impressing guests with your baking prowess.
Master the Art of Lazy Mary’s Lemon Tart
This iconic dessert boasts a rich culinary heritage rooted in French cuisine yet widely embraced across cultures today. Its fascinating origin story reflects how lemon tarts have been adapted over generations, resulting in numerous variations worldwide all celebrating the vibrant flavor profile that citrus fruits offer.
In modern times, lazy renditions like Lazy Mary's version have gained popularity among home bakers seeking delicious yet accessible desserts.
The cultural significance of lemon tarts cannot be understated; they often grace tables during festive gatherings or special occasions, symbolizing joy and celebration. Today, this timeless dessert continues capturing hearts (and taste buds) around the globe a testament to its enduring allure.
The Magic Behind This Recipe
What makes Lazy Mary’s Lemon Tart particularly enchanting are its unique flavor combinations that balance sweet and sour elements beautifully. By incorporating fresh Meyer lemons into the filling, each bite offers an explosion of citrus freshness complemented by the buttery richness from both the crust and filling itself.
Foolproof techniques outlined in this recipe ensure success every time it doesn't require advanced baking skills or specialized equipment! Whether you're new to baking or an experienced cook looking for something effortless yet impressive, this expert tested method provides clarity at each step from preparing dough to achieving optimal doneness when baking.
Time saving tips woven throughout will help streamline your preparation process without compromising quality; after all the goal is pleasure derived from both making and enjoying!
Health & Nutrition Highlights
When considering health aspects associated with desserts like Lazy Mary’s Lemon Tart, it's worth noting key nutritional benefits inherent within ingredients used here particularly from lemons which are packed full of vitamin C alongside essential minerals such as potassium.
These nutrients contribute positively towards immune function while promoting overall wellness!
For dietary considerations: while traditional recipes often rely heavily on refined sugars or heavy creams they can be modified based on individual preferences including gluten-free options if needed! Thus allowing more people access these delightful flavors regardless their lifestyle choices!
Wellness advantages also emerge thanks largely due natural ingredients incorporated herein providing balanced nutrition facts per serving; indulging occasionally doesn’t mean sacrificing health especially when made thoughtfully using whole food components!
Recipe at a Glance
Lazy Mary's Lemon Tart requires approximately 3 hours 40 minutes total preparation time allowing ample opportunity for flavors meld beautifully together during resting periods!
Skill level required remains beginner friendly ensuring anyone feels empowered make stunning results even without extensive experience under their belts!
This tantalizing tart serves about 8 people , making it perfect sharing among family friends alike or simply treating yourself after long day work week deserves some indulgence too!
Cost efficiency plays another positive role here given affordability common pantry staples included along seasonal produce sourced locally whenever possible yielding maximum satisfaction without breaking bank account either!
Dive into cooking adventure awaiting within these pages recreate beloved classic right kitchen comfort and relish every moment spent savoring incredible tastes found only inside homemade masterpiece unlike any other available stores today!
Essential Components Guide
Creating the perfect Lazy Mary’s Lemon Tart requires a careful selection of ingredients to ensure flavor and texture are at their best. Here’s a comprehensive guide to help you choose premium components for your delightful tart.
Premium Core Ingredients
1. All-Purpose Flour (1¾ cups plus 2 tablespoons)
When selecting all-purpose flour, aim for high-quality brands that offer consistent results. Look for flour with a protein content of around 10-12%, which provides the right balance of structure and tenderness in your pastry.
Store it in an airtight container in a cool, dry place to keep it fresh.
2. Powdered Sugar (⅓ cup plus 3 tablespoons)
Opt for finely sifted powdered sugar as it dissolves easily into the dough, giving your crust a smooth texture. Check the packaging for freshness dates and avoid any that appear clumpy or discolored.
Keep powdered sugar stored in an airtight container to prevent moisture absorption.
3. Vegetable Shortening (⅓ cup plus 3 tablespoons)
Choose high-quality vegetable shortening, preferably non-hydrogenated, which contributes to flakiness without altering the flavor significantly.
Always check labels for trans fats, aiming for options labeled as “zero grams trans fat.” Store it in a cool cupboard away from direct sunlight.
4. Unsalted Butter (2 tablespoons + ½ cup at room temperature)
Select unsalted butter with real cream listed as its primary ingredient; this ensures rich flavors without added saltiness interfering with your tart's taste profile.
For optimal performance, keep butter refrigerated but allow it to come to room temperature before using.
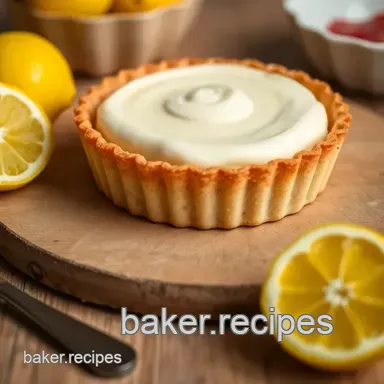
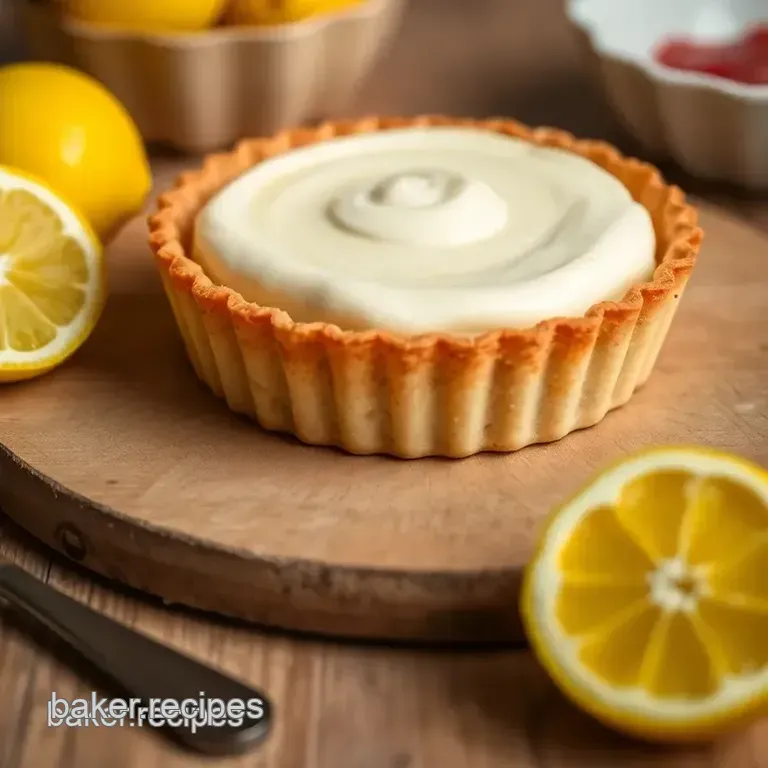
5. Meyer Lemon (1 large) or Calamondins (~5)
Meyer lemons are sweeter and less acidic than standard lemons; look for firm fruit with smooth skin free from blemishes or soft spots when choosing them from local markets or grocery stores.
Store them at room temperature if used within one week; otherwise, refrigerate them.
Signature Seasoning Blend
To elevate your lemon tart's flavor profile further, consider integrating these signature seasonings:
1. Pure Vanilla Extract (2 teaspoons)
Always opt for pure vanilla extract instead of imitation varieties; look out for deep color in liquid form and rich aroma indicating premium quality this enhances sweetness without overpowering citrus zest flavors.
2. Flavor Enhancers:
Consider adding subtle enhancements like lemon zest from additional Meyer lemons during filling preparation; this adds depth while emphasizing freshness a must have trick!
Smart Substitutions
If you're seeking alternatives due to dietary restrictions or unavailability:
1. Alternative Options:
For those who prefer gluten-free desserts: substitute regular all-purpose flour with almond flour or gluten-free blends tailored specifically for baking these provide unique textures while maintaining delicious flavors!
2. Dietary Swaps:
Replace granulated sugar with coconut sugar or honey which can yield different undertones but remain equally sweet!
3.Emergency Replacements:
In case you run out of ice water needed during dough prep? Replace it with cold sparkling water it helps create air pockets leading towards flaky pastries!
Kitchen Equipment Essentials
Gathering the right tools is essential when preparing Lazy Mary’s Lemon Tart efficiently:
Must Have Tools
- Food Processor: A powerful gadget is crucial when mixing dough quickly.
- Rolling Pin: Ensure even thickness while rolling out pastry.
- Tart Pan: Preferably one with removable bottoms aids easier serving solutions.
Recommended Appliances
An oven thermometer will ensure accurate temperatures throughout bake times! Invest in quality parchment paper designed explicitly against sticking issues too!
Helpful Gadgets
A set of measuring spoons/cups alongside silicone spatulas makes precise ingredient measurement/dough handling seamless throughout recipe execution don’t underestimate their value!
Home Alternatives
If lacking certain specialized equipment like food processors? Use traditional methods by hand mixing using bowls/fork until desired consistency achieved though labor intensive it yields similar results albeit longer time frames involved!
Pro Ingredient Tips
Enhance your cooking experience by employing these pro tips regarding core ingredient choices:
Selection Secrets
Seek organic produce whenever possible not only does this promote sustainable agriculture practices but often translates better overall taste profiles across recipes made utilizing said items too!
Quality Markers
Familiarize yourself identifying signs associated top-notch products: vibrant colors indicate ripeness/quality amongst fruits/herbs chosen as well as uniformity seen throughout flours/sugars selected within pantry staples required here today particularly noteworthy aspects!
Storage Solutions
Utilizing glass containers rather than plastic will prolong shelf life dramatically by minimizing exposure elements negatively affecting product integrity over time spent resting upon shelves waiting consumption opportunities arise next round meal preparations planned ahead thoughtfully intended use going forward
Moving forth thereafter anticipated gatherings/events coming...
By carefully selecting each component according to these guidelines combined harmoniously elevating culinary endeavors aimed completing Lazy Mary’s Lemon Tart recipe perfectly executed delightfully enjoyed sharing experiences beloved ones gathered closely surrounding tables filled laughter joyously experienced
Consistently echoed warmly imprinted minds hearts alike forever…
Foolproof Cooking Steps
Essential Preparation Steps
Before you begin, gather all your ingredients and tools. This is known as "mise en place," a French term that means everything in its place. For the Lazy Mary’s Lemon Tart, ensure you have all-purpose flour , powdered sugar , butter , vegetable shortening , and eggs ready to go.
You’ll also need a food processor for making the pastry and a blender for mixing the filling.
Next, focus on your prep techniques. Cube your chilled butter and shortening to facilitate blending with the dry ingredients. Chop the Meyer lemon into smaller pieces for easier blending later on.
Organize your workspace by clearing off countertops and aligning your tools this will help streamline your cooking process and keep distractions at bay.
Time management is crucial when preparing this tart. Allocate about 1 hour for chilling the dough, plus additional time for baking and cooling before serving. Plan ahead: if you'd like to serve it at a specific time, prepare it several hours in advance or even the day before.
Professional Cooking Method
Now that you're prepped, let’s dive into the step-by-step process of creating this exquisite tart. Start by making the pastry crust; blend together flour, powdered sugar, salt, butter, and shortening until it resembles coarse crumbs some pea-sized pieces are fine too.
Once blended, slowly add ice water while pulsing until just combined; don’t overwork it! Transfer onto a lightly floured surface and knead briefly into a disk shape about 1 inch thick before wrapping it in plastic wrap to chill in the refrigerator for an hour.
When you're ready to bake, roll out your dough on a floured surface until it's approximately 14 inches wide and ¼-inch thick. Gently press this into a fluted tart pan with removable bottom; remember to prick holes in the base with a fork to prevent bubbling during baking!
Preheat your oven to 375°F (190°C) while you freeze the crust for one hour a key step that prevents shrinkage during baking! Bake lined with parchment paper filled with weights or beans for about 25 minutes until golden brown around edges; then remove weights and bake another 10 minutes until set but not overly browned.
Reduce oven temperature down to 350°F (175°C) as you prepare filling by blending chopped lemons (seeds removed), granulated sugar, softened butter at room temperature, vanilla extract, and eggs until smooth about two minutes should do!
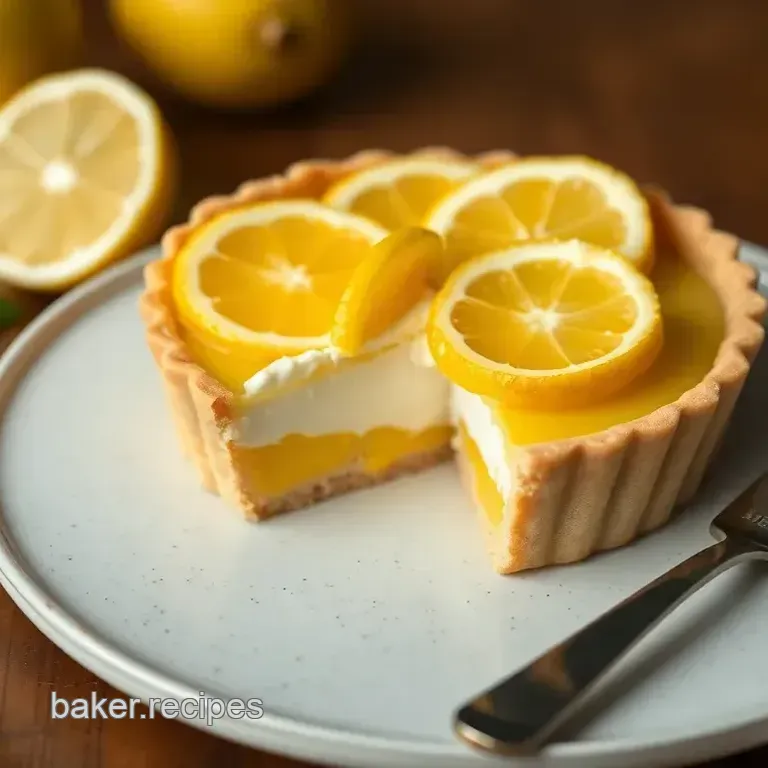
Pour this luscious mixture into your pre-baked shell carefully so as not to spill over edges this ensures clean presentation after baking! Bake again according precise timing: use approximately 40 minutes if using deeper pans or around 30 minutes if shallower pans are used.
The center should slightly jiggle without excessive movement when done a perfect indicator of doneness!
Expert Techniques
For professional results every home chef strives toward mastering critical steps is essential here! When rolling out dough ensure an even thickness throughout which helps achieve uniform cooking times across entire tart shell a thin edge could burn while thicker areas remain raw.
Temperature control is vital throughout each stage from melting fats perfectly without browning them during initial mixing phase through optimal baking temperatures achieved via preciseness offered by digital thermometers can greatly enhance final outcomes!
Quality checks post baking involve allowing tarts enough resting period prior slicing allows flavors meld beautifully together while preventing fillings from spilling everywhere upon cutting! Aim for three hours cooling time at room temperature minimum before serving this enhances texture too!
Success Strategies
Troubleshooting tips include ensuring proper ingredient temperatures: cold butter creates flaky layers whereas room temperature ingredients help emulsify mixes effectively yielding creamy textures desired in finished product!
Quality assurance comes down checking consistency during preparation stages especially filling mixture it should appear smooth without lumps whatsoever after blending thoroughly that's how we know we're on right track towards achieving perfection!
For perfect results guide take note of visual cues such as slight puffiness indicating baked goods nearing readiness alongside delightful aromas wafting through kitchen signifying deliciousness awaits beyond those oven doors once timer dings signaling completion efforts made earlier today finally pay off splendidly
Upon first bite taken afterwards savoringly enjoyed amongst family friends gathered round table celebrating success together warmly sharing moments created within culinary journey embarked upon unitedly!
Professional Secrets
Professional Insights
Creating the perfect Lemon Tart involves more than just following a recipe; it requires an understanding of techniques that elevate your dish. One key insight is to use fresh, high-quality ingredients, especially the Meyer lemons, as they provide a unique sweetness and aroma that enhances the flavor profile.
Expert Techniques
When preparing the pastry, remember to handle the dough minimally. Overworking can lead to a tough crust. Keep your ingredients cold this helps create a flaky texture that melts in your mouth. Additionally, blind baking with pie weights ensures an even bake without sogginess.
Kitchen Wisdom
Time management is crucial in achieving success with this tart. Allowing the crust to chill properly prevents shrinkage during baking while ensuring it maintains its shape. Also, letting the tart cool for several hours before slicing allows flavors to meld beautifully.
Success Guarantees
To ensure your lemon tart comes out perfectly every time, invest in quality kitchen tools like a good food processor and fluted tart pan with removable bottom for easy release. Following these professional tips guarantees impressive results that will wow friends and family alike!
Perfect Presentation
Plating Techniques
Presentation matters! For an elegant touch, slice your lemon tart into uniform pieces using a sharp knife dipped in hot water for clean cuts. Arrange slices on individual plates or on a large serving platter for sharing.
Garnish Ideas
Sprinkle generously with powdered sugar right before serving for visual appeal and added sweetness. Fresh mint leaves or edible flowers not only add color but also freshness that complements the citrusy flavor of the tart beautifully.
Serving Suggestions
Serve each slice accompanied by whipped cream or crème fraîche for richness consider adding zest from additional lemons as a refreshing twist! Pairing with fresh berries elevates both taste and presentation further.
Visual Appeal Tips
Brighten up your dessert table by using contrasting colors when garnishing a vibrant green mint against pale yellow lemon tart looks stunning! Use decorative plates or cake stands to enhance overall aesthetics during gatherings or celebrations.
Storage & make-ahead
Storage Guidelines
To maintain freshness after baking, store any leftover lemon tart wrapped tightly in plastic wrap or placed inside an airtight container in the refrigerator. This keeps it deliciously moist while preventing odors from mixing.
Preservation Methods
For longer preservation beyond four days chilled storage: consider freezing portions wrapped securely (like double wrapping) in foil followed by freezer bags labeled with dates for easy identification later!
Reheating Instructions
If you prefer warm tarts over chilled ones: reheat slices gently at low temperatures (around 300°F / 150°C) until warmed through not too long though to avoid drying them out!
Freshness Tips
Always check visually before consuming leftovers if there's discoloration or off smells present discard immediately! Keeping track of dates ensures maximum enjoyment throughout their lifespan without compromising quality!
Creative Variations
Flavor Adaptations
Explore different citrus fruits such as limes or oranges if you're feeling adventurous! Their unique flavors bring exciting twists while preserving core elements of classic recipes like this one experimentation leads toward delightful discoveries!
Dietary Modifications
For gluten-free options: substitute all-purpose flour with almond flour combined alongside nut-based fats instead of traditional butter/shortening providing distinctive textures yet retaining authentic tastes everyone loves!
Seasonal Twists
Incorporate seasonal ingredients such as berries during summer months blended into fillings creates refreshing variations worth trying out feel free mix-and-match based upon what’s available locally inspiring creativity within kitchens everywhere!
Regional Variations
Consider infusing local spices reflective of regional cuisines; cardamom adds warmth reminiscent Middle Eastern desserts whereas lavender introduces floral notes drawing inspiration European patisserie traditions creating sophisticated combinations sure impress guests anew each time served up fresh baked goods inspired
Globally around us today!
Expert FAQ Solutions
Common Concerns
Many home bakers worry about curdling eggs when making custard like fillings it’s best practice temper eggs slowly by introducing small amounts hot mixtures gradually ensuring smooth consistency throughout process avoiding lumps entirely risking ruined batches altogether otherwise crafted delicately along
Lines outlined here previously shared earlier together...
Expert Answers
If you encounter issues during preparation such as cracks forming post bake don’t fret simply cover them up artfully dusted powdered sugar hiding imperfections allowing elegance shine brighter than flaws ever could diminish confidence inside reassuring peace found knowing mistakes only serve teach valuable
Lessons learned along...
Troubleshooting Guide
In case things go awry don’t hesitate consult troubleshooting guides readily available online helping navigate common pitfalls encountered frequently experienced bakers seasoned novices alike tackling hurdles arise unexpectedly defeating odds overcoming adversity growing stronger wiser resilience tested
Repeatedly fortifying resolve deepen determination pushing boundaries expand creative...
Bake Meyer Lemon Tart With Creamy Filling