The Bills Best Mini Cheesecakes Crunchy Wafer Creamy Delight
- Elevating Tea-Time: Introducing the Ultimate Bills Wafer Mini Cheesecakes
- Why These Portion-Perfect Cheesecakes Steal the Show
- Assembling Your Bills Wafer Mini Cheesecake Components
- Essential Equipment for Perfect Portion Control
- The Step-by-Step Blueprint for Baking Success
- Pro-Hacks for Cheesecake Perfection and Longevity
- Recipe FAQs
- 📝 Recipe Card
Elevating Tea-Time: Introducing the Ultimate Bills Wafer Mini Cheesecakes
There is a certain joy that comes from perfectly portioned desserts. They banish the anxiety of slicing a magnificent, towering creation and wondering if you’ll end up with jagged edges.
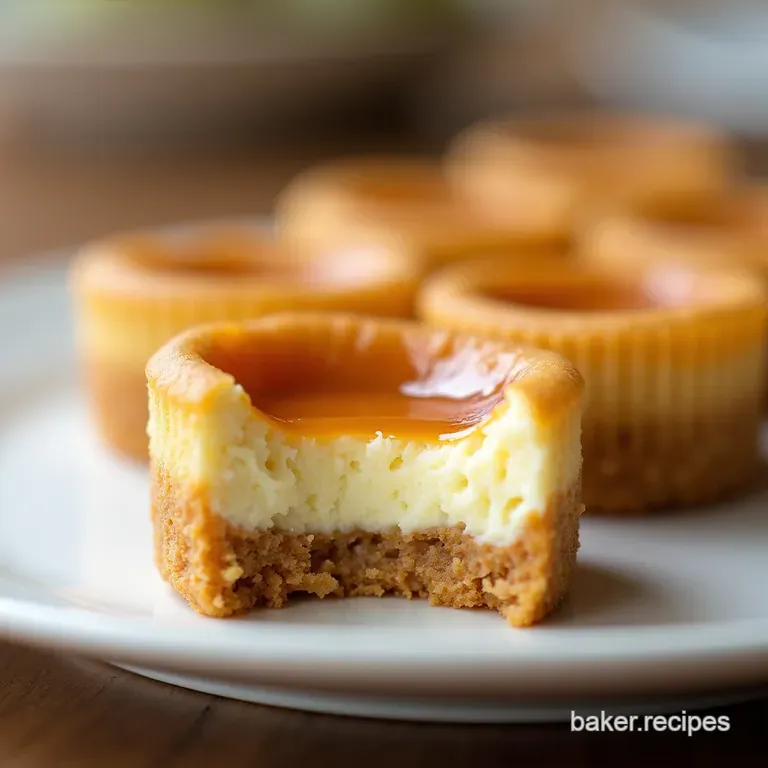
When it comes to afternoon indulgence, nothing quite captures that delightful balance of crunch and creaminess like a well executed individual cheesecake. Today, we are diving into the wonderful world of Bills Wafer Mini Cheesecakes , a recipe that marries the satisfying snap of a beloved British biscuit wafer with the rich, tangy heart of classic American cheesecake.
Forget wrestling with a giant springform pan; this method delivers charm, convenience, and unforgettable flavour in perfect 12-cup quantities.
Why These Portion Perfect Cheesecakes Steal the Show
The beauty of these mini treats lies in their clever shortcuts and inherent portability. They are deceptively simple yet deliver an elevated experience, making them ideal for everything from a quick weekday craving to the centerpiece of a sophisticated brunch spread.
A British Classic Meets American Creaminess
The concept here pays homage to simpler times. We are bypassing the traditional crushed digestive biscuit base which, while lovely, requires extra effort and instead utilizing ready-made, crisp vanilla wafers as the foundation.
This immediately introduces a lighter, slightly sweeter, and incredibly precise crunch factor. Layered beneath this familiar texture is the dense, velvety filling characteristic of a New York style bake, creating a sophisticated textural dialogue that keeps every bite interesting.
Bypassing the Big Bake: Instant Gratification in Miniature Form
The sheer convenience factor cannot be overstated. Because we are working with individual liners in a standard muffin tin, baking times are significantly reduced compared to a full 9 inch cake, which can sometimes take over an hour. This means less waiting and more enjoying!
On top of that,, clean-up is dramatically simplified; once cooled, the paper liners peel away, leaving behind perfectly formed, neat little desserts ready for serving. These Bills Wafer Mini Cheesecakes offer maximum reward for minimum fuss.
The Secret to That Irresistible Crunch Factor
The foundation of any great cheesecake is the crust, and here, the wafer crumb truly shines. Unlike standard cookie crumbs, wafers tend to be drier and more porous, requiring just the right amount of melted butter to bind them.
When compacted correctly, they bake into a firm, slightly salty platform that stands up beautifully against the creamy topping without becoming soggy during the necessary chilling process. This carefully calibrated base is essential for the overall structural integrity and textural harmony of the final product.
Assembling Your Bills Wafer Mini Cheesecake Components

To achieve success with these indulgent bites, organization is key. We divide the process into two main material groups: the wafer crust components and the rich cheesecake filling ingredients.
For the crust, you will need approximately 1 ½ cups of finely crushed plain or sweet vanilla wafers (about 150g), bound together with 6 tablespoons of melted unsalted butter and a small addition of 2 tablespoons of granulated sugar and a ¼ teaspoon of salt to enhance the flavour profile.
Moving to the filling, the standard dairy foundation requires 16 ounces (two blocks) of full fat cream cheese, which absolutely must be softened to room temperature to ensure a lump free mixture.
This richness is balanced by ¾ cup of fine white granulated sugar, two large eggs (also best at room temperature), ¼ cup of heavy cream (or double cream for extra decadence), 1 teaspoon of quality vanilla extract, and a vital 1 teaspoon of fresh lemon juice to introduce a necessary, bright tang.
Related Recipes Worth Trying
- Foolproof Mini Cheesecakes with Oreo Crust Recipe — These mini cheesecakes with Oreo crust are wonderfully easy to makeno springform pan drama Enjoy the perfect rich creamy bite every time Get the recipe
- Foolproof NoBake Nilla Wafer Mini Cheesecakes Recipe — These no bake mini cheesecakes with a Nilla Wafer crust are pure nostalgia Creamy tangy and perfectly portioned individual cheesecakes Get the easy recipe
- Foolproof Mini Vanilla Bean Cheesecakes Recipe No Cracks — Learn how to bake perfect individual Mini Vanilla Cheesecakes with a crisp biscuit base This simple recipe avoids water baths for truly elegant mini...
Essential Equipment for Perfect Portion Control
While this recipe avoids complex tools, having the right basics ensures uniformity across all twelve servings. The primary piece of equipment is a standard 12-cup muffin tin. Crucially, you must use paper or silicone liners; these are not optional, as they facilitate the clean removal of the delicate mini cheesecakes later on.
You will also rely heavily on an electric mixer, either a handheld or stand mixer, to properly aerate the cream cheese mixture. A rubber spatula is indispensable for folding ingredients gently, and a small glass or the back of a measuring spoon will serve as your crust compactor.
Cream Cheese Foundation: Required Dairy Selections
Remember, the texture of your filling is directly proportional to the temperature of your cream cheese. Ensure those 16 ounces are genuinely soft yielding easily to pressure but not melted or greasy.
The use of full fat cream cheese (not low-fat versions) is critical, as the fat content provides the necessary body and luxurious mouthfeel that defines a great cheesecake experience.
The Star Ingredient: Sourcing the Perfect Wafer Layers
The choice of wafer is where you can lean into the "Bills" inspiration. Look for vanilla sandwich wafers or similar crisp, light biscuits. The goal is to process them until they form fine crumbs, resembling coarse sand. If you use larger chunks, the base will be uneven and prone to breaking apart during handling.
Fine crumbs ensure a dense, uniform crust that complements the smooth filling above it perfectly.
Sweeteners and Zest: Balancing the Tangy Filling
While sugar provides necessary sweetness, the true flavour brilliance comes from careful balancing. The simple inclusion of 1 teaspoon of vanilla extract offers depth, but it is the fresh lemon juice that truly cuts through the richness of the dairy.
This hint of acidity prevents the dessert from tasting flat or overly heavy, ensuring that these Bills Wafer Mini Cheesecakes remain bright and compelling from the first bite to the last.
The step-by-step Blueprint for Baking Success
Baking these miniatures is a satisfying process that moves quickly once the ingredients are gathered. We begin by establishing the base, moving to the filling preparation, and concluding with the crucial cooling phases that determine the final aesthetic quality of your treats.
Setting the Scene: Achieving Optimal Crust Consistency
Preheat your oven to 325° F ( 160° C) and prepare your 12-cup muffin tin by lining it with the paper or silicone cups. This step needs to be done first so that the crust has time to chill while you prepare the filling, firming up the butter.
Preparing the Wafer Base: No-Fuss Crumb Creation
Combine your finely crushed wafers, melted butter, 2 tablespoons of sugar, and the pinch of salt in a medium bowl. Mix this thoroughly with a fork until every crumb is coated in butter and the mixture clumps slightly when pressed.
Whipping Up the Velvety Cheesecake Batter
In a separate, larger bowl, use your electric mixer to beat the room temperature cream cheese until it is completely smooth and fluffy this might take two full minutes. Gradually add the ¾ cup of sugar and beat until lightened. Incorporate the heavy cream, vanilla, and lemon juice.
Finally, add the two eggs one at a time, mixing only until the last streaks of yolk disappear. Avoid over beating after the eggs are introduced to prevent air pockets that cause cracking.
Baking Times and Testing for the Ultimate Set
Retrieve the chilled crusts. Press about 1 ½ tablespoons of the wafer mixture firmly into the bottom of each liner, ensuring it is compact and level. Then, distribute the creamy batter evenly, filling each cup approximately three quarters full. Bake for 20 to 25 minutes.
The cheesecakes are done when the edges are just starting to set and look slightly golden, but the very centre still retains a noticeable, gentle wobble.
The Crucial Chill: Perfecting Your Bills Wafer Mini Cheesecakes
The transition from oven heat to room temperature must be gradual. Immediately turn off the oven, prop the door open slightly using a wooden spoon, and allow the cheesecakes to rest inside for 30 minutes. This slow cooling process prevents thermal shock.
After this rest, remove them to a wire rack to cool completely at room temperature. Only once fully cool should they be transferred to the refrigerator to chill for a minimum of four hours, though overnight yields the best texture.
Pro-Hacks for Cheesecake Perfection and Longevity
Achieving the textbook smooth top is often the biggest challenge in baking cheesecake, but these minis simplify things considerably.
Storage Secrets: Keeping Your Minis Fresh for Days
Once fully chilled, these treats keep wonderfully. Store them in an airtight container in the refrigerator. They remain at their peak texture for three to four days. For slightly longer storage (up to a month), they can be frozen once fully set; ensure they are placed in an airtight, freezer safe container, perhaps separating layers with parchment paper to prevent sticking.
Thaw overnight in the refrigerator before serving.
Troubleshooting: Avoiding Cracks and Soggy Bases
Cracks usually result from over mixing the eggs or drastic temperature changes. Stick strictly to the slow, in-oven cooling method described above. Soggy bases are usually caused by insufficient binding in the crust; always press that wafer mixture down firmly!
If you are worried about moisture, you can lightly brush the chilled wafer base with a teaspoon of melted white chocolate before adding the filling, creating a barrier layer.
Creative Twists: Beyond the Classic Vanilla Flavor Profile
While the classic is divine, you can easily riff on this recipe. Consider adding finely grated orange zest to the filling for a bright, citrus note, or dissolving a teaspoon of high-quality instant espresso powder into the heavy cream before mixing.
Another superb option is swirling a teaspoon of high-quality fruit preserve (like raspberry or passionfruit) into the top of the batter before baking for a beautiful marble effect in your Bills Wafer Mini Cheesecakes .
Scaling the Recipe: Adjusting Quantities for Large Gatherings
Since the ratio of ingredients is linear, scaling is straightforward. If you need to serve 24 guests, simply double all ingredient measurements. Keep in mind that baking time might increase slightly if your oven is very crowded, so check the centres carefully.
For extremely large batches, it is often easier to bake in two successive rounds to ensure even heat distribution.
Strawberry Topping Ideas for an Extra Burst of Flavor
A vibrant, fresh topping cuts through the richness beautifully. For the best result, skip overly sweet canned sauces. Instead, create a quick strawberry coulis by simmering fresh or frozen strawberries with a tablespoon of sugar and a squeeze of lemon until slightly thickened, then strain for a smooth finish.
Alternatively, simply slice fresh, ripe strawberries and arrange them artfully on top of the chilled cheesecakes just before serving, perhaps adding a tiny mint leaf for contrast.

Recipe FAQs
Why are my Bills Wafer Mini Cheesecakes cracking on top? I thought I followed the steps!
Ah, the dreaded crack! More often than not, this is due to a rapid temperature change or overmixing the eggs. Make sure you’re letting them cool down gently in the turned off oven with the door propped open that slow transition is key to keeping them smooth.
Also, remember not to beat the batter too much once the eggs are in, or you’ll whip in too much air.
Can I make these Bills Wafer Mini Cheesecakes ahead of time for a party?
Absolutely, these are brilliant for making ahead; they actually taste better after a good chill! You should chill them for a minimum of 4 hours, but overnight is truly best for the texture to fully set up.
They store wonderfully in an airtight container in the fridge for up to four days, meaning less stress on the day of your gathering.
My wafer crust seems too crumbly when I try to press it in; what am I doing wrong?
That’s usually down to not enough binding agent or not pressing hard enough! Ensure your butter is fully melted, not just soft, and really compact that mixture into the bottom of the liners use the base of a measuring cup for serious pressure.
Chilling the crust thoroughly before filling also helps lock everything in place.
What’s the best way to serve these mini cheesecakes, and what if I don’t like lemon?
For serving, a tiny dollop of fresh whipped cream or a sharp raspberry coulis cuts through the richness perfectly ideal for an afternoon tea spread. If you’re skipping the lemon juice, you can replace it with an extra splash of vanilla extract or use the zest of half an orange for a different citrus note.
Do I really need to use paper liners, or can I just grease the muffin tin?
For these mini versions, liners are highly recommended it’s the difference between an easy lift out and a sticky mess! Because the wafer base is delicate and the sides are tall, liners give you something sturdy to hold onto when removing them.
Silicone liners are especially good if you have them, as they peel away beautifully.
Bills Wafer Mini Cheesecakes

Ingredients:
Instructions:
Nutrition Facts:
| Calories | 273 kcal |
|---|---|
| Protein | 1.7 g |
| Fat | 9.6 g |
| Carbs | 24.2 g |
| Fiber | 0.4 g |
| Sodium | 71 mg |
