Apple Pie Perfection: the Chefs Flaky Pastry Recipe for a Proper Pudding
- The Chef's Perfect Flaky Pastry Apple Pie: A Recipe Overview
- Unlocking the Secrets of a Non-Soggy Bottom Apple Pie
- Essential Ingredients and Artisan Substitutions for Your Apple Pie
- Master the Method: Step-by-Step Apple Pie Instructions
- Expert Chef's Tips and Avoiding Common Pie Pitfalls
- Storing, Freezing, and Reheating Your Baked Apple Pie
- Recipe FAQs
- 📝 Recipe Card
The Chef's Perfect Flaky Pastry Apple Pie: A Recipe Overview
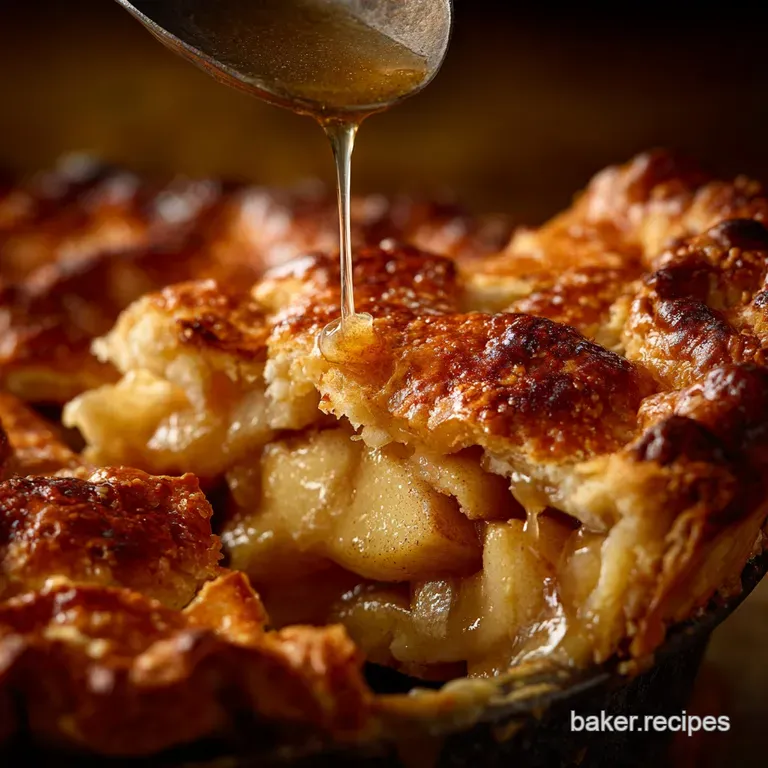
When you pull this beauty from the oven, the smell alone is enough to stop traffic. It’s that perfect, deep, spiced scent of caramelized apples and pure butter crust warm, comforting, and totally irresistible. The flaky top shatters under your fork, giving way to the molten, cinnamon laced filling inside.
Seriously, few things beat it.
I know what you're thinking: pie is hard. Pie is fussy. But trust me, once you master the simple technique of keeping everything ridiculously cold, this recipe is actually a lifesaver. It uses humble ingredients, it scales easily for a crowd, and the satisfaction of nailing that golden, non-soggy bottom is immense.
This is the apple pie recipe I rely on, especially when I need to look like a baking genius without the actual stress.
We are going to walk through the process like we're side-by-side in the kitchen, tackling the common pitfalls that ruin otherwise decent pies. Forget the complex, overly sweet fillings you find in the supermarket; this is proper, homemade [Best Homemade Apple Pie] alchemy.
Let’s get that butter chilling and crack on.
Unlocking the Secrets of a Non-Soggy Bottom Apple Pie
The secret to a truly amazing apple pie isn’t necessarily the apples, although those matter a lot. It’s all about thermal dynamics and fat distribution. We are deliberately incorporating large pieces of cold butter into the dough, which melt and release steam during the bake, creating those incredible, separated layers.
Temperature is king.
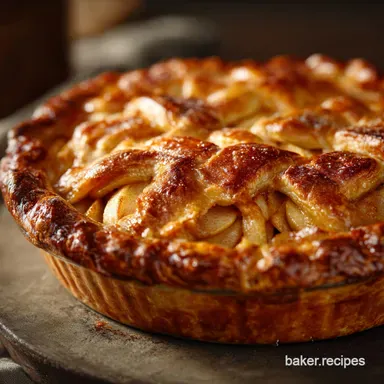
The Legacy of the Classic Double Crust Design
The double crust design is classic for a reason. It holds the steam and spices in, intensifying the aroma, and creates a robust vessel that can handle the weight of a heavy, juicy fruit filling.
Sure, a crumble top is nice, but when you want that quintessential, high ranking bakery look, nothing beats a properly crimped double crust. It adds structural integrity to the whole bake.
Essential Equipment Checklist for Perfect Pastry
You don't need fancy gadgets, but a couple of tools make this easier. A good, heavy rolling pin is essential for achieving an even thickness, preventing sad, thin spots. I always, always use a solid 9 inch deep dish plate, because who wants a shallow slice of pie?
Crucially, have a heavy baking sheet preheating in the oven. This shocks the bottom crust immediately, making the dreaded soggy bottom almost impossible.
Mise en Place: Preparation for Stress Free Baking
I once tried to make a pie after working all day, pulling ingredients out as I needed them. Total chaos! Prepping is half the battle, so slice your apples and toss them in the lemon juice first . Cut your butter into cubes and stash it back in the fridge.
Having everything ready to go means less time handling the dough and keeping the temperature where it needs to be.
The Magic of Cold Butter: Developing the Pâte Brisée Layers
We're making a pâte brisée , a very French term for a rich, short pastry. The key is stopping when the mixture looks shaggy, with pieces of butter still visible the size of peas or even walnuts.
When that cold fat hits the heat, the water inside turns instantly to steam, forcing apart the layers of dough. This makes for a perfect [Apple Pie Crust Recipe] that simply melts in your mouth.
The Science of Steam Vents: Ensuring Structural Integrity
You absolutely must cut vents into the top crust. If you skip this, the steam from the cooking apples builds up pressure, and you’ll end up with an exploding pie or, at the very least, a puffy, unevenly baked dome. Vents allow that steam to escape, ensuring the filling reduces and thickens properly, and guaranteeing your pastry stays flat and crisp. It's a simple, mandatory step in any proper pie construction, whether it's fruit or a savory dish, like my Sunday Scraps Shepherds Pie Master Leftover Cooking Techniques .
Filling Integrity: Achieving Ideal Consistency and Spice Balance
A great [Apple Pie Filling Recipe] is a balance of sweet, tart, and spiced. The apples must be firm enough to hold their shape, and the sugar must be countered by lemon juice and plenty of cinnamon and nutmeg.
We use a small amount of flour right in the filling to absorb the natural juices that release as the fruit cooks. This is the simple trick that ensures you have a sliceable pie, not apple soup.
Essential Ingredients and Artisan Substitutions for Your Apple Pie

This is where we talk brass tacks. While this recipe is incredibly forgiving, starting with quality ingredients will always give you a superior pie.
Selecting the Best Baking Apples: Firmness, Flavor, and Acidity
Don't use soft eating apples! They turn to mush. The best pies use a blend. I prefer two-thirds tart Granny Smith (for structure and tang) mixed with one-third sweeter, firmer apples like Honeycrisp or Braeburn (for depth of flavor).
| Ingredient | Why it Matters | Viable Substitute |
|---|---|---|
| Granny Smith Apples | High acidity, holds structure | Firm, underripe Jonagold or Bramley apples. |
| All-Purpose Flour | Structure and gluten development | Bread flour (use less), or a 50/50 mix with rice flour for a very tender crust. |
Understanding the Role of Flour and Fat in Flaky Pastry
The flour provides the structure, but the fat delivers the flakiness. I am a butter purist because I love that rich, unmistakable flavor. However, if you want maximum flakiness, you have options.
| Ingredient | Substitute | Notes on Usage |
|---|---|---|
| Unsalted Butter | Solid Vegetable Shortening (Crisco) | Shortening produces flakier layers but lacks flavor. Use a pinch more salt in the dough. |
| Ice Water | Ice cold milk (for richer dough) | Use sparingly; milk contains fat/protein that slightly changes gluten structure. |
| Apple Cider Vinegar | Vodka | The alcohol evaporates, preventing gluten from seizing up, leading to a much more tender crust. Use the exact same volume. |
The Quintessential Spice Blend: Cinnamon, Nutmeg, and Allspice Depth
Cinnamon is non-negotiable for a classic [Amazing Homemade Apple Pie]. But a good pie needs layers. I swear by freshly grated nutmeg (it makes a huge difference!) and just a hint of allspice.
Chef's Note: Don't skip the salt in the filling! It sounds weird, but a tiny pinch of fine sea salt enhances the sweet, spiced apple flavors dramatically, pulling everything into perfect focus.
Sweetener Science: Granulated Sugar vs. Thickening Agents
We use a mix of granulated white sugar and light brown sugar; the brown sugar adds moisture and a subtle molasses note that complements the spices perfectly. For the thickening agent, I prefer flour for a slightly opaque, old-fashioned look, but cornstarch works brilliantly too.
| Ingredient | Substitute | Notes on Usage |
|---|---|---|
| All-Purpose Flour (Thickener) | Corn Starch (Cornflour) | Use 2 tablespoons instead of 3 for the same thickening power. It results in a clearer, gel-like filling. |
| Brown Sugar | Pure Maple Syrup or Honey | Reduce added liquid in the dough slightly if using liquid sweeteners, as they introduce extra moisture. |
Master the Method: step-by-step Apple Pie Instructions
This is the exact method I use every time. Follow the temperature cues, and you'll nail the perfect [Apple Pie Recipe Easy] crust.
Phase 1: Crafting and Chilling the Flaky Butter Pastry
- Dry Mix: Whisk the flour, sugar, and salt together in a very large, chilled bowl.
- Cut in Fat: Add the very cold, cubed butter. Use a pastry blender or your fingers (working quickly!) to cut the butter into the flour until it resembles coarse crumbs mixed with chunks of butter the size of peas.
- Add Liquid: Drizzle in the ice water and the vinegar. Use a fork to mix gently, just until the dough comes together in shaggy clumps. If it’s too dry, add a few drops more water, but stop immediately once it holds a shape.
- Chill Time: Divide the dough into two discs (one slightly larger for the bottom crust). Wrap tightly and chill in the fridge for a minimum of 30 minutes, but ideally 1 hour. This allows the gluten to relax and the butter to firm up again.
Phase 2: Preparing the Apple Filling and Managing Moisture
- Apple Prep: Peel, core, and slice your apples into uniform ¼-inch pieces. Place them straight into a big bowl.
- Toss: Add both sugars, the flour, all your beautiful spices, the salt, and the lemon juice. Toss gently but thoroughly until every slice is coated in the thick, wet spice mix.
- Rest: Let the filling sit for 10– 15 minutes. This is critical it pulls excess moisture out of the apples before they go into the pie, which is our defense against the soggy bottom.
Phase 3: Assembly, Crimping, and Achieving Ideal Ventilation
- Roll the Base: Roll out the slightly larger dough disc on a lightly floured surface into a 12 inch circle. Carefully transfer it to your 9 inch pie plate. Trim the edges, leaving a 1 inch overhang.
- Fill: Pile the apples high, mounding them slightly in the center since they will collapse during baking.
- Top Crust: Roll out the second dough disc. Lay it over the apples. Cut 4 5 generous steam vents in the center.
- Seal and Crimp: Trim the top crust overhang, leaving about an inch. Fold the top crust under the bottom crust edge, then crimp them tightly together using your thumb and forefinger to seal it. A tight seal prevents the filling from escaping.
Phase 4: The Two-Stage Baking Process for Golden Perfection
- Preheat Hot: Preheat your oven to 425°F (220°C) with the baking sheet placed on the lowest rack.
- Wash and Sugar: Brush the entire top crust with the egg wash (egg yolk + cream) and sprinkle generously with granulated sugar. This gives you that gorgeous, shiny, crunchy crust.
- The Shock Bake: Place the pie directly onto the preheated baking sheet and bake at 425°F (220°C) for 15 minutes. This shock of high heat sets the crust immediately.
- Reduce and Finish: Reduce the oven temperature to 375°F (190°C). Continue baking for 50– 60 minutes, or until the juices are visibly bubbling thickly through the vents and the crust is deep golden brown. If the edges are browning too fast, cover them with small strips of aluminum foil.
- Patience Time: Transfer the pie to a wire rack. Seriously, let it cool for at least two hours. This resting time allows the starches in the filling to fully set. Cutting it early guarantees a runny disaster.
Expert Chef's Tips and Avoiding Common Pie Pitfalls
Troubleshooting the Crust: Preventing Edge Burning
It's common for pie edges to brown long before the center crust is cooked. If you see them getting too dark around the 30 minute mark, simply create a foil ring (a collar!) and gently place it around the edge of the pie.
This shields the pastry from the direct heat while allowing the rest of the pie to finish baking properly.
The 'Soggy Bottom' Cure: Utilizing the Baking Stone
I already mentioned the preheated baking sheet, but let me reiterate: it’s the key to a non-soggy bottom. If you want next level protection, use a proper baking stone instead of a sheet pan. The radiant heat from the stone is intense and immediate, ensuring your bottom crust starts to crisp up right away.
A Guide to Freezing Unbaked Pie Dough
You can absolutely freeze pie dough! Wrap the chilled, unrolled discs tightly in two layers of plastic wrap, then place them in a freezer bag. They keep perfectly for up to three months. Thaw them overnight in the fridge before rolling.
Storing, Freezing, and Reheating Your Baked Apple Pie
Optimal Storage for Leftovers (Refrigeration Timing)
Because of the high sugar and spice content, a fully baked [Amazing Homemade Apple Pie] can generally sit covered at cool room temperature (below 70°F) for up to two days. If you still have leftovers after that, wrap the slices tightly and refrigerate for up to four days.
The Egg Wash Dilemma: Shine vs. Texture
Egg washes offer that beautiful golden sheen, but you have choices.
- Egg Yolk + Cream: Maximum shine, deep golden color.
- Whole Egg + Water: Good shine, medium color.
- Milk or Cream only: Less shine, softer texture, more rustic look.
Classic Pairings: Vanilla Ice Cream and Sharp Cheddar
You simply must serve warm pie with something cold! Vanilla ice cream is the obvious classic, melting into the spiced apples beautifully. But don't knock the savory contrast until you try it: a thin slice of cold, sharp mature cheddar cheese alongside the pie is a traditional New England pairing that is unexpectedly brilliant. If you want another cozy dessert option, you might also love making a rich, decadent loaf of The Best Apple Pecan Bread Pudding Recipe with MapleBourbon Drizzle .

Recipe FAQs
How do I prevent a soggy bottom crust?
A soggy bottom is often caused by excess moisture dripping from the filling during baking. Ensure you par-bake (blind bake) the bottom crust for 10-15 minutes before adding the filling, and consider brushing the base lightly with an egg white wash to create a moisture barrier.
Allowing the pie to cool completely for several hours is also crucial, as the filling continues to set during this time.
What are the best types of apples to use for baking a classic pie?
The ideal pie apple holds its structure and offers a necessary balance of tartness and sweetness. Granny Smith apples are the preferred base for structure, but for better flavor complexity, blend them with sweet varieties like Honeycrisp, Gala, or Mutsu.
Avoid soft apples such as Red Delicious, as they will turn into an undesirable mush during the long bake time.
Why did my pie crust turn out tough instead of flaky?
A tough crust is typically caused by overworking the dough, which encourages excessive gluten development. Ensure your butter is extremely cold, handle the dough as little as possible, and use ice water when mixing to inhibit gluten formation.
Resting the dough for at least 30 minutes in the refrigerator before rolling also relaxes the gluten strands, promoting tenderness and flakiness.
How long can I store my baked apple pie?
Baked apple pie can generally be stored at room temperature, loosely covered, for up to two days, especially due to its high sugar content acting as a preservative. If you prefer to refrigerate it, wrap the pie tightly in foil or plastic wrap, and it will keep for up to four days.
Always allow the pie to come to room temperature before serving for the best flavor and texture.
Can I freeze the pie, and is it better frozen baked or unbaked?
You can freeze the pie successfully either way, but freezing it unbaked often yields a fresher result with a superior crust upon baking. Wrap the unbaked pie tightly in plastic wrap and then foil, freezing for up to 3 months; when ready to bake, place directly into a preheated oven without thawing, adding about 20-30 minutes to the total bake time.
My apple filling seems too runny after baking; how can I fix that next time?
A runny filling suggests that the starch or thickener (cornstarch, flour, or tapioca) did not fully activate or that too much moisture was released by the fruit. Ensure you are cooking the pie long enough for the center temperature to reach the activation point of the starch, usually above 200°F (93°C).
Most importantly, the filling continues to set as it cools, so resist the urge to slice the pie until it has completely cooled for 4-6 hours.
Can this classic double crust recipe be adapted to be completely vegan?
Yes, this recipe is easily convertible by replacing the dairy butter in the crust with a high-quality, solid vegetable shortening or vegan block butter substitute. If the recipe calls for an egg wash to achieve a golden sheen, substitute it with a brush of plant based milk (like oat or almond) mixed with a tiny pinch of sugar.
The filling is naturally vegan, assuming you are using standard sugar and spices.
Chefs Perfect Flaky Apple Pie
Ingredients:
Instructions:
Nutrition Facts:
| Calories | 420 kcal |
|---|---|
| Protein | 4.0 g |
| Fat | 18.0 g |
| Carbs | 63.0 g |
