Pumpkin Pie: the Chefs Classic Recipe with Flaky Crust and Spiced Filling
- The Chef’s Classic Flaky-Crust Pumpkin Pie: Deeply Spiced and Dangerously Smooth
- Why This Recipe Works: The Science of Smooth Custard and Flaky Pastry
- Essential Ingredients and Expert Substitutions for Your Pie
- Prepping Your Pastry: Building the Flaky all-butter Shortcrust
- Step-by-Step Baking Guide: Achieving the Ideal Pumpkin Pie
- The Critical Pre-Bake Steps for Crust and Filling
- Mastering Your Bake: Chef’s Tips and Troubleshooting Common Pumpkin Pie Mistakes
- Storing Your Homemade Pumpkin Pie Safely and Effectively
- Presentation and Pairing: Elevated Serving Suggestions
- Recipe FAQs
- 📝 Recipe Card
The Chef’s Classic Flaky Crust Pumpkin Pie: Deeply Spiced and Dangerously Smooth
When that first chilly breeze hits, nothing in the kitchen smells better than baking spices warming up a rich custard. That perfect intersection of creamy texture and razor sharp, flaky crust is truly addictive. It’s the aroma of cinnamon, nutmeg, and ginger that draws everyone right into the kitchen, right?
This isn’t some finicky, complicated dessert you save for formal events; this Homemade Pumpkin Pie is your holiday lifesaver. The filling requires about five minutes of whisking, and the ingredients are inexpensive, making it the best high impact, low-effort holiday dish.
Forget those store-bought monstrosities that taste like cardboard and sadness.
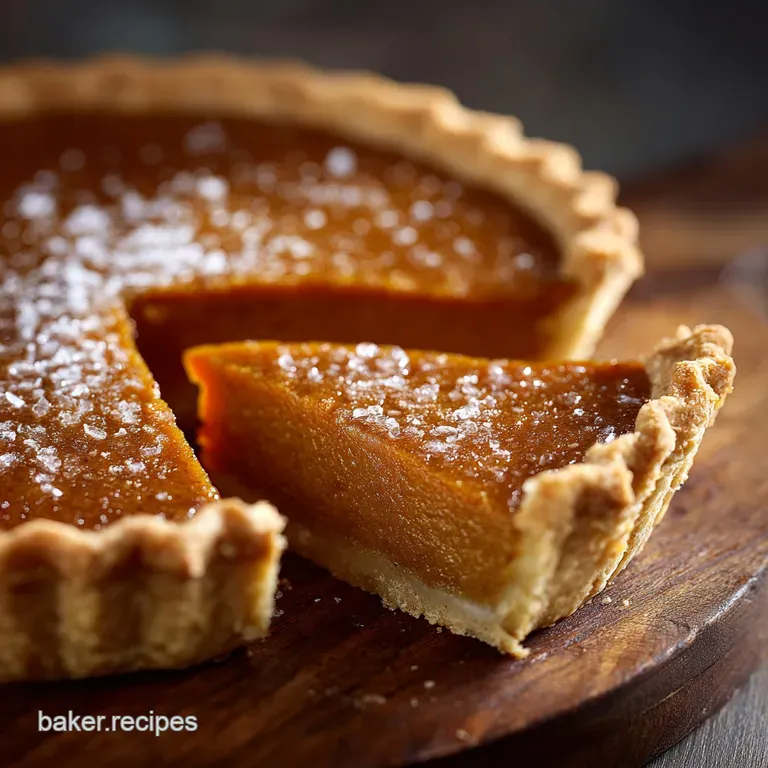
We’re making a truly superior pumpkin pie filling recipe today, focusing on texture just as much as flavour. Trust me, learning the secrets to a crack free top and a genuinely non-soggy bottom will change your baking life forever. Let’s get this holiday staple sorted!
Why This Recipe Works: The Science of Smooth Custard and Flaky Pastry
We are aiming for a silky, almost impossibly smooth interior encased in a buttery, sturdy crust. The secret lies in balancing the protein (eggs) and the moisture (pumpkin and milk).
If you rush the bake or use temperatures that are too high for too long, those proteins seize up, resulting in cracks and a grainy texture. We don't want grainy!
What Makes Our Deeply Spiced Filling Superior?
The filling gets its depth from two specific things: dark brown sugar and freshly grated nutmeg. Brown sugar adds critical moisture and a deeper, molasses rich note that standard granulated sugar can’t touch.
Grating your nutmeg fresh takes about 10 seconds but gives you an intensity that pre-ground spice just can’t replicate. This small step elevates the entire dish, transforming a basic pie into a spectacular one.
Prep Time, Bake Time, and Required Resting Periods
People often rush the crucial steps, and that’s a rookie mistake I made way back in the day. Our timeline looks long, but most of it is hands off chilling and cooling time. You need a solid hour for the dough to chill, and then, most importantly, a minimum of four hours for the finished pie to cool completely and set properly.
Don't slice it warm unless you like runny custard!
The Essential Role of Temperature in Perfect Pie Making
Temperature controls everything in pie. For the crust, ingredients must be frigidly cold to ensure the butter layers don't melt, resulting in that incredible flakiness we want (You can read more about that specific technique here: Apple Pie: Best Homemade Flaky Crust Recipe for Classic Dessert ).
For the filling, we use a two-step temperature approach: a short blast of heat to set the edges, then a long, slow bake to gently cook the delicate center.
Achieving the Dangerously Smooth Texture
To get that ultra smooth, creamy texture (the hallmark of a truly great American Pumpkin Pie Filling ), we must not over whisk the batter. Introducing too much air creates bubbles that expand and burst in the oven, leading to a porous, dry texture.
Use a whisk just until everything is combined, then switch to a silicone spatula for any final mixing.
Essential Ingredients and Expert Substitutions for Your Pie
I know life happens, and you might not have that exact ingredient called for. No problem! Here are the core ingredients and how you can switch things up in a pinch, though the filling won't be quite as rich.
| Ingredient | Role | Viable Substitute | Notes |
|---|---|---|---|
| Pure Pumpkin Purée | Bulk, Moisture | Roasted, puréed sweet potato or butternut squash. | Must be 100% pure, not "pie filling." |
| Evaporated Milk | Richness, Setting | Heavy cream (Half and half works too). | Evaporated milk provides density without excess water. |
| Dark Brown Sugar | Deep Flavour | Molasses + Granulated Sugar. | Use 1 tbsp molasses and reduce white sugar slightly. |
| Pumpkin Pie Spices | Aroma/Flavour | Use a blend of 2 parts Cinnamon, 1 part Ginger, 1/2 part Cloves. | Don’t skip the nutmeg; it’s essential! |
Prepping Your Pastry: Building the Flaky all-butter Shortcrust
You need a good base, period. I always recommend an all-butter crust because the flavour is unmatched, even if it’s slightly harder to handle than a shortening based dough. Keep that butter icy cold!
Canned Puree vs. Fresh Roasted Pumpkin: Which to Choose?
Look, I’m a purist, but even I use canned puree 99% of the time for this. Canned pumpkin puree (100% pure pumpkin, remember!) is consistently dense and has the perfect moisture level for setting custard.
Fresh pumpkin often has too much water, which means you have to pre-roast it, then strain it, and honestly, who has time for all that during the holidays?
Customizing Your Warming Spice Blend for Depth of Flavor
The spice measurements provided create a warm, robust flavor profile that balances the sweetness. If you love a huge ginger kick, feel free to bump the ground ginger up by 1/4 teaspoon. If you want a more complex, herbal note, try substituting a pinch of ground cardamom for some of the cloves.
This pie is very forgiving when it comes to the pumpkin pie spice .
The Role of Evaporated Milk vs. Heavy Cream in Custard Setting
Evaporated milk is crucial because it’s concentrated, meaning much of the water content has been removed. This gives the Homemade Pumpkin Pie a denser, less likely-to-crack structure than if you used standard milk or even heavy cream.
If you must use heavy cream, the bake time might increase by 5– 10 minutes.
Ingredient Notes for a gluten-free Alternative
You absolutely can make this gluten-free! Substitute the all-purpose flour in the crust with a good 1:1 gluten-free baking blend that already contains xanthan gum. The rest of the filling ingredients are naturally gluten-free.
step-by-step Baking Guide: Achieving the Ideal Pumpkin Pie
Let's crack on with making the best pumpkin pie recipe you've ever tasted.
The Critical Pre-Bake Steps for Crust and Filling
Blind Baking for a Truly Non-Soggy Bottom
This is the most important step for crust integrity. You must pre-bake the crust this process is called blind baking. After you roll out and crimp your chilled dough, line it with parchment and fill it completely with weights (rice, beans, or ceramic weights).
Chef’s Note: Bake with the weights for the first 15 minutes, then remove them and bake for an additional 5- 8 minutes until the crust bottom looks dry, not wet doughy.
If the bottom looks wet, you are inviting a soggy bottom disaster.
Combining Wet and Dry Ingredients for a Silky Smooth Batter
First, mix all your dry ingredients (sugars, spices, salt) in a separate bowl. Then, whisk in the pumpkin puree. This step ensures the sugars and starches are fully dissolved into the pumpkin base before the eggs and milk are added. Finally, add the eggs, evaporated milk, and vanilla.
Whisk just until smooth, but stop the second the mixture is uniform.
Oven Temperature Calibration and the Water Bath Technique
While a water bath is usually reserved for cheesecakes or finicky custards like my Rainbow Lemon Meringue Pie Fluffy Swiss Meringue No Weeping , we are using a simplified temperature drop instead. Start high at 400°F (200°C) for 15 minutes to quickly set the perimeter of the crust and the filling edge. Then, drop the heat to 350°F (175°C) to allow the delicate centre to cook gently.
How to Tell When the Center is Perfectly Set (The Jiggle Test)
Forget sticking a knife in the center; that will always cause a crack! Instead, give the pie pan a very gentle shake around the 45 minute mark. The edges should be set and slightly puffed, but the center, about 1 2 inches in diameter, should still have a small, soft quiver like soft gelatin.
This slight movement means it is done, as residual heat will carry it to perfection while it cools.
Mastering Your Bake: Chef’s Tips and Troubleshooting Common Pumpkin Pie Mistakes
I’ve made every single pie mistake there is, so trust me when I tell you exactly how to avoid them.
Preventing Cracks in the Custard Surface
The number one culprit for cracking is overbaking, followed closely by a too-rapid temperature change (like moving the hot pie straight to the fridge). Use the wiggle test! If it sets up too much, the surface tensions break, resulting in that dreaded fissure.
Bake only until the center wobbles slightly, and cool slowly at room temperature.
Stopping Crust Edges from Burning During Baking
Because we start the bake at 400°F, the exposed crust edges are prone to burning long before the custard is done. After the initial 15 minute over high heat blast, cover the crust edges. I use a dedicated pie shield, but a simple strip of aluminum foil carefully pressed around the crimped edge works just as well.
This allows the center to cook while the edges stay perfectly golden brown.
Adjusting Baking Time for Deep Dish Pie Pans
The times listed are for a standard 9 inch deep dish pan. If you use a shallow pan, reduce the final bake time by about 10 minutes. If you are using a very deep, 10 inch ceramic pan, you may need an additional 10– 15 minutes, and definitely keep an eye on that wobble test!
Storing Your Homemade Pumpkin Pie Safely and Effectively
Shelf Life and Refrigeration Guidelines
Because this is an egg-based custard pie, it is absolutely essential that it be refrigerated after it has cooled. Homemade Pumpkin Pie can be safely stored in the refrigerator, loosely covered with foil or plastic wrap, for 3 to 4 days. Do not store it on the oven top!
Best Practices for Freezing and Thawing Whole Pies
Does it freeze well? You bet. Bake the pie completely and allow it to cool fully before freezing. Wrap the entire pie (in its plate) tightly in plastic wrap, followed by a layer of aluminum foil, sealing out air. It keeps well for up to two months. Thaw overnight in the refrigerator.
To restore the crust’s crispness, bake the thawed pie in a 300°F (150°C) oven for about 15 minutes before serving.
Presentation and Pairing: Elevated Serving Suggestions
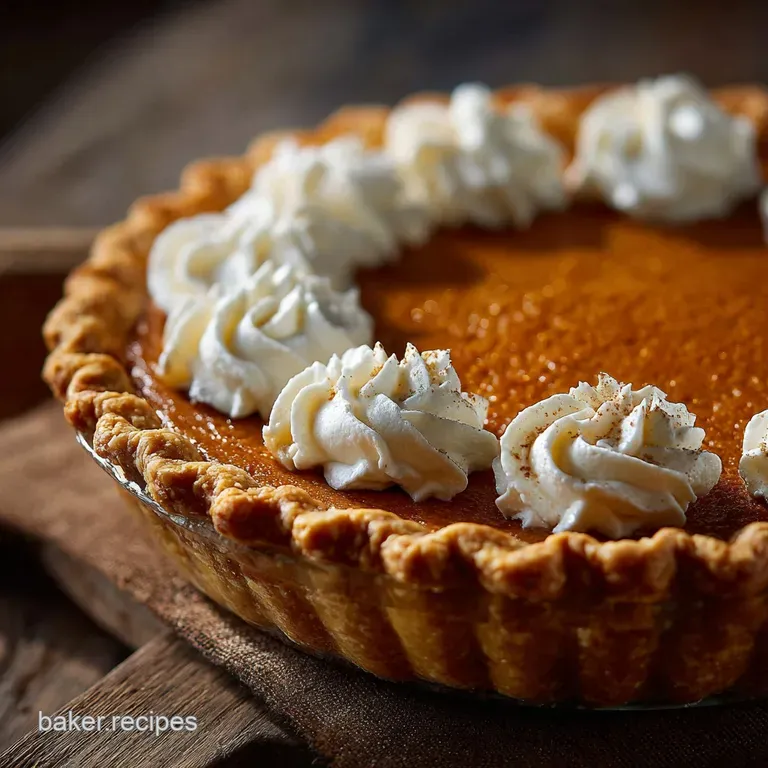
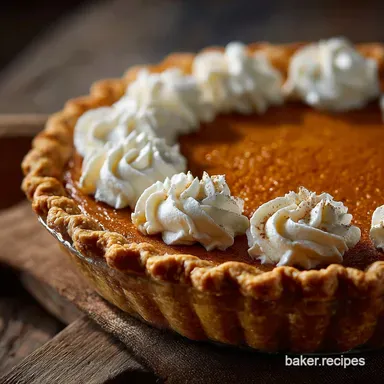
Complementary Toppings: Bourbon Whipped Cream and Caramel Drizzle
Forget plain old whipped cream; we need something that complements the robust flavor of the American Pumpkin Pie Filling . Make a standard whipped cream, but add 1 tablespoon of good quality bourbon and substitute half the powdered sugar with maple syrup.
The subtle liquor note and the richness of the maple are divine. A drizzle of homemade caramel sauce really takes it over the top. Serve cold for the best texture.

Recipe FAQs
How do I prevent my pumpkin pie filling from cracking on top?
Cracking is almost always caused by overbaking, which causes the egg proteins to seize up and contract. You should pull the pie from the oven when the outer two inches are set but the very center still retains a slight jiggle, like firm gelatin.
The pie will finish cooking perfectly during the cooling process through residual heat (carry over cooking).
My crust often turns out soggy. How can I ensure a flaky bottom crust?
A soggy bottom is prevented by blind baking (par-baking) the crust before adding the filling. Ensure the chilled dough is docked and baked with weights until the edges begin to set.
For extra protection, brush the bottom of the par-baked shell with a thin layer of egg white and bake for one minute before adding the pumpkin mixture, which creates a moisture barrier.
Can I use fresh pumpkin puree instead of canned?
Yes, but the fresh puree must be treated to match the density of the canned product. Roasting and draining the fresh pumpkin is crucial; if the puree is too watery, the filling will not set properly, resulting in a runny pie.
Always strain your fresh puree through cheesecloth for several hours to remove excess moisture before use.
How can I tell when the pumpkin pie is perfectly set and finished baking?
The best indicator is the wobble test. Gently shake the pie; the filling around the crust's edges should be completely firm, but a small spot (about the size of a silver dollar) in the very center should still slightly tremble.
This is your cue to remove the pie, as it will continue to firm up as it cools to room temperature.
How long will the pie last, and is it suitable for freezing?
A finished pumpkin pie must be refrigerated after cooling and will keep well for 3 to 4 days. While you can freeze the pie, the custard texture may become slightly grainy or weep moisture upon thawing due to the high egg content.
If you must freeze, wrap the cooled pie tightly in plastic wrap and then foil, and consume within one month.
I want to try a variation. Can this recipe be adapted to be dairy-free or vegan?
As written, this classic recipe relies heavily on dairy and eggs for its iconic structure and richness. To adapt it successfully, you would need to use full fat coconut milk or cashew cream for the liquid component and substitute the eggs with a reliable binder like silken tofu or cornstarch slurry.
Be aware that the texture and overall flavor profile will change significantly from the traditional version.
Why did my pastry crust shrink dramatically during baking?
Pastry shrinkage is typically caused by insufficient resting time before baking, which leaves the gluten tight and elastic. After rolling and fitting the dough into the pie dish, it is essential to chill the crust thoroughly for at least 30 minutes, or up to an hour, before baking.
This relaxes the gluten strands, allowing the dough to maintain its shape in the heat.
Classic Flaky Crust Pumpkin Pie Recipe
Ingredients:
Instructions:
Nutrition Facts:
| Calories | 644 kcal |
|---|---|
| Protein | 11.2 g |
| Fat | 29.1 g |
| Carbs | 87.6 g |
