Easy Chocolate Fudge: Silky and Creamy
- Time: Active 10 minutes, Passive 3 hours, Total 15 minutes (hands on time)
- Flavor/Texture Hook: Deeply chocolatey with a silky, melt on-the tongue finish
- Perfect for: Holiday gift tins, last minute party platters, or budget-friendly dessert prep
- Master the Ultimate Easy Fudge Recipe
- Why This Simple Method Works
- Analyzing Core Ingredient Science
- Selecting Quality Pantry Elements
- Essential Kitchen Tools for Results
- Executing the Perfect Glossy Pour
- Resolving Texture and Seizing Issues
- Adjusting Yield for Any Occasion
- Debunking Common Confectionery Myths
- Preservation Tactics and Waste Reduction
- Elegant Presentation and Serving Ideas
- Recipe FAQs
- 📝 Recipe Card
Master the Ultimate Easy Fudge Recipe
Legend has it that in the late 1880s, a student at Vassar College was trying to make a batch of caramels but "fudged" the process by letting the sugar crystallize. Instead of a disaster, she discovered a dense, rich confection that became a dormitory sensation.
It was cheap, required minimal equipment, and tasted far more expensive than its humble parts. This easy fudge recipe honors that spirit of modern simplicity, turning a handful of pantry staples into a treat that feels like it came from a high end chocolatier.
The aroma that fills your kitchen when the semi sweet chips meet the warm, buttery milk is pure nostalgia. It’s that deep, cocoa heavy scent that promises a velvety reward after just a few minutes of stirring.
I remember making this for the first time on a rainy Tuesday when my sweet tooth was louder than my patience. I didn't have a thermometer or a copper pot, but I had a spatula and a dream. The result was a slab of chocolate so smooth it felt like silk on the palate.
We aren't just melting things together; we're creating a stable emulsion. By using condensed milk, we skip the risky stage of boiling sugar to a specific "soft ball" stage. It’s a budget friendly hack that doesn't sacrifice quality.
You’ll get that satisfying "snap" when you bite into a square, followed immediately by a rich melt that coats the tongue. Trust me, once you see how easy this is, you'll never look at store-bought fudge the same way again.
Why This Simple Method Works
Concentrated Sugar Suspension: Sweetened condensed milk is already reduced, meaning the sugar is fully dissolved in a stable liquid state. This prevents the gritty, sand like texture often found in amateur fudge.
Fat Based Emulsification: The addition of butter provides extra milk solids that bind with the cocoa butter in the chocolate. This creates a glossy sheen and a more luxurious mouthfeel than chocolate alone.
Crystallization Inhibition: The glucose and lactose in the condensed milk act as "interfering agents." They physically get in the way of sucrose molecules trying to bond, ensuring the fudge stays smooth rather than brittle.
Thermal Stability: By heating over low heat or in short microwave bursts, we keep the chocolate tempered. This prevents the fat from separating, which would otherwise result in a greasy surface.
| Method Type | Total Time | Texture Result | Skill Level |
|---|---|---|---|
| Microwave Fast | 15 minutes | Extremely silky and uniform | Beginner |
| Classic Stovetop | 45 minutes | Slightly crumbly, traditional | Advanced |
| This Hybrid | 15 minutes | Professional gloss and snap | Intermediate |
Choosing the right approach depends on your patience. While the stovetop method is classic, this 15 minute version provides a consistency that even seasoned bakers prefer for gift giving. It's about working smarter with the ingredients we have.
Analyzing Core Ingredient Science
| Ingredient | Science Role | Pro Secret |
|---|---|---|
| Semi Sweet Chips | Provides structure and snap | Use 60% cacao for better depth |
| Condensed Milk | Prevents sugar crystallization | Never use evaporated milk by mistake |
| Unsalted Butter | Creates a glossy emulsion | Cube it cold to control melting |
Selecting Quality Pantry Elements
- 18 oz (510g) semi sweet chocolate chips: These provide the backbone. Why this? Semi sweet has the right cocoa to sugar ratio for setting firmly.
- 14 oz (397g) sweetened condensed milk: This is your sugar and liquid source. Why this? Its thick consistency ensures the fudge doesn't turn into a sauce.
- 2 tbsp (30g) unsalted butter: Adds shine and richness. Why this? Unsalted allows you to control the seasoning with sea salt later.
- 1 tsp pure vanilla extract: For aromatic depth. Why this? Real vanilla rounds out the harshness of the cocoa.
- 1/4 tsp fine sea salt: To balance the sweetness. Why this? Salt heightens the chocolate flavor and cuts through the sugar.
| Original Ingredient | Substitute | Why It Works |
|---|---|---|
| Semi Sweet Chips | Dark Chocolate (60%) | Higher cocoa content; slightly more bitter but sets very firm. |
| Unsalted Butter | Coconut Oil (Solid) | Provides the same fat structure. Note: Adds a subtle tropical flavor. |
| Vanilla Extract | Spiced Rum | Adds a complex, oaky note that pairs perfectly with dark chocolate. |
If you find yourself craving a different profile, the options are endless. For instance, if you love sweet and tangy contrasts, try drizzling some Balsamic Cherry Chutney recipe over a warm square. The acidity of the fruit cuts through the heavy chocolate in a way that feels very sophisticated.
Essential Kitchen Tools for Results
You don't need a professional confectionery setup to get this right. A heavy bottomed saucepan is your best friend here because it distributes heat evenly, preventing the chocolate at the bottom from scorching while the top is still solid.
If you choose the microwave route, use a glass or ceramic bowl; plastic can sometimes retain odors or heat unevenly, which might seize your chocolate.
A silicone spatula is also non negotiable. You need something flexible to scrape every last bit of that glossy mixture out of the bowl and into the pan. For the pan itself, an 8x8 inch (20x20 cm) square pan is the industry standard for this volume.
If you use something larger, your fudge will be thin and lose that satisfying "heft" when you hold a square.
Chef's Tip: Freeze your butter for 10 minutes before cubing it. This slow melting technique gives you more control over the emulsion as you stir the chocolate.
Executing the Perfect Glossy Pour
- Line an 8x8 inch square baking pan with parchment paper. Note: Leave an overhang on two sides to act as a "sling" for easy removal.
- Combine the 18 oz (510g) chocolate chips, 14 oz (397g) condensed milk, and 2 tbsp (30g) cubed butter in a heavy saucepan.
- Set the heat to low. Cook for 5 minutes while stirring constantly until the mixture is glossy and smooth.
- Remove the pan from the heat immediately. Note: Overheating will cause the cocoa butter to separate and turn the mix greasy.
- Fold in the 1 tsp vanilla extract and 1/4 tsp sea salt.
- Stir vigorously for 30 seconds. Observe the batter becoming thick and satiny.
- Pour the mixture into your prepared pan.
- Smooth the surface with a spatula until it looks like a dark, still pond.
- Refrigerate for at least 3 hours. Note: Patience here ensures a clean "shatter" when you bite into it.
- Lift the fudge out using the parchment sling and slice into 36 even squares.
Resolving Texture and Seizing Issues
Why Your Fudge Is Grainy
Graininess usually happens when sugar crystals from the sides of the pan fall back into the mixture, or if the chocolate was overheated. When chocolate gets too hot, the solids and fats separate, creating a rough texture.
To fix this, you can sometimes save a grainy batch by adding a teaspoon of boiling water and stirring vigorously, though it's better to prevent it by keeping the heat low.
Why Your Fudge Is Soft
If your squares are sticking to your fingers, the ratio of liquid to fat might be off, or it simply hasn't chilled long enough. 3 hours in the fridge is the absolute minimum.
If it's still soft after a night in the cold, it likely means the condensed milk wasn't high enough in sugar or the chocolate had too low a cocoa butter content.
| Problem | Root Cause | Solution |
|---|---|---|
| Seized Chocolate | Tiny drop of water entered | Add 1 tsp neutral oil and stir fast. |
| Dull Surface | Mixture cooled too fast | Stir less once it's off the heat to keep the shine. |
| Sticky Bottom | No parchment used | Dip the pan in warm water for 10 seconds to loosen. |
For a Mexican inspired kick, add a pinch of homemade fajita seasoning to the batter for a smoky finish. It sounds wild, but the cumin and chili in the blend play beautifully with the dark chocolate notes.
Common Mistakes Checklist
- ✓ Use a dry spoon (even one drop of water can seize the entire pot).
- ✓ Stir constantly to prevent the bottom from scorching.
- ✓ Don't boil the mixture; we only want to melt, not cook.
- ✓ Use parchment paper, not wax paper (wax can melt into the fudge).
- ✓ Chill in the fridge, never the freezer, to avoid "sweating" once thawed.
Adjusting Yield for Any Occasion
Scaling this recipe is incredibly straightforward because the ratios are so forgiving. If you're making this for a massive holiday gathering, you can easily double the batch. However, don't just dump everything into one pan. Use two separate 8x8 pans or one large 9x13 inch pan.
If you go the larger route, keep in mind the fudge will be slightly thinner, so you might want to adjust your "36 servings" count to something smaller but wider.
When halving the recipe, use a smaller loaf pan. The cook time will stay roughly the same because we are focusing on the melting point of the chocolate chips, which doesn't change based on volume. Just keep a close eye on the 5 minute mark; a smaller volume can overheat faster if your burner is particularly aggressive.
| Servings | Ingredient Adjustments | Pan Size | Cook Time |
|---|---|---|---|
| 18 Squares | 9 oz chips, 7 oz milk | Loaf Pan | 4 minutes |
| 36 Squares | 18 oz chips, 14 oz milk | 8x8 inch | 5 minutes |
| 72 Squares | 36 oz chips, 28 oz milk | 9x13 inch | 7 minutes |
Debunking Common Confectionery Myths
A common misconception is that you need to "beat" the fudge for 10 minutes to make it smooth. While that's true for traditional recipes involving boiled sugar and corn syrup, it's actually detrimental to this easy fudge recipe.
Over beating this specific emulsion will incorporate air bubbles and cause the butter to separate, leaving you with a dull, aerated block instead of a dense, silky treat.
Another myth is that you can substitute evaporated milk for condensed milk 1:1. They are entirely different products. Evaporated milk is just milk with the water removed; it lacks the high sugar concentration necessary to stabilize the chocolate.
If you use it, you'll end up with a chocolate soup that will never set, no matter how long it stays in the fridge.
Preservation Tactics and Waste Reduction
This fudge is incredibly stable thanks to the high sugar content of the condensed milk. You can keep it in an airtight container in the fridge for up to 2 weeks. If you’re planning to stack the squares, place a piece of parchment paper between the layers.
This prevents them from fusing back together into a giant chocolate brick.
For zero waste, don't throw away the "scraps" those uneven edges you trim off to make perfect squares. Chop them up and throw them into a batch of brownies or use them as a decadent topping for a hot bowl of oatmeal. You can also freeze the fudge for up to 3 months.
Just wrap it tightly in plastic wrap and then foil to prevent freezer burn. When you're ready to eat, let it thaw in the fridge overnight to maintain that velvety texture.
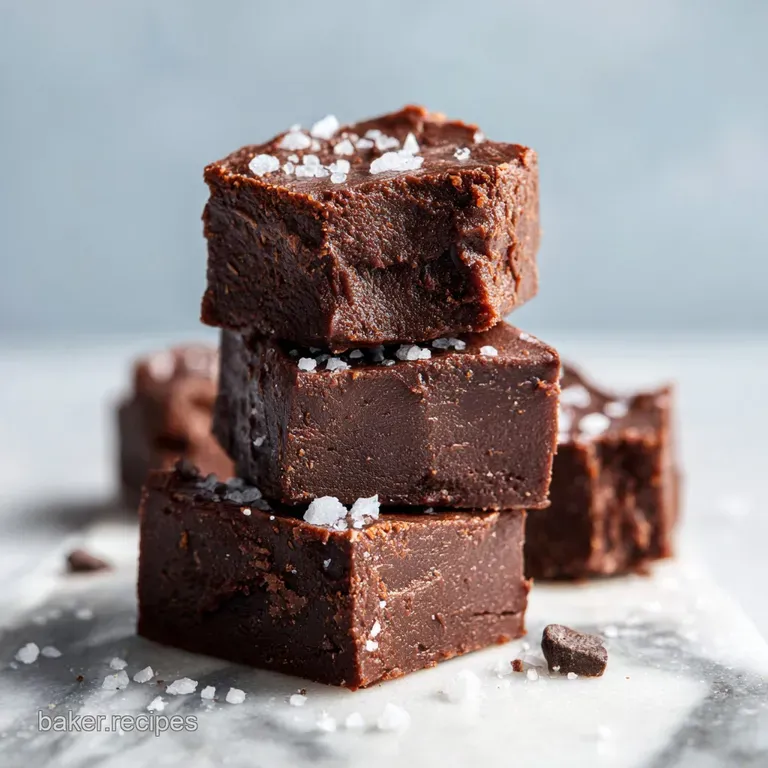
Elegant Presentation and Serving Ideas
Presentation is where you can really make this budget friendly treat look like a million bucks. Instead of just piling them on a plate, try a "salt and snap" approach. Sprinkle a tiny bit of extra flaky sea salt on top right before the fudge sets completely.
The contrast of the white crystals against the dark chocolate is stunning and signals to your guests that this isn't just a basic candy.
If you're gifting these, buy some small cardboard jewelry boxes and line them with colored tissue paper. Placing four perfect squares inside looks incredibly high end. For a party platter, pair the fudge with tart fruits like raspberries or green apples.
The acidity of the fruit cleanses the palate between the rich, chocolatey bites, making every piece taste as vibrant as the first. Don't be afraid to experiment with textures; a few crushed pretzels pressed into the top before chilling adds a fantastic crunch that breaks up the silkiness.

Recipe FAQs
How to make really easy fudge?
Combine 18 oz semi sweet chocolate chips, 14 oz sweetened condensed milk, and 2 tbsp butter in a heavy bottomed saucepan. Heat over low heat, stirring constantly until glossy and smooth, then stir in 1 tsp vanilla and 1/4 tsp salt before refrigerating for 3 hours.
What are the three ingredients in fudge?
The core base consists of semi sweet chocolate chips, sweetened condensed milk, and unsalted butter. While these form the foundation, adding vanilla extract and fine sea salt elevates the final flavor profile.
What is the secret to making good fudge?
The secret is achieving a perfectly stable emulsion by stirring constantly until the mixture is completely glossy. If you enjoyed mastering this creamy texture, you can apply the same emulsification logic when making our velvety sauce for savory dishes.
What ingredients do you need for fudge?
You need 18 oz semi sweet chocolate chips, 14 oz sweetened condensed milk, 2 tbsp unsalted butter, 1 tsp pure vanilla extract, and 1/4 tsp fine sea salt. Ensure all ingredients are measured correctly before you begin the 5-minute heating process.
Is it true I must use a candy thermometer to get the right texture?
No, this is a common misconception. Because this recipe uses sweetened condensed milk as a stabilizer, you bypass the need for precise sugar boiling temperatures entirely.
How to melt the ingredients in a microwave?
Heat the chocolate, milk, and butter mixture in 30-second intervals at 50% power. Stir thoroughly between each interval to ensure the chocolate melts evenly without scorching.
How to store fudge so it stays fresh?
Keep your fudge in the refrigerator for up to two weeks in an airtight container. Keeping it chilled is essential to maintain the firm, silky set required for clean slicing.
Easy Chocolate Fudge

Ingredients:
Instructions:
Nutrition Facts:
| Calories | 111 kcal |
|---|---|
| Protein | 1.4g |
| Fat | 5.9g |
| Carbs | 14.4g |
| Fiber | 0.9g |
| Sugar | 12.5g |
| Sodium | 20mg |
