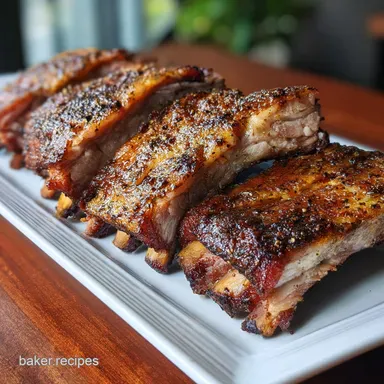
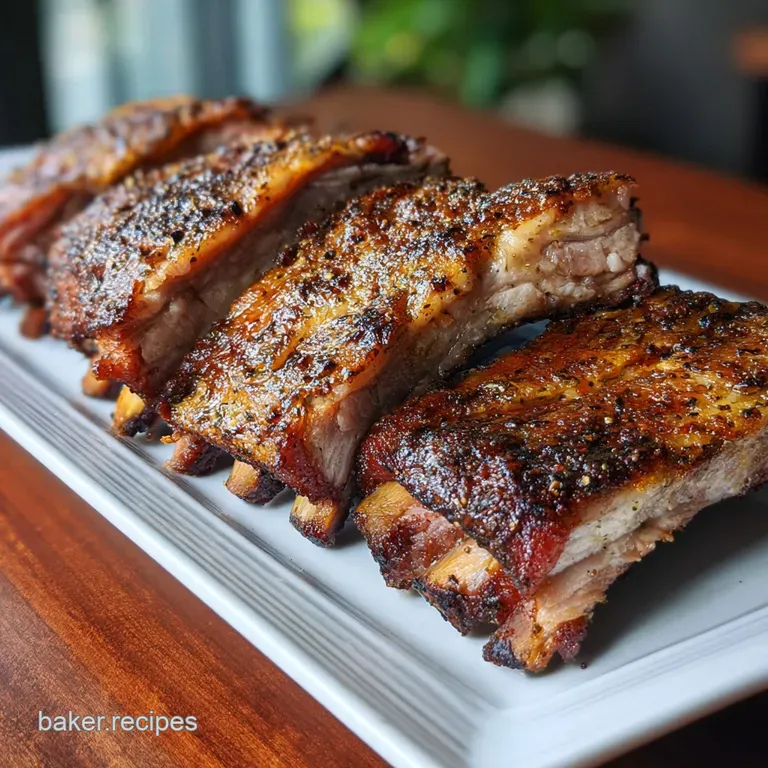
Easy Ribs on the Grill with Smoky Bark
- Time: Active 20 minutes, Passive 4 hours 30 mins, Total 4 hours 50 mins
- Flavor/Texture Hook: Smoky, melt in-the mouth meat with a sticky, caramelized exterior
- Perfect for: Backyard cookouts, lazy Sunday afternoons, and feeding a hungry crowd
- Get Smoky Flavor with Ribs on the Grill
- Scientific Secrets for Succulent Meat
- Component Analysis for Grilling Success
- The Primary Flavor Components
- Mandatory Grilling Hardware
- Cooking Steps to Follow
- Handling Common Problems
- Budget Swaps and Variations
- My Grilling Myths Debunked
- Saving Leftovers for Later
- Top Side Dish Pairings
- Answers to Common Questions
- Recipe FAQs
- 📝 Recipe Card
Get Smoky Flavor with Ribs on the Grill
There is something visceral about the sound of a match striking and the first plume of smoke rising from the charcoal. You know that smell, right? It’s the scent of a weekend done correctly.
I remember the first time I tried making ribs on the grill, I was terrified of turning a perfectly good rack into a piece of flavored leather. I’d seen the pros on TV with their massive offsets and thought, "There is no way my little kettle grill can do that." I was wrong.
It turns out, you don't need a three thousand dollar rig to get those bones to slide out clean.
What you need is patience and a couple of smart techniques to manage your fire. We are aiming for that specific texture where the meat doesn't just fall off because it's mushy, but because the connective tissue has surrendered to the heat.
It should have a "tug," a little bit of resistance that gives way to a silky, fatty bite. If you’ve ever struggled with dry meat or a bitter, burnt crust, I’ve been there. I once used way too much wood and ended up with ribs that tasted like a campfire's gym socks. We aren't doing that today.
Today, we’re keeping it budget smart but high impact. We’re using basic pantry staples like French’s Yellow Mustard and dark brown sugar to create a professional grade finish without the gourmet price tag.
This method is reliable, forgiving, and honestly, a lot of fun once you see that smoke ring for the first time. Let’s get into the nitty gritty of how to turn a humble rack of pork into something your neighbors will start sniffing over the fence for.
Scientific Secrets for Succulent Meat
Understanding what's happening under the hood of your grill makes you a better cook than any recipe ever could. Here is why this method actually works:
- Collagen Conversion: Long chain proteins in the connective tissue begin to denature and transform into liquid gelatin at sustained temperatures between 160°F and 180°F.
- Surface Evaporation Control: The "Texas Crutch" (wrapping in foil) halts the evaporative cooling process, known as the "stall," which otherwise keeps the internal temperature stagnant for hours.
- Hygroscopic Sugar Action: Dark brown sugar attracts moisture from the air and the meat, creating a tacky surface that allows smoke particles to "stick" and build the bark.
- Acidic Denaturation: Using apple cider vinegar in the spritz gently breaks down surface proteins, keeping the exterior supple while adding a bright counterpoint to the heavy fats.
Component Analysis for Grilling Success
| Component | Science Role | Pro Secret |
|---|---|---|
| Dark Brown Sugar | Caramelization and moisture retention | Use it for the molasses content which prevents the bark from becoming too brittle. |
| Yellow Mustard | Protease driven binder | Don't worry, the vinegar heavy flavor disappears, leaving only a perfectly adhered spice crust. |
| Smoked Paprika | Flavor and color catalyst | It provides that deep mahogany hue even if your wood smoke is light that day. |
| Apple Cider Vinegar | PH Balance | Spritzing lowers the surface PH, which helps the smoke ring develop more clearly. |
The Primary Flavor Components
For this cook, we’re focusing on 2 racks (approx. 4 lbs) of Baby Back Ribs or St. Louis Style Spare Ribs. Baby backs are leaner and cook a bit faster, while St. Louis ribs have more fat and a rectangular shape that cooks very evenly. Both are fantastic here.
The Binder and Rub - 2 tbsp French's Yellow Mustard Why this? It’s the ultimate cheap binder that holds spices without adding grease. - 1/4 cup C&H Dark Brown Sugar, packed Why this? The higher molasses content ensures a deeper color and
stickier bark. - 2 tbsp Smoked Paprika - 1 tbsp Diamond Crystal Kosher Salt Why this? Larger flakes make it harder to over salt than fine table salt. - 1 tbsp Coarse Ground Black Pepper - 1 tsp Garlic Powder - 1 tsp Onion Powder - 1/2 tsp Cayenne Pepper
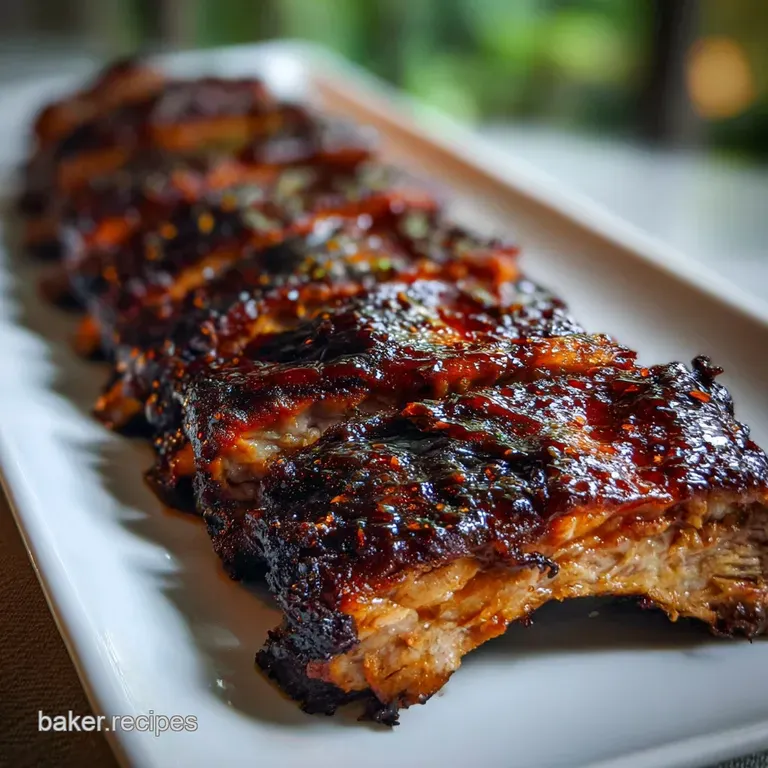
The Finishing Touches - 1/2 cup Bragg Apple Cider Vinegar - 1 cup Sweet Baby Ray's BBQ Sauce Why this? It’s a classic high sugar sauce that caramelizes beautifully over coals.
If you’re looking for a slightly different vibe, you can swap the dark brown sugar for honey, though it will be stickier and prone to burning faster. If you're out of apple cider vinegar, white vinegar with a splash of apple juice works in a pinch to maintain that acidic balance.
Mandatory Grilling Hardware
You don't need a specialized smoker, but you do need a grill with a lid. A classic Weber Kettle is my go to for this. You'll also need a meat thermometer, preferably a digital one like a Thermapen, to check for tenderness. A spray bottle for the vinegar and some heavy duty aluminum foil are non negotiable.
If you're using charcoal, a chimney starter will save you from the "gasoline" taste of lighter fluid, which is a mistake I made far too many times in my early twenties. Trust me, the chimney is worth the ten bucks.
Cooking Steps to Follow
1. Remove the Silver Skin
Lay your 2 racks of ribs on a baking sheet. Locate the thin, white membrane on the bone side. Use a butter knife to pry up a corner, then grab it with a paper towel for grip and pull it off in one steady motion. Note: This allows the rub and smoke to actually penetrate the meat from both sides.
2. Apply the Mustard Binder
Spread 1 tbsp of yellow mustard over each rack, covering every inch including the sides. This won't make the ribs taste like a hot dog, I promise. It just gives the dry spices something to cling to so they don't fall off during the flip.
3. Mix the Spices
In a small bowl, combine the 1/4 cup dark brown sugar, 2 tbsp smoked paprika, 1 tbsp kosher salt, 1 tbsp pepper, 1 tsp garlic powder, 1 tsp onion powder, and 1/2 tsp cayenne. Stir until no clumps of sugar remain.
4. Season the Meat
Sprinkle the rub generously over the ribs from about a foot above the meat to get an even coating. Press the spices gently into the mustard with your hands. Let them sit for at least 15 minutes until the rub looks wet and dark.
5. Ignite the Fuel
Prepare your grill for two zone cooking. If using charcoal, pile lit coals on one side. If using gas, turn on the burners on one side only. Aim for a steady temperature of 225°F to 250°F.
If you're using a charcoal grill, add a few chunks of hickory or apple wood to the coals now.
6. Begin the Smoke
Place the ribs on the cool side of the grill (indirect heat), bone side down. Close the lid with the vents positioned directly over the meat to draw the smoke across the racks. Cook for 2 hours until the surface looks matte and mahogany.
7. Monitor the Stall
After the first 2 hours, fill your spray bottle with the 1/2 cup apple cider vinegar. Spritz the ribs lightly every 30 minutes for the next hour. This keeps the surface from drying out while the internal fats begin to render and soften.
8. Use the Texas Crutch
Lay out two large pieces of heavy duty foil. Place each rack on the foil, spritz one last time with the vinegar, and wrap them tightly so no steam can escape. Return them to the indirect side of the grill for 1 hour 30 mins until the meat has pulled back about half an inch from the bone ends.
9. Apply the Glaze
Carefully unwrap the ribs (watch out for the steam!) and place them back on the grill. Brush with 1 cup of BBQ sauce. Close the lid and cook for another 20 minutes until the sauce is tacky and bubbling.
10. Rest the Meat
Remove the racks from the grill and let them sit on a cutting board for 15 minutes. Note: This allows the juices to redistribute so they don't all run out the moment you slice into the rack.
Handling Common Problems
One of the biggest hurdles when doing ribs on the grill is temperature fluctuations. If your grill gets too hot, the sugars in the rub will scorch before the meat is tender. If it’s too cold, you’ll be out there until midnight waiting for the collagen to break down. If you find yourself in a rush, my Tender Instant Pot recipe is a great way to get that texture in a fraction of the time.
Correcting Dry Meat
If you find your ribs are a bit stiff, they likely skipped the "rendering" phase. This usually happens if the temperature was too low or you didn't wrap them in foil.
Fixing Burnt Sugar
When the bark turns black and tastes bitter, the grill was definitely too hot (over 300°F). You can save this by scraping off the burnt bits and applying a fresh layer of sauce at the end to mask the bitterness.
Taming Mushy Texture
"Fall off the bone" is often used as a compliment, but if the meat has the consistency of mashed potatoes, it stayed in the foil too long. Next time, reduce the foil wrap stage by 20 minutes.
| Problem | Cause | Fix | Pro Tip |
|---|---|---|---|
| Tough meat | Not enough time in the "stall" | Wrap earlier or cook longer | Use the "bend test": pick up the rack; it should crack slightly. |
| Gray bark | No smoke or low sugar | Add wood chunks or more dark sugar | Ensure your vents are open enough for airflow. |
| Dry surface | Lack of moisture | Increase spritzing frequency | Keep a small pan of water on the hot side of the grill. |
Budget Swaps and Variations
When you're trying to keep the grocery bill down, ribs can feel like a luxury. But by focusing on the method rather than expensive woods or artisanal sauces, you can get incredible results. If you prefer a more hands off approach that still delivers high-quality results, check out my FallOffTheBone Crockpot Ribs recipe.
Managing the Heat
If you don't have a thermometer, watch the bones. When the meat pulls away and exposes about 1/2 inch of bone, you're usually in the sweet spot for tenderness.
Scaling Down
To make just one rack, you don't need to change much other than the amount of rub. The cook time remains the same because the thickness of the meat hasn't changed, only the length of the rack.
Scaling Up
Feeding a crowd with 4 or 6 racks? You'll likely need to rotate the racks' positions on the grill every hour to ensure they all get equal exposure to the heat source. Don't crowd them too tightly or the smoke won't reach the sides.
Chef's Tip: Freeze your BBQ sauce for 15 minutes before brushing it on. The cold sauce sticks better to the hot meat and creates a thicker, more "professional" looking glaze layer.
My Grilling Myths Debunked
- Soaking Wood Chips: Many people swear by soaking wood chips in water, but this actually delays smoke production. The grill has to evaporate the water first, creating steam, not smoke. Use dry wood for a cleaner, more immediate flavor.
- Boiling Ribs: Please, never boil your ribs before grilling. It leaches out all the pork flavor into the water. If you want tender ribs, the low and slow indirect heat on the grill is the only way to go.
- Opening the Lid: We say "if you're lookin', you ain't cookin'" for a reason. Every time you open the lid, you lose that stable convection heat. Use a probe thermometer so you can monitor the progress without lifting the hood.
Saving Leftovers for Later
Ribs are surprisingly good the next day. Keep them in the fridge for up to 4 days in an airtight container. To reheat, wrap them in foil with a tablespoon of water or apple juice and pop them in a 250°F oven for 20 minutes. This steams them back to life without drying them out.
If you want to freeze them, they'll stay good for about 3 months. I recommend slicing them into individual bones first; they freeze and thaw much faster that way. For zero waste, save any bones you have left over.
You can toss them into a pot with some beans or a split pea soup to add a massive hit of smoky, porky depth to the broth.
Top Side Dish Pairings
You really can't go wrong with the classics here. I usually lean toward something acidic or creamy to cut through the richness of the pork. A sharp, vinegar based coleslaw is the traditional choice, but a thick, stovetop mac and cheese is what my kids always beg for.
If you have some extra space on the grill, toss on some corn on the cob (husk on!) for the last 30 minutes of the cook. The steam inside the husk makes the kernels incredibly juicy.
Or, if you want something more substantial, these ribs go beautifully with a classic potato salad loaded with dill and red onions.
Answers to Common Questions
Managing the Smoke
If your smoke is thick and white, your wood is smoldering poorly. You want "blue smoke," which is almost invisible but smells like heaven. Open your vents slightly to give the fire more oxygen.
Using Gas Grills
Can you do this on gas? Absolutely. Just use a smoker box filled with wood chips over the active burner. It won't be quite as deep as a charcoal cook, but it'll still beat anything you'd get at a chain restaurant.
Choosing the Meat
St. Louis ribs are fattier and more forgiving for beginners. Baby backs are leaner and can dry out faster if you aren't careful with your "Texas Crutch" timing. If it's your first time, go with the St. Louis cut.
Skipping the Foil
You can definitely cook ribs without wrapping them, but it will take about 1 to 2 hours longer. The bark will be much crunchier (which some people love), but the meat might be slightly less juicy. It's a trade off!
The beauty of making ribs on the grill is that every rack is a little different. You'll learn how your specific grill breathes, where the hot spots are, and exactly how much cayenne your family can actually handle.
Don't stress if the first time isn't "perfect" it's still going to be better than anything that didn't come off a grill. Now, get that charcoal lit and enjoy the process. Happy grilling!

Recipe FAQs
How long should ribs take on a grill?
Total time is generally 4.5 to 5.5 hours for low-and-slow cooking. This includes about two hours unwrapped, followed by a 1.5 to 2-hour foil wrap stage, and a final 20 minutes for glazing.
Should ribs be wrapped in foil when grilling?
Yes, wrapping in foil is highly recommended for tenderness. This technique, often called the Texas Crutch, helps push through the stall phase and accelerates the breakdown of connective tissue into gelatin, ensuring a moist result.
How do you cook ribs on a regular gas grill?
Set up two-zone cooking by turning on only one side of the burners. Place the ribs on the unlit side (indirect heat) and maintain a temperature between 225°F and 250°F. You will need a smoker box filled with wood chips over the active burner for smoke flavor.
What is the 3:2:1 method for grilling ribs?
The 3:2:1 method is a time based guideline, not a strict rule, for spare ribs. It suggests 3 hours smoking, 2 hours wrapped in foil (the "crutch"), and 1 final hour unwrapped with sauce, totaling six hours.
Is it true you must boil ribs first to make them tender?
No, this is a common misconception. Boiling leaches out the essential pork flavor and breaks down the surface too much, resulting in mushy meat rather than a desirable smoky bark.
What temperature should the grill maintain during the main cook?
Maintain a steady grill temperature between 225°F and 250°F. This lower temperature range is crucial because it allows the collagen to convert to gelatin slowly without burning the sugars in your rub or glaze. Mastering this temperature control is similar to the precision needed when searing meat, such as in our The Ranch Hands Bold Cowboy Butter Recipe for Steak.
When should I apply the BBQ sauce?
Apply sauce only during the final 20 to 30 minutes of cooking. Sauces are high in sugar and will burn easily if applied too early; the goal is to heat it until it becomes tacky and caramelized, not scorched.
Easy Ribs On The Grill