Apple Pie Recipe: the Flaky All-Butter Crust Guaranteed to Impress
- Mastering the Classic Apple Pie: Recipe Overview
- The Science of Texture: Why This Apple Pie Recipe Succeeds
- Ingredients: Selection, Preparation, and Smart Swaps
- Flaky All-Butter Apple Pie: Step-by-Step Baking Method
- Expert Tips for Home Bakers: Troubleshooting and Elevation
- Preserving Perfection: Storage, Freezing, and Reheating
- Presentation and Pairings: Elevating Your Apple Pie Experience
- Recipe FAQs
- 📝 Recipe Card
Mastering the Classic Apple Pie: Recipe Overview
If there is one scent that defines comfort baking, it is the aroma of Apple Pie bubbling away in the oven. It hits you with warm cinnamon, brown sugar caramelizing, and that heady, rich smell of melted butter it just instantly resets the whole house.
Seriously, nothing else smells like it.
I used to think pie was a huge hassle, something reserved for pros on the Great British Bake Off, but trust me, this specific formula is a lifesaver. We are tackling the two biggest pain points flaky crust and no soggy bottom using simple tricks that any home cook can master.
It's truly the Best Apple Pie Recipe Ever because it gives you that show stopping result without hours of stress.
Are you ready to stop being intimidated by pastry and finally nail that perfect slice? Good, because we are going deep on butter temperature, apple ratios, and why cooling time is just as important as baking time. Let's crack on and make some pie!
The Science of Texture: Why This Apple Pie Recipe Succeeds
This isn’t just a random ingredient list; every component in this recipe plays a strategic role in achieving textural perfection. We are aiming for a crisp, gold crust and a thick, sliceable filling that doesn't run all over the plate when you cut it.
What Sets This All-Butter Crust Apart
We are using an All-Butter pie crust because it delivers the absolute best flavour. Yes, shortening is easier to work with, but nothing beats that nutty, rich flavour of pure butter.
The trick here is temperature control, keeping that fat absolutely freezing cold so it doesn't integrate completely into the flour; that separation is what creates those desirable layers that shatter when you bite them.
Quick Prep Time vs. Chill Time: The Baker's Schedule
While the active preparation time is less than an hour, the waiting time for the dough is non-negotiable. You have to allow the gluten you developed during mixing to relax; otherwise, your crust will shrink significantly in the oven, resulting in a tough, sad pastry edge.
This is why pie makers need patience.
Essential Equipment Checklist for a Perfect Pie
You really don't need much fancy gear for pie success, but a decent 9 inch deep dish plate is crucial. Ceramic or glass pies tend to hold heat better than metal, which really helps the bottom crust cook.
A food processor makes quick work of cutting the butter into the flour, but a good old pastry blender works beautifully too.
Achieving a Flaky Crust (The Cold Butter Imperative)
I cannot stress this enough: cold, cold, cold. When you mix the dough, you should still see distinct, flat chunks of butter the size of small peas. These pieces melt in the oven, releasing steam and creating air pockets for flakiness.
If you’re really struggling with warm hands or a hot kitchen, I recommend grating frozen butter right into the flour that little tip changed my pastry life. If you want to dive deeper into dough strategy, I wrote a whole article on [Apple Pie Recipe: The Ultimate Flaky Pastry No-Soggy Bottom Method].
Preventing the Dreaded Soggy Bottom (Starch & Bake Temperature)
The secret weapon against a soggy bottom is a combination of thickeners and temperature management. We use both cornstarch and flour in the filling; the cornstarch thickens beautifully, and the flour helps bind the moisture from the fruit.
On top of that,, we hit the pie with a blast of high heat (425°F) for the first 15 minutes, which instantly sets the bottom crust before the fruit juices even start weeping.
Balancing Sweetness and Acidity in the Fruit Filling
A truly great apple pie filling recipe doesn't taste like one dimensional candy; it needs complexity. We use a combination of tart Granny Smiths (for structure and tang) mixed with sweeter, firmer apples like Honeycrisp (for flavour and aroma).
Don't forget that splash of lemon juice; it prevents the apples from oxidizing and brightens the whole profile.
Ingredients: Selection, Preparation, and Smart Swaps
Choosing the Perfect Blend of Baking Apples (Tart vs. Sweet)
| Ingredient | My Recommendation | Smart Swap/Substitution |
|---|---|---|
| Baking Apples | 4 Granny Smith + 2 Honeycrisp | Use all Fuji or Braeburn if you prefer less tartness, or use Golden Delicious, but reduce the sugar by ¼ cup. |
| Unsalted Butter | European Style (high fat) | Use a blend: 50% cold butter, 50% cold vegetable shortening for guaranteed flake and easier handling. |
| Cornstarch | Standard Food Grade | Use 2 tbsp of arrowroot powder or tapioca starch for a shinier, gluten-free filling. |
| All-Purpose Flour | Standard AP Flour | A quality gluten-free cup-for-cup blend works great for both the filling and the crust. |
| Cinnamon/Nutmeg | Vietnamese Cinnamon & Fresh Nutmeg | Use 1 tbsp pre-mixed apple pie spice blend if you are short on individual spices. |
Dairy Deep Dive: Why European Butter is Essential for Flake
European style butter often has a higher butterfat content (around 82%) compared to standard American butter (around 80%). That extra fat means less water, leading to a richer flavour and a more dramatic flakiness when baked.
If you can’t find it, just ensure whatever butter you use is high-quality and, again, absolutely frozen solid when you start.
Essential Thickening Agents and gluten-free Alternatives
Using two thickeners is my failsafe approach. Cornstarch handles the bulk of the juice absorption, but the small amount of flour helps prevent the dreaded weeping or separation that can sometimes happen when a filling cools.
For a clearer, less cloudy filling, tapioca starch is a great alternative, but you might need slightly less of it.
Spice Profile: Using Vietnamese Cinnamon and Fresh Nutmeg
Ditch the pre-ground nutmeg that’s been sitting in the cupboard since 1998, please. Freshly grated nutmeg has a warmth and fragrance that is just unmatched and truly elevates this Homemade apple pie .
Vietnamese cinnamon is often stronger and sweeter than standard Ceylon cinnamon, which means you get that signature warmth without using too much gritty powder.
Flaky All-Butter Apple Pie: step-by-step Baking Method
Phase 1: Constructing the Dough (The Pâte Brisée Technique)
- Prep the Dry: Whisk the flour, sugar, and salt together in a bowl. Add the cold butter cubes.
- Cut the Fat: Use a pastry blender or food processor to mix the butter into the flour until it resembles coarse crumbs, but remember to leave those pea-sized pieces untouched. This is crucial for flake.
- Hydrate Carefully: Drizzle in the ice water and vinegar (if using) just one tablespoon at a time. Pulse/mix only until the dough just comes together it should still look shaggy. Mistake I once made: Adding too much water makes the dough gummy.
- Chill Time: Divide the shaggy dough into two discs, wrap tightly, and chill for at least 60 minutes.
Phase 2: Preparing the Fruit Filling and Resting Time
- Slice Uniformly: Peel, core, and slice your apples uniformly, about ¼-inch thick. If your slices are too thick, they won't soften properly. Too thin, and you'll end up with apple sauce.
- Flavor Toss: Toss the apple slices immediately with the lemon juice and zest.
- Mix the Dry Stuff: Whisk together the sugars, cornstarch, flour, salt, and spices in a separate bowl.
- Combine: Pour the dry mix over the apples and toss gently until everything is evenly coated. Let this mixture sit for 10- 15 minutes while you roll the dough; the sugar will start drawing out moisture, and that's okay!
Phase 3: Assembly and Perfect Crimping Techniques
- Roll and Fit: Roll the slightly larger disc into a 12 inch circle and gently drape it into your 9 inch pie plate. Do not stretch the dough!
- Pile it High: Pour the apple filling into the crust. It should look like an alarming mountain of apples it will cook down, I promise. Dot the top with the final 2 tablespoons of butter.
- Top Layer: Cover with the second crust (or lattice). Trim the excess, tuck the edges under, and then pinch or use a fork to firmly crimp the edges shut to create a seal.
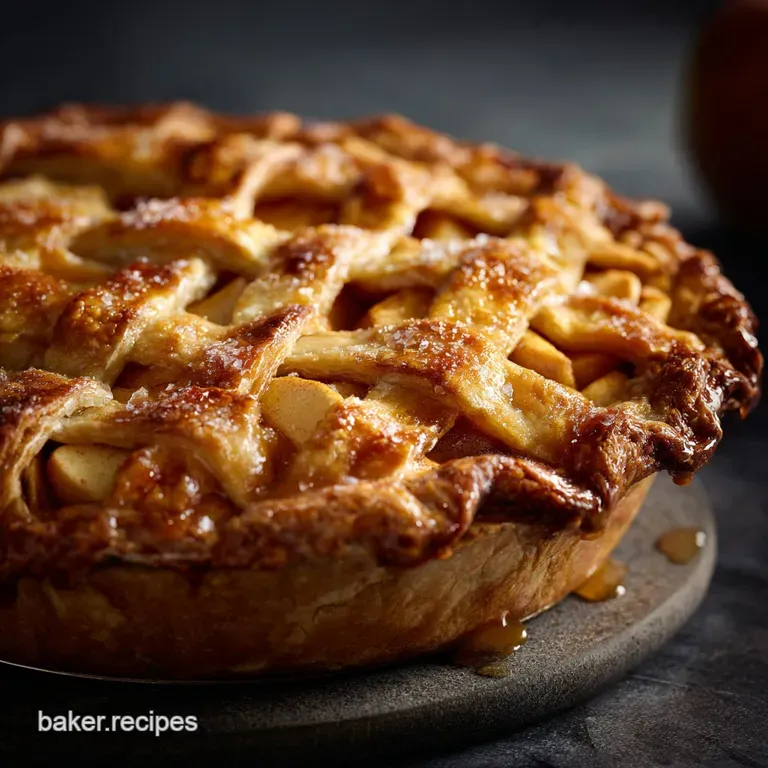
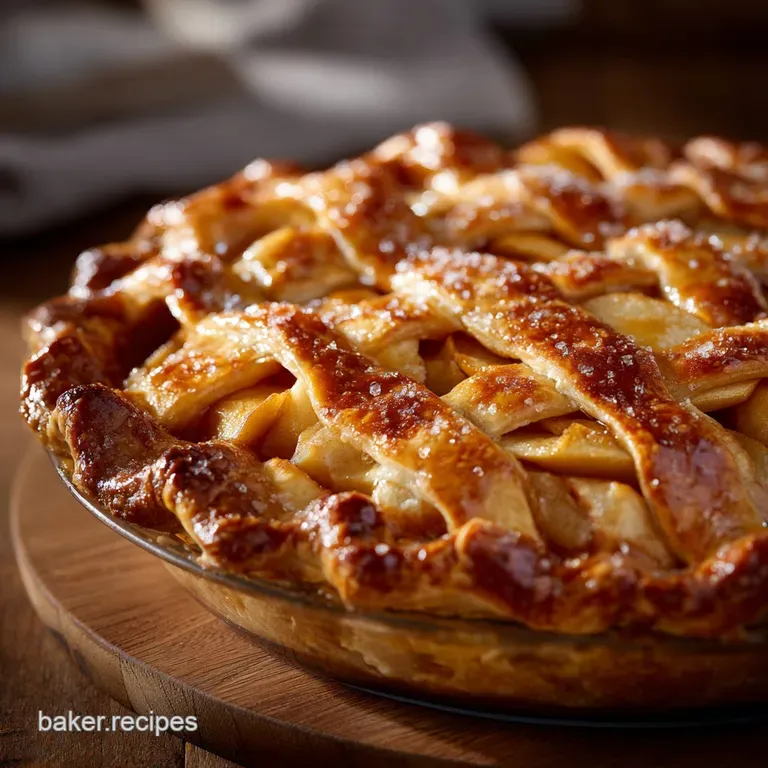
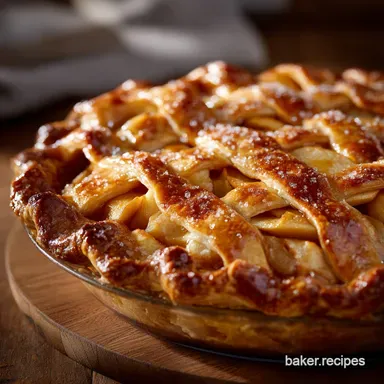
- Vent and Brush: Cut at least four large steam vents into the top crust. Brush the crust evenly with the egg wash and sprinkle with coarse sugar for that professional sparkle.
Phase 4: Bake Temperatures, Venting, and Internal Checks
- Preheat & Protect: Preheat your oven to 425°F (220°C). Place the pie on a parchment lined baking sheet and place this on the lowest rack.
- Hot Start: Bake at 425°F for 15 minutes. This sets the bottom crust.
- Slow Finish: Reduce the temperature to 375°F (190°C) and continue baking for 40– 50 minutes. The filling should be audibly bubbling in the center vents. If the edges start to brown too quickly, shield them with foil strips.
- Check Doneness: Use a thin skewer or knife inserted through a vent to ensure the apples are tender.
- Cooling is Mandatory: Transfer the pie to a rack and let it cool for at least 2 hours, preferably 3. If you cut it hot, you will get runny filling. That’s just pie law.
Expert Tips for Home Bakers: Troubleshooting and Elevation
Solving the Crumbly Dough Dilemma
If your dough cracks and crumbles immediately when you try to roll it, it is too dry. This usually happens because you skimped on the water. Quickly sprinkle a tablespoon of ice water over the cracked areas, fold it over itself, and gently knead/pat it together just enough to seal the cracks.
Immediately re-chill it for 15 minutes before attempting to roll again.
How to Achieve an Even, Golden Brown Finish
That beautiful, even crust comes entirely from the egg wash and sugar combo. I use one egg beaten with a teaspoon of water or milk. Don't slather it on, just brush lightly. The coarse sugar (like turbinado or demerara) adds sparkle and crunch, making the crust look incredibly appealing.
Chef’s Note: If you notice one side of the crust browning faster than the other, simply rotate the pie 180 degrees halfway through the 375°F bake time. Ovens always have hot spots!
Adjusting Filling Consistency Post Bake
What if you cut it and it’s runny? First, panic a little, then realize it's probably salvageable. If you didn't cool it long enough, let the slice sit for 15 minutes it might set up more. If it’s still soupy, you skimped on the thickeners.
Next time, add an extra ½ teaspoon of flour or cornstarch. You can’t fix a runny filling once the pie is baked, but you can serve the slices with ice cream to absorb the extra liquid.
The Professional Baker's Secret: Lard vs. Butter Debate
Many old-school bakers swear by using lard (or half lard, half butter) for pastry. Lard creates the flakiest texture imaginable because it has a higher melting point and 100% fat content.
If you aren't put off by using animal fat, substituting half your butter with cold lard guarantees an Amazing Apple Pie Recipe with incomparable flakiness.
Preserving Perfection: Storage, Freezing, and Reheating
Storing Unbaked Pie Dough and Filling Separately
You can prep both components well in advance. Wrapped tightly, the pie dough discs will keep for up to 3 days in the fridge, or up to 2 months in the freezer. Keep the filling components separate until you are ready to assemble; slice the apples and store them coated in just the lemon juice and zest, then mix in the sugars and starch right before assembling.
Best Practices for Freezing a Whole Baked Apple Pie
Yes, you can freeze a whole baked apple pie ! Cool it completely, wrap it tightly in plastic wrap, and then cover it again with heavy duty foil. It will last for up to 4 months.
To reheat, remove the plastic/foil, place the frozen pie in a cold oven, and then turn the heat up to 350°F (175°C). Bake for about 45– 60 minutes until the filling is bubbling hot in the center.
Preserving Perfection: Storage, Freezing, and Reheating
This pie is always best the day it’s baked, but leftovers are fantastic. Keep slices covered loosely at room temperature for up to 2 days, or transfer to an airtight container and refrigerate for up to 4 days.
If refrigerated, reheat individual slices gently in the microwave or, even better, in a 300°F oven for 10 minutes until the crust crisps up again.
Presentation and Pairings: Elevating Your Apple Pie Experience
Serving Suggestions
I am a purist, so I love a classic slice served warm with a scoop of real vanilla ice cream. However, if you want to get truly cosy, serve it with hot pouring custard, the British way.
The spiced apple filling also pairs brilliantly with pork dishes, much like the apple/sausage combination in my recipe for [Sunday Roast Stuffed Winter Squash Sausage Apple Pecan]. Either way, don’t forget the tea!
Presentation Tips
For a clean slice, ensure the pie is fully cooled before cutting. Use a large, sharp knife dipped in hot water between slices. Garnish the plate simply with a dusting of powdered sugar or a fresh sprig of mint for a pop of colour.

Recipe FAQs
How do I prevent the dreaded "soggy bottom" crust?
Achieving a crisp lower crust requires managing moisture and temperature. Ensure your baking stone or heavy sheet pan is preheated in the oven before placing the pie on it, which immediately helps crisp the bottom dough.
Additionally, blind baking the lower crust for 10-15 minutes or brushing it with an egg white wash before filling can create a waterproof barrier.
My filling is too runny after baking. What went wrong?
A runny filling typically occurs when the pie is underbaked or insufficient thickener was used relative to the apple volume. Ensure the internal temperature reaches 200°F (93°C), which allows the cornstarch or tapioca starch to fully activate and set properly.
If you suspect your apples are particularly juicy, add an extra tablespoon of thickener during prep.
Can I use different types of apples than Granny Smith and Honeycrisp?
Yes, the key to a balanced filling is using a blend of firm, tart apples (like Northern Spy or Cortland) and slightly softer, sweeter apples (like Gala or Braeburn). It is crucial to avoid apples that break down into mush too easily, such as McIntosh, as they will compromise the structured texture of the final filling.
Why isn't my all-butter crust flaking, and is dense instead?
Flaky crust relies heavily on maintaining very cold butter and limiting gluten development. If the butter melts during mixing or rolling, or if you overwork the dough, the necessary pockets of fat that create steam and layers will be destroyed.
Ensure the butter pieces are still visible (pea-sized) before chilling the dough for at least two hours.
What is the best way to store leftover pie, and can I freeze it?
Store cooled leftover pie covered loosely at room temperature for up to two days, or refrigerate for up to four days for extended freshness. You can freeze an entire unbaked pie by wrapping it tightly in plastic wrap and foil; bake directly from frozen, adding about 20-30 minutes to the total baking time.
Can I prepare the pie filling or crust the day before baking?
Absolutely, preparing the dough a day ahead is recommended as chilling improves the texture and flakiness. You can also prep the filling 12 hours ahead, but store the sliced apples and spices separately from the sugar mixture, combining everything just before assembly to prevent the sugar from drawing out too much moisture prematurely.
Flaky All Butter Apple Pie Recipe
Ingredients:
Instructions:
Nutrition Facts:
| Calories | 593 kcal |
|---|---|
| Protein | 6.0 g |
| Fat | 27.4 g |
| Carbs | 84.1 g |
