Deliciously Creamy Roasted Garlic Bliss Spread
- Recipe Overview
- Key Benefits
- Essential Ingredients Guide
- Unlocking Professional Cooking Methods: Transform Your Kitchen Game
- Pro Tips & Secrets for Roasted Garlic Bliss
- Perfect Presentation of Roasted Garlic Bliss
- Storage & Make-Ahead: Keep It Fresh
- Creative Variations: Switch It Up
- Complete Nutrition Guide: Know What You're Eating
- Frequently Asked Questions
- 📝 Recipe Card
You ever have one of those days where you feel a bit wilted? maybe your favorite sweater didn’t fit right, or you burned the toast been there.
But then, you stumble across something that makes everything right again. for me, that “something” is roasted garlic bliss: a flavorful delight .
Oh my gosh, just thinking about it makes my mouth water! this dish takes plain old garlic and transforms it into this heavenly spread that just wraps you in a cozy hug.
Trust me, it’s like a warm blanket for your soul!
But let’s not get ahead of ourselves here! this roasted garlic recipe isn’t just about bringing joy, darling. garlic has huge health benefits, too.
Seriously, it’s like nature’s little superhero. packed with antioxidants, it boosts your immune system and even helps reduce blood pressure.
So as you indulge in this creamy garlic spread, know that you're doing something good for your body, too.
Recipe Overview
Now, let’s delve into this mediterranean inspired dish. roasted garlic has been adored for centuries! it’s a staple in mediterranean cuisine, where folks know how to love their garlic.
This garlic butter blend brings warmth and flavor to the table something that has never gone out of style. honestly, everyone from your grandma to that hipster cafe down the street has a version of roasted garlic bliss!
Putting together this dish is a piece of cake. you’ll need about 15 minutes of active prep and 45 minutes of cooking .
Total time? just an hour. and don’t sweat it; this is an easy side dish recipe, perfect for any home cook.
You’ll yield around six generous servings.
When it comes to cost, you won’t break the bank this will probably set you back under $10, especially if you’re using fresh herbs from your backyard or local farmer's market.
Key Benefits
Let’s chat health for a second. did you know the culinary uses of garlic don’t just make food taste good? garlic is known for its health benefits like boosting heart health and giving your body a fighting chance against nasty bugs during flu season.
Plus, it’s low in calories!
What really sets roasted garlic bliss apart is its versatility. you could whip this up for a cozy date night or serve it at your next gathering.
It’s those enticing spreads for entertaining that leave everyone asking for the recipe. side note: this will up your host game, i promise!
It’s the perfect accompaniment to crusty artisan bread or roasted vegetable sides. and if you want something with a bit of kick, toss in some sun-dried tomatoes or roasted red peppers for unique flavor combinations that knock your socks off.
Plus, if you or your friends are vegan, no worries! You can easily whip up vegan roasted garlic options without missing any blissful flavor.
So, are you ready to see what goes into this deliciousness? Here’s what you’ll need…
Essential Ingredients Guide
Welcome to the wonderful world of cooking! if you’re anything like me, you know that the right ingredients can turn an ordinary meal into a mouth watering experience.
Let’s dive into some essential ingredients, shall we? consider this your go-to guide for creating delicious dishes like roasted garlic bliss: a flavorful delight !
Premium Core Components
First things first: measurements matter! when you’re whipping up something special, getting those quantities right is key. for instance, for our roasted garlic bliss , you’ll need 2 whole bulbs of garlic (that’s about 300g ), along with 1 tablespoon of olive oil (around 15ml ).
Now, if you’re more of a metric person, just follow along these measurements work for everyone!
Now, let’s talk about quality indicators . the best garlic should feel firm and have no sprouting or soft spots. this ensures you’re getting the freshest flavors.
As for storage , keep those bulbs in a cool, dry place. they can last up to 10 days at room temp, but if you refrigerate, watch them closely.
They won’t spoil, but they can start sprouting.
And here’s a hot tip: before you grab those ingredients, always give ‘em a sniff! fresh herbs should smell aromatic, and garlic should smell, well, garlicky! this simple step helps you pick the best quality stuff for your dishes.
Signature Seasoning Blend
Now here comes the fun part creating that signature seasoning blend ! when it comes to garlic, pair it with some classic herbs like thyme and parsley for a heavenly mediterranean flavor.
Oh man, just thinking about it gets me all excited!
For our creamy Roasted Garlic Bliss , you can’t go wrong with a bit of lemon juice to balance the flavors. It’ll make everything pop!
And let’s not ignore the local flair. If you’re feeling adventurous, swap in some rosemary or even basil . That’s the beauty of cooking; it’s all about personal flair and experimentation!
Smart Substitutions
We’ve all been there, staring at a recipe and realizing we don’t have half the stuff. but worry not! here’s where smart substitutions come into play.
If you’re out of cream cheese, how about giving mascarpone or ricotta a shot? both can create that creamy texture we’re after!
For those watching their dairy, this is where vegan roasted garlic options come in. you can use cashew cream instead of cheese, and trust me, it’s just as dreamy! also, if you’re in a pinch, greek yogurt can gracefully replace sour cream.
Kitchen Equipment Essentials
Before diving into that culinary masterpiece, let’s make sure you have your kitchen equipment essentials ready. you’ll need an oven and a baking dish for roasting that lovely garlic.
As for blending your ingredients, a food processor or a good old-fashioned mixing bowl does the trick!
Don’t stress if you're missing fancy gadgets; sometimes, a bit of creative thinking goes a long way. A simple mixing spoon can also whisk a homemade dip together if you're in a rush!
Tips & Tricks to Remember
Cooking should be fun, right? So here are a few quick tips to keep it breezy while making those delicious garlic dishes:
- Watch your garlic carefully while it’s roasting. You want it golden brown and soft —not burnt!
- Allow garlic to cool slightly before blending. This makes for a super creamy texture in your whipped garlic spread .
- Always taste and adjust! Don’t be shy about adding a bit more lemon or extra herbs.
Now that we’ve got that wrapped up, why don’t we dive into making that roasted garlic bliss ? gather your ingredients and get ready for an explosion of flavors that’ll wow your friends and family.
With these handy tips and ingredients, you’ll be one step closer to creating a dish that’s simply delightful! let’s get cooking!
Unlocking Professional Cooking Methods: Transform Your Kitchen Game
Cooking can feel like an art form, but honestly, it can also be a hot mess, right? if you want to elevate your culinary experience and impress your friends, mastering some professional cooking methods is the way to go.
Today, we’ll dive into essential preparation steps, a step-by-step roasting process, and some expert techniques to create the magic called roasted garlic bliss: a flavorful delight .
Essential Preparation Steps
First, let’s chat about mise en place french for “everything in its place.” it’s all about being organized before you cook, so you don’t end up scrambling like a chicken without its head! gather your ingredients, like those two bulbs of garlic and a few dollops of cream cheese.
Seriously, it saves so much time!
Time management is another key player here. when you illustrate your prep time, like the 15 minutes you'll need for chopping and 45 minutes of roasting, it becomes a cakewalk.
I remember the first time i tried to whip up something complex without charting it out. spoiler alert: i was elbow deep in ingredients when i realized i forgot to preheat the oven.
Not fun, folks!
Don’t overlook safety considerations either. always keep a clean workspace and use a cutting board. nobody wants to risk a finger or a bout of food borne illness, especially not when you’re making something as decadent as a creamy garlic spread .
Step-by-step Process
Time to bring this recipe to life. Here’s your no-nonsense list to follow:
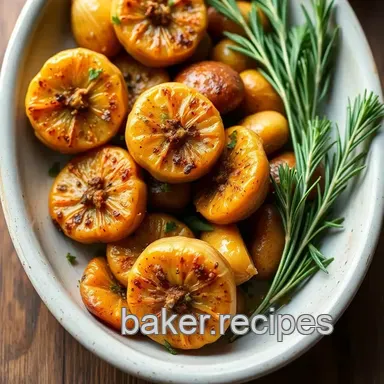
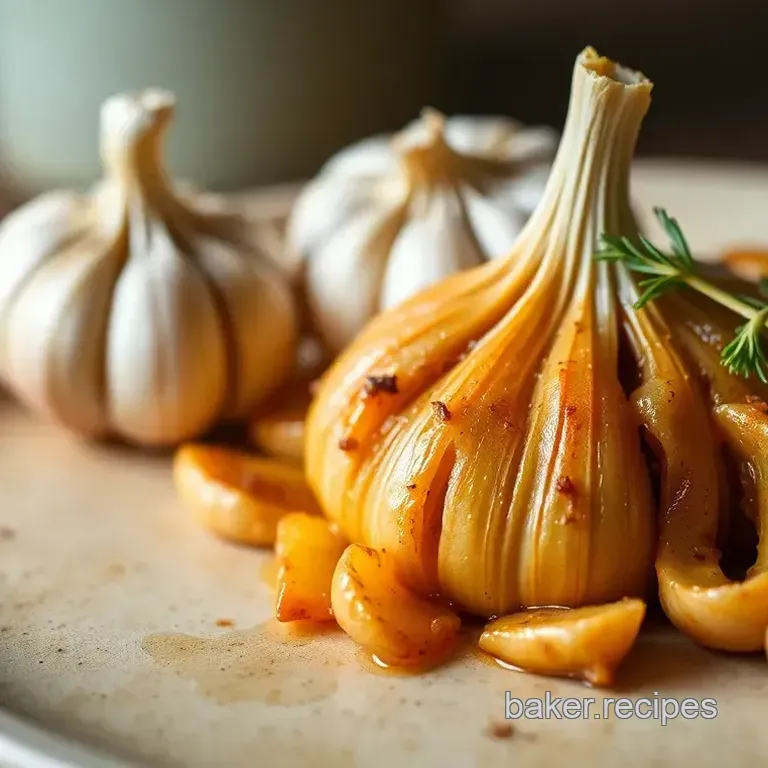
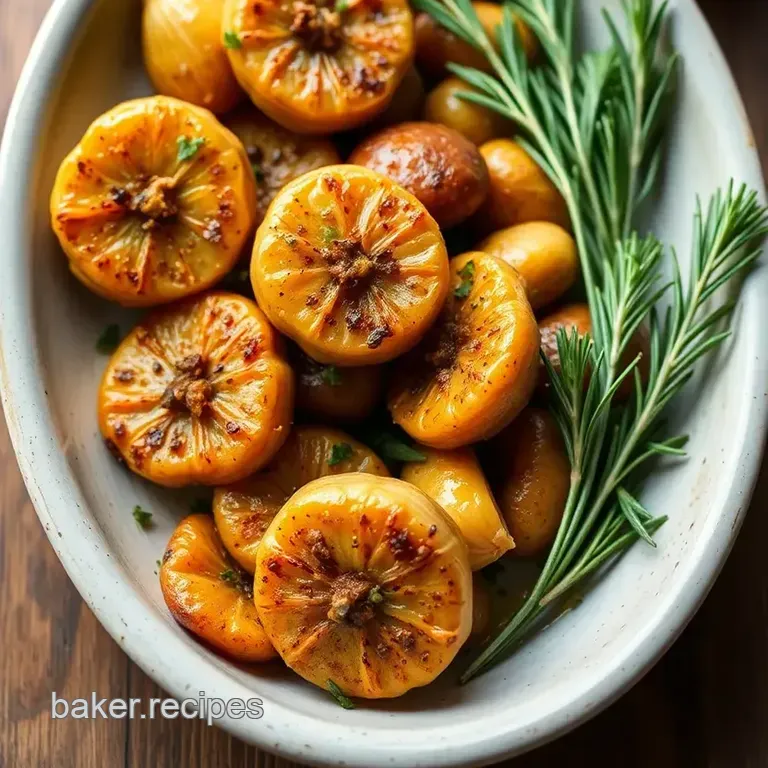
- Preheat your oven to 400° F ( 200° C) . This is your starting point.
- Prepare your garlic : Trim the tops of the garlic bulbs to expose the cloves, drizzle with olive oil, wrap them up, and pop them in a baking dish.
- Roast the garlic : Bake for 35- 45 minutes until soft and golden brown. Trust me; the smell will be to die for .
- Cool the garlic slightly before you handle it; nobody likes burnt fingers.
- Mix it up : In a bowl, combine softened cream cheese, butter, and Greek yogurt. Squeeze those roasted cloves into the mix.
- Season : Add your salt, pepper, lemon juice, and thyme for that delicious flavor punch. Blend until you have a silky, dreamy spread.
Remember, timing is everything! You’re looking for those golden brown visuals to tell you that your garlic is just right. It should ooze sweetness and bring that comfort food essence to life.
Expert Techniques
Here's where those critical steps shine. take your time when blending; the smoother the whip, the creamier the texture. if your spread feels too thick, don’t hesitate to toss in a splash of extra greek yogurt.
We’ve all faced those oops moments. Over roasted garlic? Not the end of the world! Just toss in a bit more cream cheese and seasoning to mask that bitterness.
If you’re feeling adventurous, try different roasted garlic variations like sun-dried tomatoes or roasted red peppers. They add zing to your homemade dip!
Success Strategies
Many home cooks fall into the trap of skipping the seasoning you don’t want to be that person. a sprinkle of salt can take your dish from “meh” to “heck yes!” check those quality checkpoints before serving.
Taste is your best friend.
Also, make this dish ahead! you can whip it up and store it in the fridge for up to 3 days .
Perfect for parties or a laid back night with rustic bread pairings.
Additional Information
So there you have it: a detailed plan to navigate your way to roasted garlic bliss: a flavorful delight . this recipe is versatile, healthy, and showcases the culinary uses of garlic beautifully.
Don't just stick with the basics get creative with flavors, and don't be afraid to experiment! now, get cooking and enjoy the beautiful world of mediterranean garlic dishes .
Who knows, maybe you'll find your make-ahead options are next level!
Pro Tips & Secrets for Roasted Garlic Bliss
Alright, friends! let’s dive into some pro tips and secrets that’ll take your roasted garlic bliss: a flavorful delight to the next level.
First off, roasting garlic is more about technique than anything else. you wanna watch those cloves transform into a sweet, nutty goodness.
So, keep an eye on them while they roast. a little golden brown is perfect; too much brown and, well, you’ve got a burnt mess.
Speaking of time saving techniques, if you’re in a hurry, you can just wrap those bulbs in aluminum foil instead of a baking dish.
It actually helps them cook faster, and you'll nail that mellow, rich flavor without waiting as long. gotta love those shortcuts!
Flavor enhancement tips? yeah, i’ve got those too! adding fresh herbs like thyme or even a sprinkle of smoked paprika after blending can give it that extra oomph.
You’ll surprise yourself with how just a hint of something different can elevate your garlic spread to new heights. if you wanna bring out that mediterranean vibe, consider adding a drizzle of good quality olive oil right before serving.
Talk about a flavor explosion!
And when it comes to presentation advice, think about how you want to show off your masterpiece. use a shallow bowl for that whipped-up bliss.
Spread it out a bit to show off the creamy texture. and topping it with some chopped parsley? total game changer!
Perfect Presentation of Roasted Garlic Bliss
Now, let’s get to the fun part: presentation ! you know what they say, we eat with our eyes first.
When plating your roasted garlic bliss , don’t just scoop it into a bowl and call it a day. spread it artistically! you can use the back of a spoon to create swirls or even a little well in the middle for your olive oil drizzle.
Color is super important too. the pale creaminess of the garlic spread is gorgeous against a rustic brown antipasto platter.
Toss in some cherry tomatoes, or olives to add pops of red or green. a vibrant spread always gets the crowd talking.
Fewer boring platters, more appetizing canvases!
Storage & make-ahead: Keep It Fresh
Alright, let’s talk storage . if you’ve got leftovers (which honestly, i doubt you will, because it’s that good), store your garlic bliss in an airtight container it’ll last in the fridge for up to three days .
No one wants stale spreads, right?
If you’re thinking of prepping ahead of time, this garlic goodness actually gets better if you give it a day to meld in the fridge.
Just make sure to let it come to room temperature before serving to maintain that perfect creamy consistency. for reheating, just scoop a portion and microwave for about 10-15 seconds to take the chill off.
Voila!
Creative Variations: Switch It Up
Now, let’s spice things up with some creative variations . want a different flavor? toss in some chopped sun-dried tomatoes or roasted red peppers for a sweet twist.
Feeling adventurous? give a go at mixing in some spices like cumin or coriander for a world of flavors in one bite.
And don’t forget, if you’re looking into vegan roasted garlic options , try swapping the cream cheese with cashew cream.
It’s super creamy and packs a punch of flavor. seriously, these adaptations can turn your garlic based appetizers into something everyone will remember!
Complete Nutrition Guide: Know What You're Eating
Now, i know many of us are interested in the nutrition behind our food. per serving, our roasted garlic bliss gives you around 120 calories with some healthy fats and protein.
Garlic itself offers health benefits like boosting your immune system and even heart health. so, while you’re enjoying this savory spread, you’re also doing something good for your body.
When it comes to portion guidance, remember moderation is key; enjoy it with a slice of rustic bread, or as a simple dip for roasted veggies it’s all about balance, friends!
In conclusion, don’t shy away from experimenting. cooking should always be fun! this roasted garlic recipe is so versatile, and with your own twists, it’s bound to become a staple.
So gather your ingredients, let those garlic cloves roast away, and enjoy the cheerful chatter and laughter that comes with sharing an enticing spread with friends and family.
Trust me, once you try roasted garlic bliss: a flavorful delight , you'll be hooked! happy cooking!
Frequently Asked Questions
What is Roasted Garlic Bliss: A Flavorful Delight, and how can I serve it?
Roasted Garlic Bliss is a creamy, savory spread made with roasted garlic, cream cheese, and Greek yogurt, perfect for enhancing various dishes. You can serve it as a dip with crackers or artisan bread, or use it as a flavorful spread in sandwiches and wraps.
It also pairs wonderfully with roasted vegetables and fresh salads.
Can I make Roasted Garlic Bliss ahead of time?
Yes! You can prepare Roasted Garlic Bliss ahead and store it in the refrigerator for up to 3 days. To maintain the best flavor and texture, cover it tightly in an airtight container. Just give it a good stir before serving to reintroduce its creamy consistency.
What are some variations I can try with Roasted Garlic Bliss: A Flavorful Delight?
There are numerous delicious variations you can try! For a tangy twist, add sun-dried tomatoes or roasted red peppers. For a vegan alternative, substitute the cream cheese and yogurt with cashew cream and plant based yogurt to maintain the creamy texture and flavor.
How do I properly store leftover Roasted Garlic Bliss?
Leftover Roasted Garlic Bliss can be stored in an airtight container in the refrigerator for up to 3 days. If you want to keep it longer, consider freezing it. You can store it in small portions using ice cube trays, then transfer the frozen cubes to a zip-top bag for longer storage.
Is Roasted Garlic Bliss healthy?
Roasted Garlic Bliss can be a healthy addition to your diet when consumed in moderation. It contains beneficial ingredients like garlic, which is known for its health promoting properties, and Greek yogurt, which adds protein and probiotics.
Always be mindful of portion size due to the fat content from butter and cream cheese.
What can I use instead of garlic if I want to make a different flavor blend?
If you're looking to switch up the flavor profile, consider using roasted shallots for a milder, sweeter taste, or caramelized onions for added sweetness and depth. You can also experiment with herbs like basil or rosemary, which can maintain a savory note without the garlic.
Garlic Bliss Roasted Delight