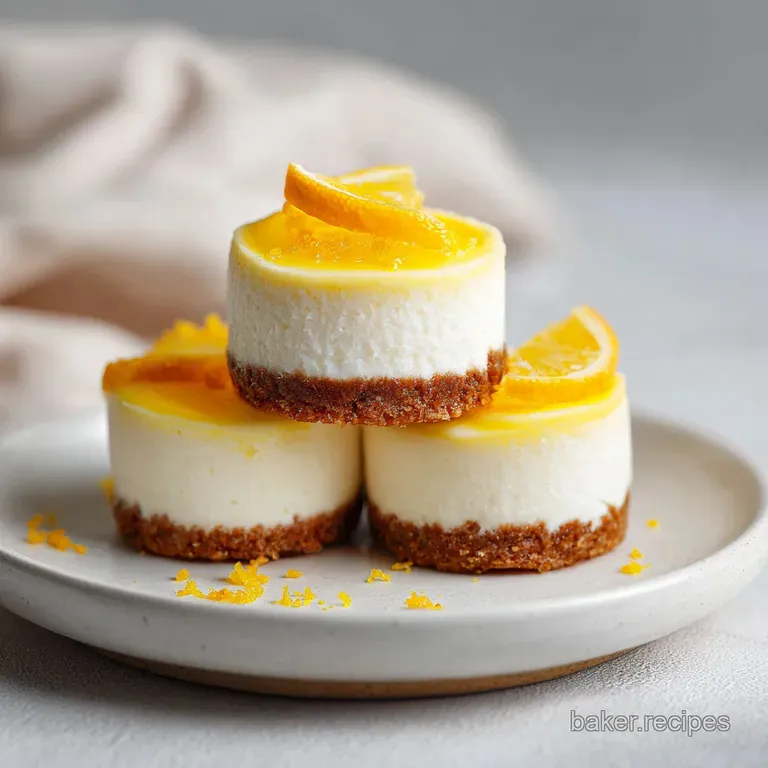
Lighter Mini Cheesecakes: Silky and Snappy
- Time: Active 15 minutes, Passive 18 minutes, Total 33 minutes
- Flavor/Texture Hook: Silky honey vanilla center with a buttery graham cracker snap
- Perfect for: Stress free hosting, portion controlled treats, or beginner bakers
- Why These Small Bites Actually Work
- The Logic Behind the Creaminess
- Selecting Your Elements and Substitutes
- Setting Up Your Baking Station
- Step-By-Step Assembly Instructions
- Mastering the Texture and Fixes
- Adjusting the Batch Size
- Debunking Common Kitchen Tales
- Smart Storage and Zero Waste
- Serving and Topping Ideas
- Recipe FAQs
- 📝 Recipe Card
Why These Small Bites Actually Work
If you've ever bitten into a cheesecake only to find the crust is more like wet sand than a biscuit, you know the heartbreak of a poorly constructed dessert. I spent years thinking the filling was the only thing that mattered, but the real secret to spectacular Mini Cheesecakes lies in the structural integrity of the base.
Most recipes have you dump raw crumbs into a tin and hope for the best, but that leads to a rubbery, uninspired mess. This version uses a precise pre bake at a higher temperature to "set" the butter and sugar, creating a moisture proof barrier that keeps things crisp.
But let's talk about the filling texture. Traditional recipes can feel heavy or cloying after just two bites. We’re fixing that by introducing Greek yogurt into the mix. It isn’t just about saving a few calories, it’s about the chemistry of the crumb.
The acidity in the yogurt interacts with the cream cheese to create a more velvety, almost mousse like finish that doesn't stick to the roof of your mouth. When you pull these out of the oven, they won't look like much, but after a slow chill, they transform into these dense, floral, and incredibly satisfying little gems.
We are also ditching the complicated water bath. Since we’re working with smaller volumes in a muffin tin, the heat distribution is much more even than a giant 9 inch cake. By dropping the oven temperature after the crust is done, we mimic the gentle environment of a water bath without the risk of splashing water into our batter.
It’s a cleaner, faster, and much more reliable way to get that professional, crack free finish every single time. Trust me, once you see that slight jiggle in the center, you’ll know you’ve nailed the perfect bake.
Moisture Barrier: Pre baking the graham crumbs at 350°F toasts the starches, preventing the filling from soaking in and causing sogginess.
Acidic Tenderizing: The lactic acid in Greek yogurt breaks down dense dairy proteins, resulting in a velvety, lighter mouthfeel.
Low Impact Aeration: Mixing the egg on the lowest speed prevents trapped air bubbles that cause the cakes to rise and then collapse.
| Method | Time | Texture | Best For |
|---|---|---|---|
| Toasted Crust | 33 minutes | Crunchy and Snap | Traditional dessert lovers |
| No Bake Crust | 25 minutes | Soft and Crumbly | Last minute cravings |
| Frozen Base | 40 minutes | Hard and Cold | Hot summer afternoons |
Choosing the right approach depends entirely on how much crunch you want. If you're in a massive rush, you can skip the pre bake and just freeze the crusts for 15 minutes, but you'll lose that deep, nutty flavor that only comes from the oven's heat.
For the absolute best results, stick to the toasted method the contrast between the warm, woody graham cracker and the cool, silky cream is exactly what makes these Mini Cheesecakes stand out from a basic store-bought version.
The Logic Behind the Creaminess
| Ingredient | Science Role | Pro Secret |
|---|---|---|
| low-fat Cream Cheese | Structural Base | Use blocks, not tubs, for a denser, more authentic set. |
| Greek Yogurt | Emulsifier/Acid | Full fat yogurt provides the silkiest texture and best tang. |
| Honey | Hygroscopic Sweetener | Honey keeps the filling moist longer than granulated sugar. |
| Large Egg | Protein Binder | Ensure it is room temperature to prevent the batter from curdling. |
The choice of honey over refined sugar isn't just a "healthy" swap; it's a texture play. Honey is a humectant, meaning it holds onto moisture with a death grip. This prevents the cheesecakes from drying out if they sit in the fridge for a day or two. If you're looking for a different vibe, you could try this Mini Key Lime Cheesecakes recipe which uses similar principles but with a citrus heavy profile.
Selecting Your Elements and Substitutes
- Graham Cracker Crumbs (1.5 cups): These provide the earthy, honeyed foundation. Why this? They absorb butter perfectly while maintaining a distinct, grainy crunch.
- Unsalted Butter (3 tbsp, melted): The glue for our crust. Why this? Unsalted allows you to control the seasoning with your sea salt pinch.
- Coconut Sugar (1 tbsp): Adds a deep, caramel like sweetness to the base. Why this? It has a lower burn point than white sugar, aiding the toasting process.
- Sea Salt (1 pinch): Essential for balancing the sugar. Why this? It brightens the dairy flavors in the cream cheese.
- low-fat Cream Cheese (12 oz): The tangy, creamy heart of the dish. Why this? It provides structure without the heavy greasiness of some full fat brands.
- Plain Greek Yogurt (0.5 cup): Our secret for a velvety finish. Why this? The high protein content helps the cheesecake set firmly without being rubbery.
- Honey or Maple Syrup (0.25 cup): A liquid sweetener for a smoother batter. Why this? Dissolves instantly, ensuring no gritty sugar crystals remain.
- Large Egg (1 unit): The binder that holds everything together. Why this? Provides the "lift" and richness needed for a custard like set.
- Vanilla Bean Paste (1 tsp): For those beautiful little black specks and deep flavor. Why this? Offers a more intense aromatic profile than standard extract.
- Lemon Zest (0.5 tsp): The "high note" of the recipe. Why this? Essential oils in the zest cut through the richness of the cheese.
| Original Ingredient | Substitute | Why It Works |
|---|---|---|
| Graham Crumbs | Ginger Snaps | Same texture but adds a spicy, warm kick. |
| Greek Yogurt | Sour Cream | Similar acidity level. Note: Result is slightly richer and higher in fat. |
| Coconut Sugar | Light Brown Sugar | Same moisture content and molasses like flavor profile. |
| Vanilla Bean Paste | Pure Vanilla Extract | Provides the same flavor. Note: You lose the visual aesthetic of the bean specks. |
Replacing the graham crackers with crushed Biscoff cookies or even shortbread is a great way to pivot the flavor profile. If you decide to go with a chocolate base, this Oreo Crust Mini Cheesecakes recipe is a fantastic reference for getting that cocoa to butter ratio just right. Just remember that different cookies have different fat contents, so you might need to adjust your melted butter by a teaspoon or two.
Setting Up Your Baking Station
You don't need a high end pastry kitchen to make world class Mini Cheesecakes, but a few specific tools make the process a breeze. A standard 12 cup muffin tin is the most important piece of gear.
While some people swear by specialized mini cheesecake pans with removable bottoms, I actually prefer the classic muffin tin lined with paper. The paper liners make them incredibly easy to transport and serve at parties.
For the smoothest batter, a handheld electric mixer is your best friend. You can use a stand mixer, but since we are working with a relatively small volume of ingredients (only 12 oz of cream cheese), a stand mixer bowl can sometimes be too large, leaving unmixed chunks at the very bottom.
A handheld mixer gives you better control over the speed, which is crucial when we get to the egg mixing stage where over aeration is the enemy.
Finally,, grab a flat bottomed glass or a small measuring cup. This is the "secret weapon" for a flat, even crust. Trying to press crumbs into a corner with your fingers always results in thick edges and a thin middle.
A glass allows you to apply even pressure across the entire surface, ensuring that every single bite of your cheesecake has the exact same ratio of crust to filling. It’s a small detail, but it’s what separates the amateurs from the pros.
step-by-step Assembly Instructions

- Preheat your oven to 350°F (177°C) and line a 12 cup muffin tin with paper liners. Note: This ensures the cheesecakes don't stick to the metal.
- Combine the graham crumbs, melted butter, sugar, and salt in a bowl until the mixture feels like wet sand.
- Press approximately 1.5 tablespoons of the mixture into each liner. Use the bottom of a small glass to pack it down firmly until the surface is flat and even.
- Bake the crusts for 5 minutes until they smell nutty and toasted. Remove from the oven and immediately reduce the temperature to 325°F (163°C).
- Beat the softened cream cheese in a medium bowl with your electric mixer until no lumps remain and it looks silky.
- Add the honey, Greek yogurt, vanilla bean paste, and lemon zest, mixing on medium speed until the batter is pale and uniform.
- Crack the room temperature egg into the bowl and mix on the lowest possible speed until just barely incorporated. Note: Do not over mix here or your cheesecakes will puff up and crack.
- Divide the batter evenly among the 12 liners, filling them nearly to the top.
- Bake at 325°F for 16–18 minutes until the edges are matte and set but the center still has a slight jiggle.
- Cool the tin on a wire rack at room temperature for 30 minutes, then transfer to the fridge for at least 2 hours until completely cold and firm.
Chef's Tip: If you want a perfectly flat top, tap the muffin tin firmly on the counter three times before sliding it into the oven. This forces any trapped air bubbles to rise to the surface and pop before the batter sets.
Mastering the Texture and Fixes
The most common hurdle with Mini Cheesecakes is knowing exactly when to pull them out of the heat. Because they are so small, they continue to cook for several minutes after they leave the oven. If you wait until they look "done" and solid in the middle, they will end up rubbery and dry once they cool.
You are looking for a specific visual cue: the edges should look slightly puffed and dull, while the very center (about the size of a dime) should still look a bit shiny and wobble like Jello when you gently shake the pan.
Why Your Cheesecake Sinks
A sunken center is usually the result of "the soufflé effect." If you whip too much air into the batter especially after adding the egg the air bubbles expand in the heat, lifting the cheesecake up like a balloon. Once it cools, those bubbles collapse, and the center drops.
To prevent this, always keep your mixer on the lowest setting for the final stage and ensure your ingredients are room temperature so they incorporate easily without heavy beating.
Why Your Crust Is Weeping
If you see little puddles of oil or moisture at the bottom of your liners, your butter to crumb ratio was likely a bit too high, or your cream cheese wasn't fully emulsified. This can also happen if you refrigerate the cakes while they are still warm, causing steam to trap under the crust.
Always let them reach full room temperature on the counter before they hit the cold air of the fridge.
| Problem | Root Cause | Solution |
|---|---|---|
| Surface Cracks | Oven was too hot or over baked. | Reduce temp to 325°F and use the "jiggle test" for doneness. |
| Gritty Texture | Cream cheese was too cold when mixing. | Ensure cheese is soft enough to spread like butter before starting. |
| Lumpy Batter | Ingredients added too quickly. | Scrape the bowl after every single addition to ensure total incorporation. |
- ✓ Pat the lemon zest dry if it's particularly oily to prevent clumping.
- ✓ Always use a room temperature egg to ensure a smooth emulsion.
- ✓ Preheat the oven for at least 20 minutes to ensure a stable temperature.
- ✓ Use a cookie scoop to divide the batter for 12 perfectly equal portions.
- ✓ Don't skip the pre bake; it's the only way to guarantee a "shatter" crunch.
Adjusting the Batch Size
Scaling Mini Cheesecakes is relatively straightforward because they are already divided into individual portions. If you want to make a half batch (6 servings), the only tricky part is the egg.
I recommend cracking one egg into a small bowl, whisking it well, and then measuring out exactly 2 tablespoons of the whisked egg. This ensures you keep the protein to fat ratio perfect without having to worry about "half an egg" messiness.
When scaling up to a double batch (24 servings), you’ll need to work in stages unless you have two muffin tins. Do not leave the cheesecake batter sitting on the counter for too long while the first batch bakes; the lemon zest acidity can start to "cook" the dairy proteins and change the texture.
Keep the extra batter in the fridge and give it a very gentle stir before filling the second round of liners. For larger batches, you might find that you need to increase the baking time by 2-3 minutes if your oven is crowded, as the extra thermal mass can drop the internal temperature of the oven.
Debunking Common Kitchen Tales
One persistent myth is that you must use a water bath even for small cheesecakes. This is simply not true. While a water bath provides insurance against cracking in a large cake, the small surface area of a muffin tin allows the heat to penetrate the center quickly enough that the edges don't overcook before the middle is set.
As long as you keep your oven temperature at a modest 325°F, you’ll get a beautiful result without the soggy crust risk of a water bath.
Another misconception is that "low-fat" means "low quality." In this specific recipe, the low-fat cream cheese actually works in our favor when paired with the Greek yogurt. It creates a cleaner flavor profile that allows the vanilla bean and lemon zest to shine through.
Some full fat cream cheeses can be so heavy that they mask the delicate floral notes of the honey. Don't feel like you're compromising on taste here this is a deliberate choice for a modern, brighter dessert.
Smart Storage and Zero Waste
These little treats are the ultimate make-ahead dessert. They actually taste better on day two because the flavors have had time to fully marry and the texture has stabilized. Keep them in an airtight container in the fridge for up to 5 days.
If you're worried about condensation making the tops sticky, place a single layer of paper towel over the top of the cheesecakes before sealing the lid. This absorbs any stray moisture.
For long term storage, these freeze beautifully. Place the fully chilled cheesecakes on a baking sheet and freeze until solid (about 2 hours), then transfer them to a freezer safe zip top bag. They’ll stay fresh for up to 3 months.
When you're ready to eat, just move them to the fridge the night before.
Zero Waste Tip: Don't toss the lemon after you've zested it! Squeeze the juice into a small jar and mix it with a little extra honey to create a simple syrup. You can drizzle this over the cheesecakes just before serving to add an extra punch of bright acidity.
If you have leftover graham cracker crumbs, toss them with a bit of melted butter and use them as a "sprinkle" topping for morning yogurt or oatmeal.
Serving and Topping Ideas
While these Mini Cheesecakes are stunning on their own with those tiny vanilla bean specks, they are also a blank canvas for your favorite flavors. Since they have a subtle honey lemon base, they pair exceptionally well with fresh fruit.
A single raspberry or a thin slice of strawberry on top adds a pop of color and a fresh, tart contrast to the velvety filling.
If you want to get a bit more decadent, a small dollop of lemon curd or a swirl of salted caramel can transform these from a casual snack into a dinner party worthy finale. For a festive look, try a light dusting of powdered sugar or some finely chopped pistachios for a bit of salty crunch.
No matter how you serve them, the key is to keep them cold until the very moment of service the temperature contrast between the cool cheese and the room temperature crust is half the fun!

Recipe FAQs
Does Costco have mini cheesecakes?
Yes, Costco typically carries mini cheesecakes in their bakery or freezer sections. These are convenient alternatives if you do not have time to make them from scratch in 33 minutes.
Is cheesecake good for heart patients?
No, it should be consumed sparingly. Cheesecakes are typically high in saturated fats and sugars, which generally do not align with heart healthy dietary guidelines.
What can I use for mini cheesecakes?
Use a 12-cup muffin tin lined with paper cups. This ensures the individual cheesecakes maintain their shape and do not stick to the metal pan during the 16 18 minute bake time at 325°F.
What are the three ingredient cheesecake bites?
No, this is a common misconception; authentic cheesecake requires more components. A true cheesecake bite needs cream cheese, sweetener, and an egg to achieve the correct structure, as seen in our mini vanilla bean cheesecakes.
How to prevent mini cheesecakes from cracking?
Avoid over mixing the egg into the batter. Adding the egg on low speed until just combined prevents excess air from being incorporated, which helps keep the surface smooth during the bake.
How to get a perfectly flat crust?
Press the crumb mixture firmly using the bottom of a small glass. Compacting the graham crumbs, butter, and sugar ensures an even, stable base that will not crumble when you remove the liners.
How to tell when mini cheesecakes are finished baking?
Look for set edges and a slight jiggle in the center. Pull them from the oven after 16 18 minutes at 325°F, as they will firm up completely while cooling at room temperature and then during the required 2 hours of refrigeration.
Lighter Mini Cheesecakes

Ingredients:
Instructions:
Nutrition Facts:
| Calories | 167 kcal |
|---|---|
| Protein | 4.6 g |
| Fat | 9.4 g |
| Carbs | 14.8 g |
| Fiber | 0.4 g |
| Sugar | 5.4 g |
| Sodium | 125 mg |
