Perfectly Poppable Mini Cheesecakes with Crispy Nilla Wafer Crusts
- Why These Mini Cheesecakes with Nilla Wafers Are Your New Baking Obsession
- A Nod to Nostalgia: The Ultimate Portion-Controlled Dessert
- Assembling the Components for Flawless Mini Portions
- Essential Equipment for Perfect Mini Portions
- Step-by-Step Guide: Crafting Your Mini Cheesecakes with Nilla Wafers
- Baking Precision: Techniques for Consistent Creaminess
- Elevating Your Mini Cheesecakes: Toppings and Variations
- Recipe FAQs
- 📝 Recipe Card
Why These Mini Cheesecakes with Nilla Wafers Are Your New Baking Obsession
There’s something inherently joyful about a perfectly portioned dessert. It offers all the decadent satisfaction of a full sized classic, without any of the commitment or the pressure of achieving pristine slices.
These Mini Cheesecakes with Nilla Wafers are precisely that: an irresistible marriage of creamy tang and nostalgic vanilla crunch, baked into delightful, two-bite packages.
They require straightforward techniques, yielding results so flawlessly smooth and perfectly balanced that they deserve a permanent spot in your dessert rotation. If you’ve ever shied away from a full cheesecake due to concerns about water baths or cracked tops, this streamlined approach is your glorious introduction to effortless indulgence.
A Nod to Nostalgia: The Ultimate Portion Controlled Dessert
These little beauties take the rich decadence of a classic baked cheesecake and shrink it down into the ultimate grab and-go treat. We aren't just making small cheesecakes; we are utilizing the iconic flavour of vanilla wafer cookies to build a base that sings of comfort and tradition.
In fact, the entire ethos behind this Mini Cheesecakes with Nilla Wafers recipe leans into simplicity and speed. They are rich, tangy, and utterly irresistible, making them ideal for parties, picnics, or simply when you need to satisfy that intense cheesecake craving without committing to an entire nine inch behemoth.
This recipe yields 12 standard Individual Cheesecakes with Nilla Wafers , ensuring everyone gets their own perfect portion.
Bypassing the Springform Panic: An Easier Approach
The major advantage of this method is completely sidestepping the often intimidating springform pan. We rely on a standard 12-cup muffin tin, lined neatly with either paper or silicone liners for effortless removal.
This not only simplifies cleanup significantly but also removes the need for complex techniques often required to prevent leaks or ensure even baking in larger pans. The overall difficulty level is decidedly Easy , relying only on standard mixing practices, which makes this accessible even for the novice baker looking to impress.
Flavor Profile: Creamy Filling Meets Iconic Vanilla Crunch
The magic lies in the interplay between textures and tastes. The filling delivers that signature, smooth, slightly tart centre truly Creamy Mini Cheesecakes . This richness is beautifully contrasted by the crust. Instead of a standard graham cracker base, we use crushed Nilla Wafers.
When slightly pre-baked or baked alongside the filling, these cookies transform, offering a sturdier, more vanilla forward foundation than traditional crumbs. This combination defines the appeal of Mini Cheesecakes Vanilla Wafers Bottom .
The Secret to Achieving a 'No Soggy Bottom' Crust
A common fear when baking with cookie crusts is the dreaded "soggy bottom." Our strategy for these Nilla Wafer Crust Mini Cheesecakes tackles this head-on. After preparing the base mixture finely crushed Nilla Wafers combined with melted butter and a touch of optional sugar for extra sparkle it is crucial to press it down firmly into the bottom of each liner.
We then chill these bases in the freezer for 15 minutes before adding the wet filling. This brief chill solidifies the butter, setting the crust structure before it even sees the heat of the oven, ensuring the Mini Cheesecakes Nilla Wafers Bottom stays crisp throughout the entire cooking and cooling process.
Assembling the Components for Flawless Mini Portions
Getting these Easy Mini Cheesecakes Nilla Wafers ready takes about 25 minutes of active prep time. Before you begin mixing, ensure all your dairy components the full fat cream cheese and the sour cream (or Greek yogurt) are completely softened to room temperature.
This is non-negotiable for achieving that desired silky texture. Similarly, your two large eggs must also be at room temperature; introducing cold eggs to the smooth cream cheese mixture risks curdling the batter, leading to a less than-perfect outcome.
The entire process is designed for maximum flavour impact with minimum fuss, echoing the straightforward elegance often associated with classic recipes, perhaps reminiscent of the comforting style used by experts like Paula Deen’s take on Paula Deen Mini Cheesecakes Vanilla Wafers .
Related Recipes Worth Trying
- Foolproof Key Lime Coconut Bars Recipe with Toasted Crumble — Whip up these magnificent Key Lime Coconut Bars They offer the perfect balance of tart citrus and sweet coconut on a buttery shortbread base Get the secret...
- Easy NoBake Vanilla Wafer Mini Cheesecakes Recipe — Forget the fuss These Nilla Wafer Mini Cheesecakes deliver creamy perfection in individual cups Theyre the easiest mini cheesecakes youll ever make Find the...
- Foolproof Blueberry Chutney Recipe with Ginger Spice — Whip up this vibrant Blueberry Ginger Chutneyits the perfect sweet and tangy topping for pork or cheese boards Easy to make
Essential Equipment for Perfect Mini Portions
To execute this recipe successfully and yield 12 perfectly formed treats, you will need a few key items. A standard 12-cup muffin tin is the cornerstone, ideally used with paper or silicone liners for the easiest removal later.
For the crust preparation, a food processor speeds up the crushing of the wafers, though a sturdy zip-top bag and a rolling pin work just as well. For the filling itself, an electric hand mixer or a stand mixer fitted with a paddle attachment is recommended to ensure thorough creaming of the cheese before introducing the eggs.
Sourcing the Ideal Cream Cheese and Sweeteners
The quality of the filling starts here. Always opt for full fat cream cheese; the reduced fat versions contain more water and can negatively affect the final texture. Alongside the cream cheese, you will incorporate half a cup of granulated sugar, a quarter cup of room temperature sour cream (which adds that essential tang), a teaspoon of good vanilla extract, and a pinch of salt to balance the sweetness.
What You Need for the Signature Nilla Wafer Base
For the crust, you will need 1 ½ cups of finely crushed Nilla Wafers. These crumbs must be bound together using 4 tablespoons of melted unsalted butter. If you prefer a slightly sweeter crust foundation, you can mix in an additional tablespoon of granulated sugar with the crumbs and butter before pressing.
Muffin Tin Prep: Liners vs. Non-Stick Spray Strategy
While some bakers skip liners entirely when using a non-stick spray, I strongly advocate for using liners either sturdy paper or reusable silicone when making Mini Cheesecakes with Nilla Wafers . These individual cheesecakes shrink slightly as they cool.
The liners allow you to lift them cleanly from the tin without damaging the sides or the fragile crust, making plating and serving significantly simpler.
step-by-step Guide: Crafting Your Mini Cheesecakes with Nilla Wafers
The journey to these delightful bites begins with preparing your foundation. First, set your oven to preheat to 325° F ( 160° C) and line your 12 muffin cups. Next, process your Nilla Wafers until they form fine crumbs.
Mix these crumbs thoroughly with the melted butter and any optional sugar until the mixture is uniformly damp. Press about 1 ½ tablespoons of this mixture into the bottom of each liner, packing it down with force.
Place this tray into the freezer for that crucial 15 minutes while you move on to the creamy centre.
Baking Precision: Techniques for Consistent Creaminess
Achieving that perfectly smooth, creamy interior requires attention to mixing order and temperature manipulation, particularly when dealing with eggs in a rich base like this.
Crust Creation: Pressing and Pre-Baking the Wafers
As detailed above, firmly pressing the crumb mixture is vital. While some recipes call for pre-baking the crusts separately, for these quick Mini Cheesecakes with Nilla Wafers , we rely on the chilling period to set the structure, allowing the crust to bake simultaneously with the filling, thus streamlining the entire cooking time.
Whipping Up a Silky Smooth Cheesecake Batter
Begin by beating the softened cream cheese on medium speed until it is completely smooth and lump free, scraping down the bowl thoroughly. Gradually add the sugar, beating only until it blends in. Introduce the sour cream, vanilla, and salt, mixing on low until just combined.
The critical step follows: add the room temperature eggs one at a time, mixing on the absolute lowest speed only until the yellow streak of the yolk disappears. Overmixing once the eggs are present aerates the batter too much, leading to guaranteed cracking upon cooling.
Temperature Control: Achieving the Best Bake Results
Once the batter is gently mixed, spoon it carefully over your chilled crusts, filling each cup about three quarters full. Bake for a concise 18 to 22 minutes.
You are looking for the edges to appear set and slightly puffed, while the centre should still retain a very slight, gentle wobble think the consistency of firm jelly when gently shaken.
The Critical Cooling Phase: Preventing Surface Cracks
This phase is as important as the mixing! Immediately after removing the tin from the oven, turn the oven off. Prop the oven door open slightly a wooden spoon works perfectly and allow the cheesecakes to rest inside this gradually cooling environment for a full 30 minutes.
This slow temperature transition prevents the top layer from contracting too rapidly, which is the primary cause of those unsightly surface cracks. After this initial rest, transfer the tray to a wire rack to cool completely before transferring them to the refrigerator to chill for a minimum of four hours, though overnight chilling provides the absolute best texture for these Easy Mini Cheesecakes Nilla Wafers .
Elevating Your Mini Cheesecakes: Toppings and Variations
Once fully chilled, these little desserts are magnificent on their own, but a little flair can turn them into showstoppers.
Classic Garnish Ideas Beyond the Basics
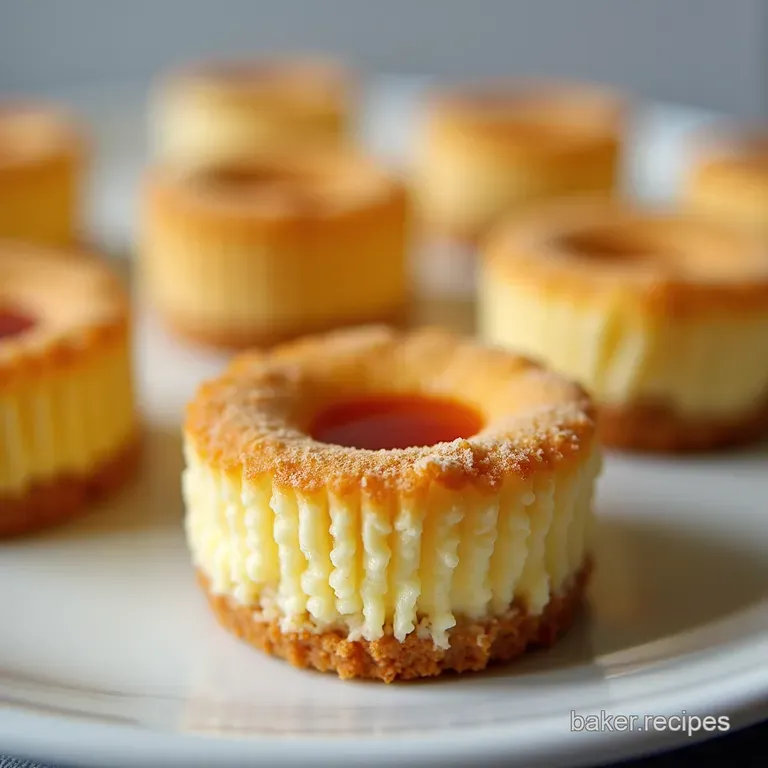
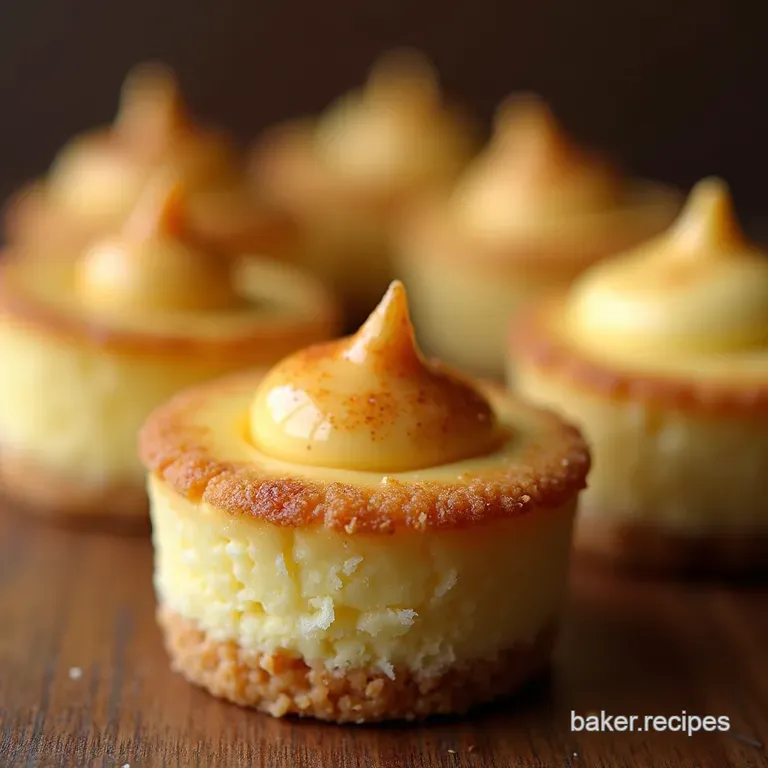
A simple dusting of powdered sugar provides an elegant, matte finish. For a more vibrant presentation, consider creating a quick Mini Cherry Cheesecakes Nilla Wafers variant by topping each chilled cheesecake with a spoonful of canned cherry pie filling, allowing the deep red syrup to contrast beautifully with the white filling.
Flavor Twists: Incorporating Strawberry or Citrus Zest
To introduce brightness, whisk the zest of one large lemon directly into the cream cheese filling before adding the eggs. This brightens the entire profile considerably. Alternatively, you can use a strawberry puree gently folded into the batter for a subtle pink hue and fruity flavour.
Freezing Instructions for Future Indulgences
These small wonders freeze exceptionally well! Once fully chilled and set, place the mini cheesecakes (still in their liners) on a baking sheet and flash freeze until solid. Then, transfer them to an airtight, freezer safe container, separating layers with wax paper.
They can be enjoyed straight from the freezer for a firm, almost ice-cream like texture, or thawed in the refrigerator for several hours before serving.
Nutritional Snapshot of These Delightful Bites
While these are undeniably a treat, their small size helps with portion control. On average, each of these little delights contains approximately 210 to 240 calories, depending on the exact ingredients used in the crust and filling.
They offer a satisfying amount of fat and carbohydrates to provide genuine indulgence without tipping into excessive richness.

Recipe FAQs
Why are my Mini Cheesecakes with Nilla Wafers sinking or cracking after baking?
This usually comes down to two things: mixing too vigorously after adding the eggs, or cooling them too quickly. When you over mix the eggs, you incorporate too much air, causing a major puff-up that inevitably leads to a dramatic fall.
Always turn your mixer down low when adding eggs and ensure you let them cool slowly inside the turned off oven for at least 30 minutes it’s the secret to a smooth top!
Can I make the Nilla Wafer crust ahead of time without it going soggy?
Yes, you absolutely can! After pressing the crumb mixture into the liners, you can freeze the crusts for up to 24 hours before adding the filling. Freezing them helps them set up firm, which acts as a brilliant moisture barrier against the wet cheesecake batter.
Just make sure to chill them for those 15 minutes before filling, even if you’ve prepped them earlier.
What’s the best way to store leftovers, and how long will these keep?
Treat these like a proper cheesecake they need a good chill. Store the cooled Mini Cheesecakes with Nilla Wafers in an airtight container in the refrigerator. They are best enjoyed within 3 to 4 days, though they probably won't last that long once people get a taste!
Don't even think about leaving them out on the counter.
My cream cheese wasn't soft enough and my filling is lumpy can I fix it now?
Oh dear, a lumpy start! If you’ve already added the eggs, it’s tricky, but you can try beating it gently on medium speed for a minute or two, stopping frequently to scrape the bowl thoroughly.
If it remains stubbornly lumpy, you might need to pass the batter through a fine mesh sieve before spooning it over the crusts. Next time, remember: room temperature cream cheese is essential, like ensuring the kettle is boiled before making a cuppa!
I don't have sour cream; what's a good substitute for the cheesecake filling?
If you’ve run out of sour cream, full fat Greek yogurt is a brilliant stand-in, offering a similar tang and richness without altering the texture too much. You could also use crème fraîche if you have some lurking in the fridge.
The key is using a full fat, room temperature dairy item to maintain that signature creamy mouthfeel.
Mini Nilla Wafer Cheesecakes

Ingredients:
Instructions:
Nutrition Facts:
| Calories | 159 kcal |
|---|---|
| Protein | 2.0 g |
| Fat | 12.1 g |
| Carbs | 21.1 g |
| Fiber | 0.3 g |
| Sodium | 58 mg |
