Peppermint Ice Cream Recipe: Velvety Custard
- Time: Active 20 minutes, Passive 15 minutes, Total 35 mins (plus chilling)
- Flavor/Texture Hook: Cooling peppermint with a velvety, shatter crisp candy crunch
- Perfect for: Holiday gatherings or a refreshing after dinner palate cleanser
- Mastering the Best Peppermint Ice Cream Recipe at Home
- The Specific Science of Why This Custard Works
- Analyzing the Role of Each Core Ingredient Component
- Critical Preparation Steps and Time Management Specs
- Essential Kitchen Tools for Achieving a Smooth Churn
- Moving Your Mixture From Initial Prep to Plate
- Solving Common Problems and Fixing Your Frozen Texture
- Adapting This Base for Your Own Creative Variations
- Protecting Your Batch with These Smart Preservation Secrets
- Simple Ways to Improve Your Final Serving Presentation
- Recipe FAQs
- 📝 Recipe Card
Mastering the Best Peppermint Ice Cream Recipe at Home
The sound of peppermint candies shattering inside a heavy plastic bag is the official start of the holidays at my house. Last year, I tried to "eyeball" the peppermint extract in a rush and ended up with a batch that tasted exactly like frozen toothpaste.
It was a total disaster, and my friends still haven't let me live it down. Honestly, skip the guessing game and follow a real custard based method if you want that professional mouthfeel.
This peppermint ice cream recipe isn't about fancy gadgets or complicated steps. It's about that rich, buttery base that makes store-bought tubs look like flavorless ice chips. We're going old school with real egg yolks because that's how you get the texture that melts slowly and evenly on your tongue.
Trust me on this, once you taste the difference between a "quick mix" and a true custard, you'll never go back.
We've all been there, staring at a curdled mess or a rock hard block of ice. But don't worry, I've made all those mistakes so you don't have to. We're going to walk through the tempering process and the "spoon test" so your base comes out smooth every single time.
It's brilliant how a few simple tricks with temperature can change the entire outcome of your dessert.
The Specific Science of Why This Custard Works
The Physics of the Freeze: Egg yolks act as a powerful natural emulsifier, binding the water and fat together to prevent large ice crystals from forming. This creates a microscopic structure that traps air during churning, resulting in a smooth, velvety finish rather than a grainy one.
- Fat Induced Stability: The 36% milkfat in the heavy cream coats the tongue and carries the volatile peppermint oils longer.
- Sugar Interference: Granulated sugar lowers the freezing point of the mixture, ensuring the scoop stays soft enough to eat straight from the freezer.
- Protein Coagulation: Gently heating the yolks thickens the liquid into a stable matrix that holds its shape as it melts.
| Premium Choice | Budget Alternative | Flavor Impact | Savings |
|---|---|---|---|
| Pure Peppermint Extract | Peppermint Oil | Oil is much stronger, use only 2 drops | Save $4-5 |
| Hand Crushed Candy Canes | Pre crushed Peppermint Bits | Pre crushed is harder and lacks the "shatter" | Save $2-3 |
| Organic Heavy Cream | Store Brand Heavy Cream | Very minimal difference in a flavored base | Save $3-6 |
It's helpful to decide early on if you want to go all out with top shelf extracts or keep it simple with store brands. Both will result in a great treat, but the "shatter" of hand crushed candies really adds a textural layer that pre packaged bits just can't match.
Analyzing the Role of Each Core Ingredient Component
| Ingredient | Science Role | Pro Secret |
|---|---|---|
| 5 Large Egg Yolks | Emulsification and richness | Use room temp yolks for faster tempering |
| 2 Cups Heavy Cream | Provides the primary fat structure | Don't use "ultra pasteurized" if you can avoid it |
| 1.5 tsp Peppermint Extract | Main flavor profile | Add this after the custard cools to keep it potent |
- 2 cups heavy cream (36% milkfat): Why this? Essential for that buttery mouthfeel and preventing a "thin" or icy texture.
- Substitute: Full fat coconut milk (note: adds a distinct tropical flavor).
- 1 cup whole milk: Why this? Thins the cream just enough to let the peppermint flavor shine through.
- Substitute: 2% milk (result will be slightly less creamy).
- 0.75 cup granulated sugar: Why this? Sweetness and crucial for controlling the freezing point.
- Substitute: Caster sugar (dissolves faster).
- 5 large egg yolks: Why this? The "glue" that creates a stable, scoopable custard.
- Substitute: 1 tbsp cornstarch mixed with cold milk (less rich, more "gelato" style).
- 0.5 tsp fine sea salt: Why this? Sharpens the sweetness and cuts through the heavy fat.
- Substitute: Table salt (use slightly less).
- 1.5 tsp pure peppermint extract: Why this? Provides the classic cooling sensation without being medicinal.
- Substitute: Spearmint extract (gives a "mojito" or gum like flavor).
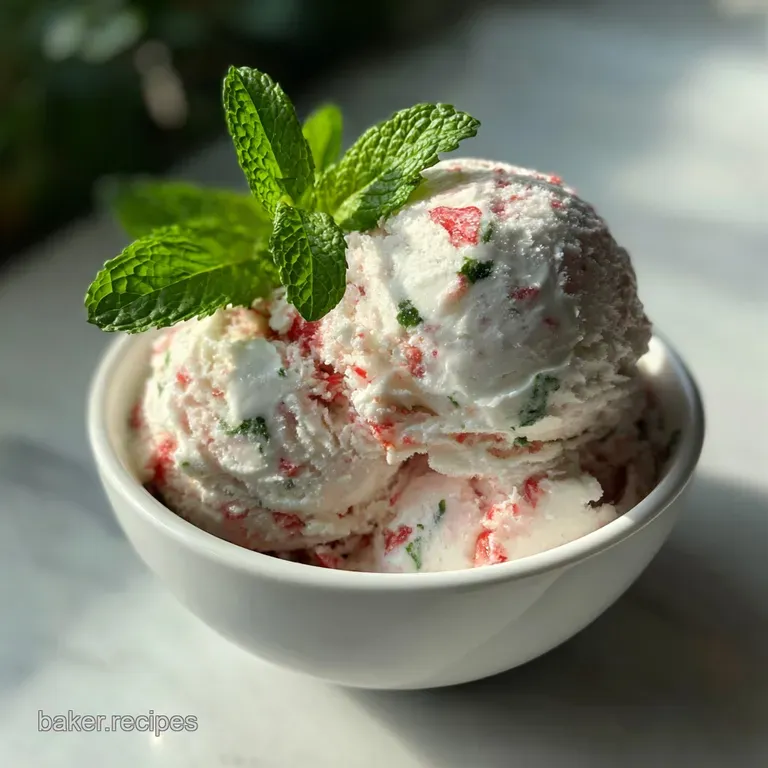
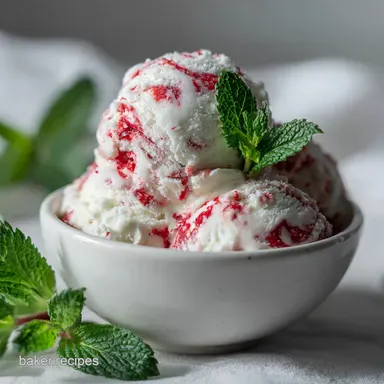
- 1 cup crushed hard peppermint candies: Why this? Provides the essential "shatter" and pops of pink color.
- Substitute: Mini chocolate chips for a "bark" inspired twist.
Critical Preparation Steps and Time Management Specs
You don't need a professional kitchen to pull this off, but a few specific tools make the process much smoother. I personally love using a heavy bottomed saucepan because it distributes heat evenly, preventing the bottom of your custard from scorching while you're busy whisking. If you're looking for a similar creamy project, the technique for the base is quite similar to my Rocky Road Ice recipe.
- Precision Checkpoint 1: The custard must reach exactly 79-80°C (175°F) on a digital thermometer to safely thicken without scrambling the eggs.
- Precision Checkpoint 2: Chill the base for a minimum of 4 hours (ideally 12) until it reaches 4°C or lower before churning.
- Precision Checkpoint 3: Ensure your ice cream bowl has been in the freezer for at least 24 hours if using a canister style maker.
| Feature | Stovetop Custard | Oven Baked Custard |
|---|---|---|
| Control | High (you see the change) | Low (hidden in oven) |
| Texture | Silky and fluid | Denser and "set" |
| Effort | Constant whisking required | Hands off after prep |
Essential Kitchen Tools for Achieving a Smooth Churn

Using the right gear is more about efficiency than being fancy. A fine mesh strainer is non negotiable here. No matter how careful you are, there's always a tiny bit of cooked egg that needs to be filtered out to keep the base silky.
I usually just use a standard whisk, but a silicone coated one is great if you're worried about scratching your pans.
Chef Tip: Freeze your storage container for 20 mins before the ice cream finishes churning. This prevents the edges of your fresh ice cream from melting the moment they hit the plastic.
Right then, let's get the mixture ready. I like to crush my candies while the milk is warming up. It's a great way to get out any holiday stress! Just put them in a heavy duty bag and use a rolling pin. Don't go too far; you want some chunks for texture, not just red dust.
Moving Your Mixture From Initial Prep to Plate
- Whisk the yolks. Combine 5 large egg yolks with 0.75 cup sugar and 0.5 tsp sea salt in a medium bowl. Note: Whisk until the color turns a pale, creamy yellow.
- Warm the dairy. Heat 2 cups heavy cream and 1 cup whole milk in a saucepan over medium heat. Cook 5 minutes until small bubbles form around the edges.
- Temper the eggs. Slowly drizzle one ladle of hot cream into the yolk mixture while whisking constantly. Note: This prevents the eggs from scrambling by raising their temperature slowly.
- Thicken the base. Pour the yolk mixture back into the saucepan with the remaining cream. Cook 8-10 mins until it coats the back of a spoon.
- Strain the custard. Pour the hot liquid through a fine mesh sieve into a clean bowl. Note: This catches any "chalazae" or accidental scrambled bits.
- Chill thoroughly. Cover the surface with plastic wrap (touching the liquid) and refrigerate. Wait 4-12 hours until the bowl feels cold to the touch.
- Add the flavor. Stir in 1.5 tsp peppermint extract only after the base is cold. Note: Adding extract to hot liquid causes the flavor to evaporate.
- Churn the mix. Pour into your ice cream maker and process according to the manufacturer's directions. Churn 20-25 mins until it looks like thick soft serve.
- Fold in candies. Stop the machine and stir in 1 cup crushed peppermint candies by hand. Note: Churning the candies can sometimes turn the whole batch grey or muddy purple.
- Final freeze. Transfer to a container and freeze. Wait 4 hours until the center is firm and scoopable.
Solving Common Problems and Fixing Your Frozen Texture
Why Your Custard Is Grainy
If your ice cream feels like fine sand on your tongue, the sugar might not have dissolved completely, or you overcooked the eggs. To fix this, you can actually reheat the base (if you haven't churned it yet) and strain it a second time.
If it's already frozen, your best bet is to let it melt slightly before serving, which softens the grains.
Why Your Candy Melted
Adding the peppermint candies too early is a classic mistake. The moisture in the base will dissolve the sugar in the candies, leaving you with pink streaks and no crunch. Always wait until the very last minute of churning or even better, fold them in by hand right before you put the tub in the freezer.
| Problem | Root Cause | Solution |
|---|---|---|
| Greasy film on tongue | Churned too long / Buttering | Stop churning as soon as it reaches soft serve stage |
| Rock hard in freezer | Not enough sugar or fat | Add 1 tbsp of vodka or light corn syrup to the base |
| Won't thicken | Heat was too low | Return to stove and whisk until it reaches 175°F (80°C) |
Common Mistakes Checklist
- ✓ Never boil the custard - boiling will break the emulsion and curdle the eggs.
- ✓ Don't skip the straining step - even the best cooks get tiny egg fragments.
- ✓ Ensure the freezer bowl is "rock solid" - if you hear liquid sloshing, it's not cold enough.
- ✓ Keep the extract in the cupboard until the base is cold - heat kills the peppermint punch.
- ✓ Pat your storage container dry - any water droplets will turn into ice shards.
Adapting This Base for Your Own Creative Variations
If you're looking for a chocolate peppermint ice cream recipe, simply whisk 0.5 cup high-quality cocoa powder into the milk and cream while heating. The bitterness of the chocolate balances the sweet peppermint perfectly.
For those using a specific machine, a ninja creami peppermint ice cream recipe works best if you freeze the base for a full 24 hours and skip the candy mix ins until the "mix in" cycle at the very end.
But what about dietary needs? For a dairy-free peppermint ice cream recipe, swap the cream and milk for full fat coconut milk and cashew milk. Use a bit of extra vanilla to round out the coconut flavor. If you're looking for a different festive project, you might also enjoy the process in this How to Bake recipe for ice cream sandwiches.
- If you want a softer scoop, add 1 tablespoon of vegetable glycerin or light corn syrup.
- If you want more color, add two drops of red gel food coloring to the base before churning.
- If you want a "Bark" flavor, mix in 0.5 cup of chopped dark chocolate along with the peppermint.
Protecting Your Batch with These Smart Preservation Secrets
Storing homemade ice cream is different from store-bought because we don't use stabilizers. It will stay fresh in the fridge for about 2 weeks before the texture starts to suffer. To prevent "freezer burn," press a piece of parchment paper or plastic wrap directly onto the surface of the ice cream before closing the lid.
This blocks the air that creates those nasty ice crystals.
For zero waste, don't throw away the egg whites! You can freeze them in an ice cube tray for later use in meringues or egg white omelets. If you have leftover crushed peppermint, stir it into your morning coffee or use it to rim the glass of a festive cocktail. Even the "dust" from the bottom of the candy bag can be saved and sprinkled over brownies or a Homemade Blueberry Buckle recipe.
Simple Ways to Improve Your Final Serving Presentation
Presentation is everything when you're serving a simple dessert. I love serving a scoop of this in a chilled glass bowl with a single, whole candy cane tucked into the side. It looks like something out of a high end boutique.
If you're feeling fancy, a drizzle of warm dark chocolate ganache over the top creates a "magic shell" effect that everyone loves.
One "better than boutique" sundae idea is to crush some chocolate sandwich cookies and layer them in the bottom of the bowl. The dark cocoa against the bright white and pink ice cream is stunning. Another trick is the holiday "affogato" drop a small scoop of this peppermint ice cream into a shot of hot espresso.
The mint and coffee combination is surprisingly sophisticated and always a hit at dinner parties. Just make sure to serve it immediately!
- Fridge Life: 2 weeks (quality peaks in first 5 days)
- Freezer Life: 1 month (wrap tightly to avoid odors)
- Reheating: Never microwave; let it sit on the counter for 10 mins to soften naturally.
Scaling the Recipe
- Down (1/2 Batch): Use 3 yolks and half of all other ingredients. Watch the heat carefully as small batches burn faster.
- Up (Double Batch): Only increase the peppermint extract to 2.5 tsp (not 3) as it can become overpowering. Work in two churning batches unless you have a commercial sized machine.
The "Old Fashioned" Myth: People think you need rock salt and a hand cranked bucket to get "old fashioned" results. Not true! The "old fashioned" part is the custard base, not the machine.
You can get that exact same nostalgic texture in a modern electric maker as long as your ingredient ratios are correct. Searing the flavors into the milk (steeping) is another myth; peppermint extract is already a concentrated oil, so steeping candy canes in hot milk is redundant and just messes with your sugar levels.

Recipe FAQs
What are the ingredients in peppermint ice cream?
Heavy cream, whole milk, egg yolks, sugar, salt, pure peppermint extract, and crushed hard peppermint candies. The yolks are crucial as they emulsify the fat and water, creating a stable, silky texture that resists ice crystals.
What is the secret ingredient in homemade ice cream?
Egg yolks are the secret ingredient for a rich custard base. They act as a natural emulsifier, binding the fat and water perfectly to prevent graininess and ensure a slow, velvety melt.
Can you add peppermint extract to ice cream?
Yes, you absolutely can, but timing is vital. You must stir the extract into the base only after it has thoroughly chilled, never while the custard is hot, as the volatile oils will evaporate, leaving a muted flavor.
How much peppermint extract to add to 1 quart of ice cream?
Start with 1.5 teaspoons for a standard 1-quart batch base. If you use peppermint oil instead of extract, use only 2 drops, as oil is significantly more potent and can easily taste medicinal.
How to thicken the ice cream base without overcooking the eggs?
Heat the base slowly until it reaches exactly 175°F (80°C). Use a thermometer and stop cooking immediately when this temperature is reached; this is the point where the yolk proteins safely thicken the mixture without scrambling.
Is it true you must use an ice cream maker for proper texture?
No, this is a common misconception when aiming for a softer texture. While a machine is ideal, you can achieve a similar, denser texture similar to gelato by freezing the base and whipping it vigorously with a hand mixer every 30 minutes for the first 3 hours.
What is the best way to add crunch to the finished product?
Fold the crushed peppermint candies in by hand immediately before the final freeze. Churning them breaks them down too much, resulting in a muddy color; folding preserves the "shatter" contrast against the smooth base.
Peppermint Ice Cream Recipe
Ingredients:
Instructions:
Nutrition Facts:
| Calories | 401 kcal |
|---|---|
| Protein | 3.9g |
| Fat | 25.2g |
| Carbs | 40.7g |
| Fiber | 0g |
| Sugar | 38.6g |
| Sodium | 186mg |
