Christmas Cookies: Elegant Stained Glass Shortbread Biscuits
- Buttery Stained Glass Christmas Biscuits (Classic Shortbread Cut-Outs)
- The Culinary Science Behind Our Tender Shortbread Base
- Essential Ingredients for Sparkling Stained Glass Christmas Biscuits
- Mastering the Stained Glass Cookie Technique: A Step-by-Step Guide
- Troubleshooting and Expert Tips for Dazzling Christmas Cookies
- How to Store and Preserve Your Edible Stained Glass
- Gifting and Display: Creative Ways to Use Your Finished Biscuits
- Recipe FAQs
- 📝 Recipe Card
Buttery Stained Glass Christmas Biscuits (Classic Shortbread Cut-Outs)
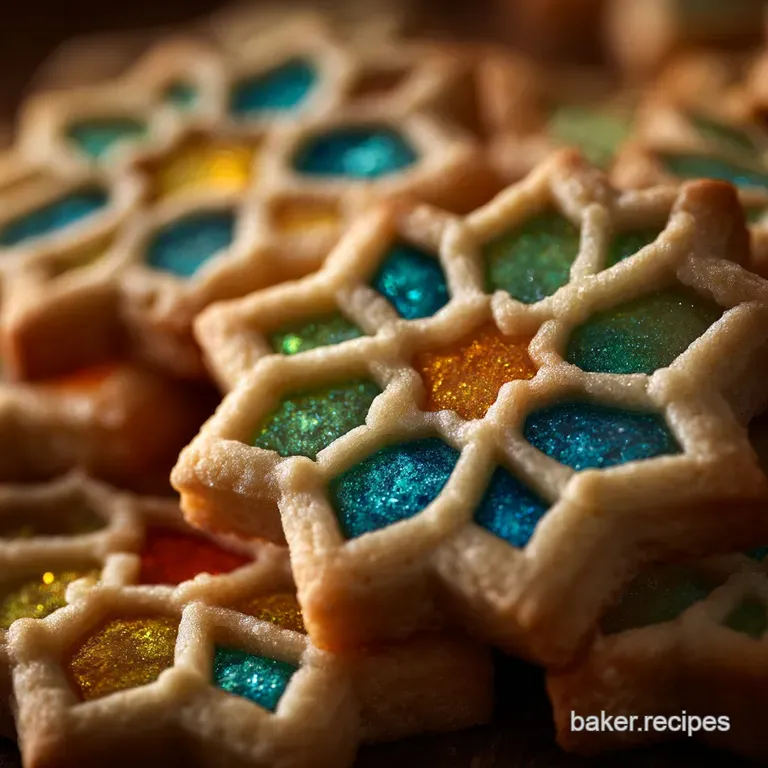
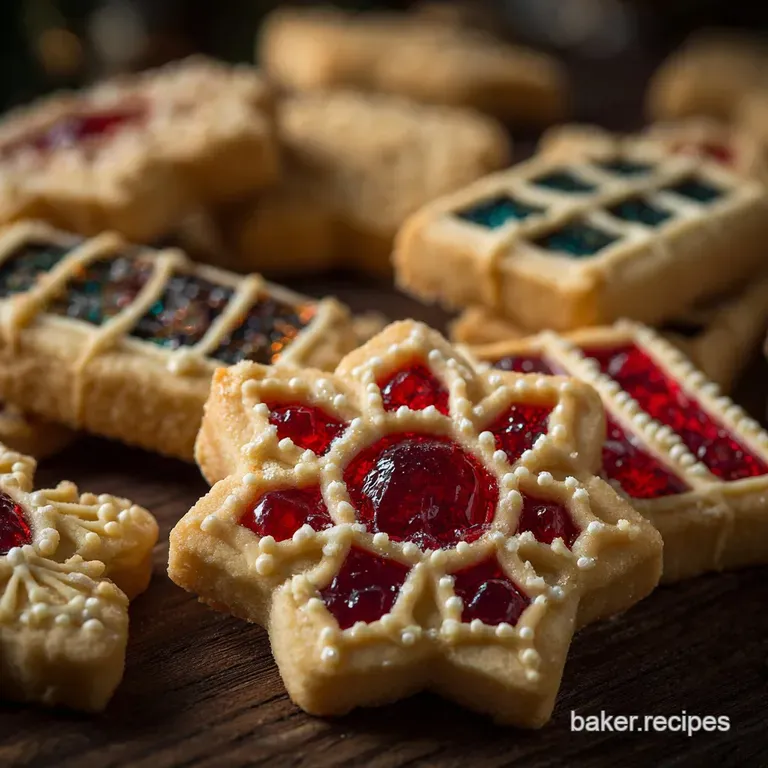
Is there anything better than walking into a warm kitchen and getting hit by that scent of pure, melting butter mixed with vanilla? These Stained Glass Christmas Cookies or biscuits, as we call them across the pond don't just smell incredible; they are a visual showstopper.
When the holiday lights hit that jewel toned candy, they just sparkle. They look like tiny, edible ornaments, and the texture is pure, melt-in-your mouth heaven.
I know what you're thinking: Those look too hard. Trust me, they aren't. While they require patience for chilling, the actual dough technique is incredibly straightforward, relying on a classic shortbread base.
This recipe is a lifesaver when you need a batch of gorgeous treats fast, and they travel exceptionally well, making them perfect for your Christmas cookie swap. They're surprisingly resilient too, which is essential if you plan to hang them on the tree.
We are skipping the royal icing drama and the endless piping this year. We're leaning into a proper, tender shortbread base the very foundation of stellar treats like my famous Keto Pistachio Shortbread Cookies Buttery LowCarb Biscuits — and adding a little magic with hard candy. Stick with me, and let’s crack on with the dough.
The Culinary Science Behind Our Tender Shortbread Base
Why Stained Glass Cookies Are the Perfect Edible Ornament
These cookies offer a beautiful blend of structure and sweetness, making them ideal for high impact Christmas Theme Treats. The shortbread is naturally sturdy because it uses almost no liquid, allowing it to hold its shape perfectly during cutting and baking.
Plus, the melted hard candy sets into a rock solid, glass like pane, giving us both a dazzling effect and a structural integrity that holds up beautifully, even when tied to a ribbon.
A Nod to Tradition: The Heritage of Buttery British Biscuits
This is a true 1:2:3 shortbread recipe, meaning we keep the ratio simple: one part sugar, two parts butter, and three parts flour. This classic ratio is the secret weapon for achieving that signature crumbly texture that dissolves on your tongue.
We also add a single egg yolk, which contributes essential fat and richness, preventing the biscuit from tasting dry while keeping it wonderfully tender.
The Magic of Cold Butter: Achieving a Flaky, Tender Crumb
For shortbread, we don't want chewy; we want tender. Using cold, cubed butter and incorporating it slowly, often called the reverse creaming method, ensures that the fat coats the flour particles before much gluten can develop. This is why you must not overmix the dough.
Stopping as soon as the flour disappears guarantees a buttery, crumbly structure rather than a tough, bread like one.
Why the Shortbread Dough Needs a Mandatory Chill Time
The chill time serves two critical functions that cannot be ignored. First, the refrigeration allows the gluten strands, which inevitably formed during mixing, to relax completely. Second, and most importantly, it hardens the butter.
When cold butter hits the hot oven, it takes longer to melt, locking your cookie shape in place before the whole thing spreads into a mess.
Crystallization vs. Melting: Perfecting the Clear Candy Window
The candy needs to melt completely without scorching, while the shortbread needs to finish baking. This balance is tricky, but we solve it with a partial bake. We set the dough for about seven minutes, giving the structure time to firm up before introducing the candy.
Adding the crushed sweets later ensures the sugar melts quickly and sets clear, avoiding the bubbling or cloudy appearance that happens when the candy bakes for the entire cycle.
Essential Ingredients for Sparkling Stained Glass Christmas Biscuits
You don't need fancy components for this; just high-quality dairy, since butter is the star. Trust me, spending a little extra on good butter pays dividends in flavour here.
| Ingredient | Role | Viable Substitution |
|---|---|---|
| Unsalted Butter | Flavour base, structure | high-quality, plant based stick butter (must be solid, not margarine) |
| All-Purpose Flour | Structure | 1:1 gluten-free baking blend (you might need a splash of milk) |
| Granulated Sugar | Sweetness, tenderness | Fine Caster Sugar or Powdered Sugar (adjust volume slightly) |
| Large Egg Yolk | Richness, binding | 1 Tbsp of heavy cream (you will lose some richness) |
| Pure Vanilla Extract | Flavour | Almond extract or 1/2 tsp of Orange Zest for a festive twist |
| Hard Candies | The "Glass" | Clear, hard mints or simple colourful lollipops (crushed) |
Selecting the Right Hard Candy for Your Jewels
Stick to hard, clear candies, sometimes called boiled sweets. Avoid anything creamy or opaque, like caramels or taffy. Life Savers, Jolly Ranchers, or simple striped peppermints work brilliantly. Make sure you separate your colours before crushing them; otherwise, you get a muddy brown mess when they melt together.
We want vibrancy!
Flour Power: Weighing vs. Measuring for Dough Precision
This is my biggest baking soapbox: always weigh your flour, especially when making tender shortbread dough. Scooping flour straight from the bag often results in up to 25% extra flour, yielding a dry, crumbly dough that cracks when you roll it.
If you must use cups, spoon the flour lightly into the measuring cup, then level it off. Precision prevents painful dough disaster.
Dairy Details: The Role of high-quality Unsalted Butter
Since shortbread is mostly butter, using high-quality unsalted butter is non-negotiable for superior flavour. Unsalted gives you control over the final salinity, though you can use salted butter if that's all you have, just reduce the added salt by half.
Using cool, firm butter ensures we get those beautiful, crisp edges.
Substitutions for Dietary Needs: Handling Flour and Fat Swaps
If you need a gluten-free option, use a reliable 1:1 gluten-free baking blend. I find that these blends sometimes absorb slightly more moisture, so if your dough looks like sand instead of wet crumbs after mixing, add a teaspoon of milk or water.
For dairy-free bakers, ensure you use a block style vegan butter stick, not the spreadable tub variety; the water content is too high in the soft spreads.
Mastering the Stained Glass Cookie Technique: A step-by-step Guide
Preparing the Dough: The Reverse Creaming Method for Shortbread
- Cream the Butter and Sugar: Start by beating the cool, cubed butter and sugar together until light and fluffy. This should take 3 to 5 minutes. You're aiming for a pale yellow colour and a noticeable fluffiness; this incorporates air and ensures a tender biscuit.
- Bind the Wets: Beat in your egg yolk and vanilla extract until they are just combined. Scrape the bowl down, making sure everything is incorporated evenly.
- Add the Dry: Gradually add the pre-sifted flour and salt mixture on the lowest speed. Stop the moment the last streak of flour disappears. The dough should look slightly shaggy but will come together when pressed.
Chef's Note: If you want a more complex, warming flavour, consider adding a little ground ginger or cinnamon here, transforming the shortbread into a sophisticated spice biscuit.
Achieving the Perfect Cut-Out and Window Shape
After chilling the dough for at least 60 minutes, roll it out on a lightly floured surface to about 1/4 inch thickness. Use large cutters for the exterior (stars, Christmas trees, gingerbread people).
Then, using a much smaller cutter or even a piping tip for tiny windows, cut out the interior shape. Carefully place all the cut biscuits onto a parchment lined tray.
Crushing and Filling the Candy Centers (The Critical Step)
While your oven preheats to 350°F (175°C), crush your sorted hard candies. I put mine in a zip-top bag and smash them with a rolling pin until they are coarse sand consistency not dust, but not large chunks either. After cutting the dough, chill the trays in the freezer for ten minutes.
This second chill is non-negotiable for shape retention!
Baking Times and Recognizing the Perfect Melt and Spread
Bake the chilled, un-filled biscuits for 6– 8 minutes first. They should look set but still quite pale. Pull them out and immediately fill the center holes completely with your crushed candy mixture. Return to the oven for another 4– 6 minutes.
The candy is done when it’s completely melted, smooth, and glossy. Remove immediately and slide the parchment onto a wire rack. Do not touch them until the candy is fully hardened.
Troubleshooting and Expert Tips for Dazzling Christmas Cookies
Preventing Your Candy Window From Bubbling or Burning
The culprit here is usually baking the candy for too long or placing it too high in the oven. The partial bake technique prevents both. If you see the candy beginning to bubble violently when they come out, you can gently tilt the sheet back and forth immediately to smooth the surface before it sets.
Handling Sticky Dough: The Flour vs. Parchment Paper Debate
If your dough is too sticky to roll after the first chill, resist the urge to add massive amounts of flour. Too much flour will dry out the cookies. Instead, roll the dough between two sheets of parchment paper. This allows you to roll quickly and cleanly, and you can simply peel the top layer off before cutting.
Why Your Cookies Spread (And How to Stop It)
Your Christmas cookies spread for three main reasons: warm butter, insufficient chilling, or too much mixing. We solved the first two with cold butter and a double chill cycle. If you find they still spread, try replacing a quarter of the all-purpose flour with rice flour or cornstarch; this significantly impedes gluten development and guarantees a crisper, more stable edge.
How to Store and Preserve Your Edible Stained Glass
Optimal Airtight Storage to Prevent Moisture Clouding
Once completely cool, the finished cookies store beautifully in an airtight container at cool room temperature for up to a week. However, humidity is the enemy of the candy window. The candy (pure sugar) is hygroscopic, meaning it attracts moisture, which turns the clear glass cloudy.
To combat this, place a small paper towel or a slice of sandwich bread in the container; it will absorb excess moisture and keep your jewels sparkling.
Freezing Unbaked Dough vs. Fully Baked Biscuits
Does the dough freeze well? You bet. Form the dough into discs, wrap tightly in plastic wrap, and then foil. It will last in the freezer for up to three months. Thaw it overnight in the fridge before rolling and cutting.
Freezing fully baked biscuits works too, but the candy window may slightly cloud due to the freeze/thaw cycle. If you freeze them baked, wait until they are fully thawed before attempting to separate them.
Gifting and Display: Creative Ways to Use Your Finished Biscuits
Preparing Your Shortbread Jewels for Tree Hanging
If you intend to hang these on your tree, make sure you use a large, sturdy cutter (like a star or bell). Before the second chill (after cutting the window), use a toothpick or skewer to poke a small hole near the top edge for the ribbon.
Make sure the hole is big enough for your ribbon, as it will slightly shrink during baking. Once cooled and hardened, thread a pretty ribbon through the hole. These cookies make a stunning addition to any holiday table, especially when served alongside a warm mug of Proper Old Fashioned Wassail Recipe for Christmas and Yuletide .
These are such lovely Christmas Themed Desserts for boxing up as gifts, too. They present beautifully next to other simple treats, like my Sticky Toffee Pudding Thumbprints Easy Date Cookies , creating a visually stunning mixed box that everyone will rave about.
 : PIN FOR LATER")
Recipe FAQs
My shortbread dough is too crumbly and won't stick together. What went wrong?
Shortbread dough is naturally tender, but excessive dryness usually indicates you over floured or didn't mix long enough for the fat to bind the mixture. If it refuses to hold a shape, try adding a teaspoon of cold milk or water at a time until the dough just comes together.
Avoid kneading aggressively, as this develops gluten and results in tough biscuits.
Why did the crushed candy burn or crystallize instead of melting into a smooth center?
The candy may have burned because the oven temperature was too high, or you filled the cavities too early. For best results, bake the shortbread plain for 8-10 minutes first, then quickly fill the cavities and return them to the oven for the final stage.
Use clear, hard candies that melt readily without leaving residue.
How can I prevent the stained glass from sticking to my baking sheet?
Using a high-quality silicone baking mat or parchment paper is absolutely essential, as molten sugar adheres fiercely to bare metal. If you notice any sugar seepage during baking, allow the cookies to cool completely before attempting to lift them, as the solidified sugar will release much easier.
Can I freeze the unbaked shortbread dough to bake closer to Christmas?
Yes, freezing the dough is highly recommended for planning ahead. Wrap the prepared disc tightly in cling film, then seal it inside a freezer bag; it keeps well for up to three months. Thaw the dough overnight in the refrigerator before rolling, cutting, and proceeding with the baking instructions.
How do I make the hole for hanging these cookies on a Christmas tree?
Use a small, clean drinking straw or a wooden skewer to gently pierce a hole near the top edge of the cutout cookie. Do this after the dough has been chilled and cut, but before it goes into the oven. Ensure the hole is slightly larger than needed, as it will contract a bit during baking.
What types of hard candies work best for creating the clear stained glass effect?
The best choices are clear, hard boiled sweets or fruit drops that do not contain any creamy fillings or opaque colorants, such as traditional Jolly Ranchers or Life Savers (the solid variety). Avoid using chewy candies like taffy or gumdrops, as they will simply burn and spoil the clear window effect.
How long will the finished Stained Glass Biscuits stay fresh?
Store the completely cooled cookies in an airtight container at room temperature for up to one week. Be aware that the sugar centers are sensitive to moisture, so high humidity may cause them to become slightly sticky or "sweat" over time. Do not store these cookies in the refrigerator.
Stained Glass Christmas Cookies Recipe
Ingredients:
Instructions:
Nutrition Facts:
| Calories | 185 kcal |
|---|---|
| Fat | 10 g |
| Fiber | 1 g |
