Summer Veggie Sandwich: Seared and Savory
- Time: 15 min active + 10 min cook
- Flavor/Texture Hook: Charred, salty, and velvety
- Perfect for: Easy vegetarian lunch recipes
The Best Summer Veggie Sandwich
Sizzle. That is the only sound that matters when you start this. I remember making a version of this a few years back where I just piled raw veggies onto some sourdough. It looked like a Pinterest board, but two bites in, it felt like eating a wet sponge.
The bread had absorbed all the tomato juice, and the vegetables were just... cold. It was a depressing lunch.
That failure taught me that a Summer Veggie Sandwich needs more than just fresh produce, it needs a strategy. You need heat to concentrate the sugars in the peppers and a moisture shield to protect the bread.
When you get it right, you get a contrast between the shatter of toasted ciabatta and the velvety spread of hummus.
This recipe is my answer to the "soggy sandwich" problem. We are using a combination of over high heat searing and strategic layering to make sure every bite stays crisp. It is simple, budget friendly, and actually fills you up. Let's get into how to make it.
Why This Build Works
Most people just stack things, but we are engineering this for texture. Here is why these specific steps make the difference:
Charred Sugars: High heat on the zucchini and peppers creates browned edges, which concentrates the natural sugars. This adds a smoky depth that balances the raw freshness of the cucumber.
The Fat Barrier: Spreading hummus and butter creates a hydrophobic layer. According to Serious Eats, creating a barrier prevents moisture from the vegetables from migrating into the bread crumb.
Textural Contrast: Combining soft roasted vegetables with the crunch of raw English cucumber and the peppery snap of arugula ensures the sandwich doesn't feel one dimensional.
Salty Balance: Feta cheese provides a sharp, salty punch that cuts through the creaminess of the hummus and the sweetness of the roasted red onion.
| Method | Time | Texture | Best For |
|---|---|---|---|
| Raw Assembly | 5 mins | Crunchy/Wet | Very quick snacks |
| Seared Classic | 25 mins | Charred/Crisp | Satisfying meals |
I've found that spending those extra 10 minutes at the stove completely changes the experience. A raw vegetable sandwich is a snack, but this version is a full meal.
Ingredient Deep Dive
Not all ingredients are created equal here. If you use a watery tomato or a cheap bread, the whole thing falls apart.
| Ingredient | Science Role | Pro Secret |
|---|---|---|
| Ciabatta | Structural Support | Use a roll with large air pockets to trap the pesto |
| Hummus | Moisture Shield | Use a thick, classic variety for a better barrier |
| Feta | Flavor Contrast | Crumble it by hand for uneven, salty pockets |
| Heirloom Tomato | Umami Source | Salt the slices 2 mins before adding to draw out flavor |
Choosing the right bread is a big deal. Ciabatta is great because it is sturdy. If you use a soft white loaf, the weight of the vegetables will just crush it into a pancake. Trust me, don't even bother with low-fat cheese here, as the fat is what carries the flavor of the grilled veggies.
Essential Gear Needed
You don't need a professional kitchen for this, but a few things make it easier. A cast iron skillet is my go to because it holds heat better than anything else. If you have a grill pan with those ridges, that works even better for getting those distinct charred lines on the zucchini.
I also suggest using a serrated knife for the ciabatta. If you use a smooth blade, you risk squishing the roll before you even get the butter on it. A simple spatula for tossing the veggies is all else you'll need.
Honestly, if you don't have a broiler, a toaster works fine for the bread, though the broiler gives it that slightly burnt, restaurant style edge.
Step-by-step Instructions

Right then, let's crack on. Make sure your vegetables are sliced evenly so they all cook at the same rate.
- Heat 2 tbsp olive oil in a large cast iron skillet or grill pan over medium high heat until the oil shimmers. Note: If the oil smokes, turn it down slightly.
- Add the sliced zucchini, bell peppers, and red onions to the skillet. Sauté for 5-7 minutes, tossing occasionally, until the vegetables exhibit charred edges.
- Remove the vegetables from the heat and set them aside on a plate.
- Split the ciabatta rolls and spread 2 tbsp softened butter on the cut sides. Broil or toast until the edges are golden brown and crisp.
- Immediately spread 1/2 cup hummus on the bottom half of each roll and 1/4 cup basil pesto on the top half.
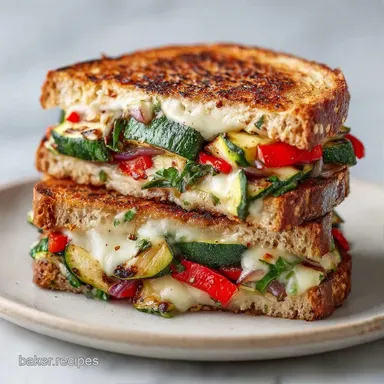
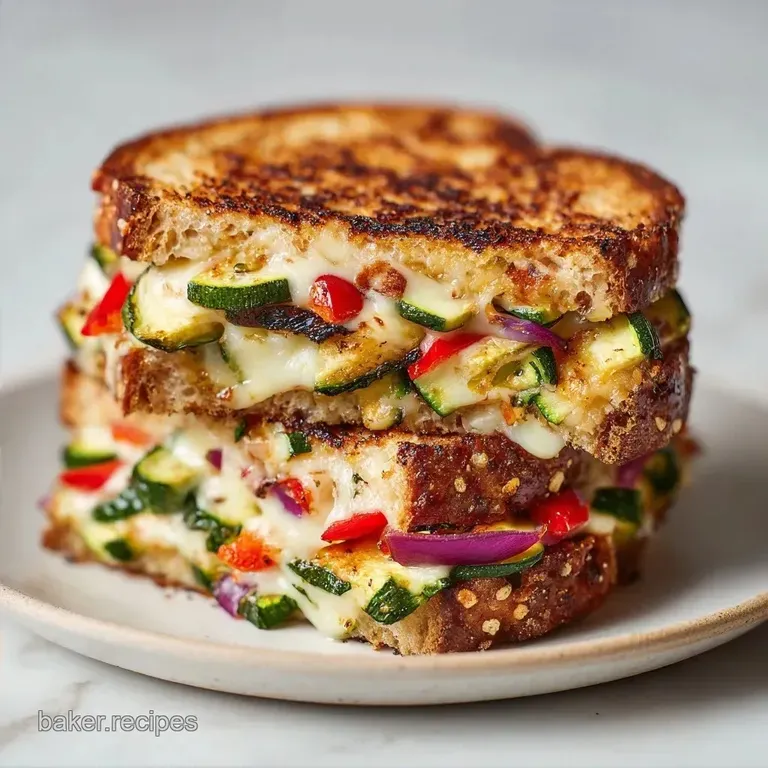
- Layer the charred zucchini and peppers over the hummus, then sprinkle with 4 oz crumbled feta cheese.
- Add slices of English cucumber and heirloom tomato, then pile 1 cup baby arugula on top.
- Press the pesto slathered top bun firmly onto the fillings until the sandwich feels locked in place.
Chef's Note: To get that professional look, stack the zucchini in a shingle pattern before adding the peppers. It stops the fillings from sliding out the side when you take your first bite.
Pro Tips and Pitfalls
One mistake I once made was adding the tomato at the very bottom. The tomato is the "wettest" part of the Summer Veggie Sandwich. If it touches the bread directly, you're back to that soggy sponge situation. Always keep a layer of hummus or roasted veggies between the tomato and the crumb.
Another trick: freeze your butter for 10 mins before grating it or spreading it if it's too melty. It helps you get a more even coat on the ciabatta. Also, try adding a tiny pinch of flaky salt directly onto the tomato slices before they go in. It makes the flavor pop.
Why Your Sandwich Slides
If your fillings are escaping, it is usually because the vegetables were too oily or the hummus was too thin. Ensure you sauté the veggies well so the excess moisture evaporates.
| Problem | Root Cause | Solution |
|---|---|---|
| Slippery Fillings | Too much oil on veggies | Pat veggies with a paper towel before layering |
| Soggy Bottom | Tomato touching bread | Move tomato to the middle of the stack |
| Bread Tearing | Over toasting | Reduce broiling time by 1 minute |
When you're assembling, think of the hummus as the "glue." It should be a generous layer that grips the vegetables.
Avoiding the Bread Soak
The key is the timing. Don't toast your bread and then let it sit for 10 minutes while you prep the veggies. Toast the bread after the veggies are done. This ensures the bread is at its maximum crispness when the moisture rich fillings hit it.
- ✓ Pat your cucumber slices dry with a towel.
- ✓ Use a high fat butter for the toast.
- ✓ Press the top bun firmly to compress the layers.
- ✓ Layer the heaviest items (zucchini) at the bottom.
- ✓ Keep the arugula at the top to stay fresh.
Ways to Mix It Up
If you want to change the vibe of your Summer Veggie Sandwich, you have plenty of options. For a high protein version, you can add a layer of sliced grilled halloumi or some canned chickpeas smashed with lemon juice.
Want a Summer Vegan Sandwich Idea? Just swap the feta for sliced avocado and use a vegan butter for the ciabatta. The creaminess of the avocado mimics the feta's texture while keeping it plant based.
If you prefer a Grilled Summer Veggie Sandwich, you can assemble the whole thing and then press it in a panini press for 3 minutes until the feta softens.
For those looking for more Mediterranean Veggie Sandwich Fillings, try adding sun dried tomatoes or roasted red peppers from a jar. If you're hosting a larger crowd, this sandwich pairs great with a Garden Party Veggie Pizza for a full spread of vegetarian options.
Decision Shortcut:
- If you want it spicy: Add sliced jalapeños to the sauté.
- If you want it sweeter: Add thinly sliced apple or pear.
- If you want more crunch: Use a toasted baguette instead of ciabatta.
Storage and Waste Tips
You can't really "store" a fully assembled Summer Veggie Sandwich because the moisture will eventually win. However, you can prep the components. The charred vegetables will stay great in the fridge for 3-4 days. Just store them in an airtight container.
When you're ready to eat, toast the bread and assemble fresh. If you have leftover hummus or pesto, use them as a dip for the remaining raw cucumber sticks.
As for zero waste, don't throw away the zucchini ends or the pepper seeds. I usually toss all my veggie scraps into a freezer bag. Once the bag is full, I boil them with some water and salt to make a quick vegetable stock for a Hearty Vegetable Soup (just skip the beef if you're staying vegetarian).
Storage Guide:
- Charred Veggies: Fridge for 4 days.
- Toasted Bread: Best eaten immediately.
- Assembled Sandwich: 4 hours (wrapped in parchment paper).
Best Pairing Suggestions
This sandwich is quite hearty, so you want sides that provide a refreshing contrast. A simple side salad with a lemon vinaigrette works well. If you want something warmer, my Roasted Frozen Broccoli is a great companion because the charred broccoli echoes the charred flavor of the zucchini.
Another great option is a bowl of chilled gazpacho or a small serving of marinated olives. Since the Summer Veggie Sandwich has so many flavors - salty, sweet, and tangy - you don't want a side dish that is too overpowering. Keep it light and acidic to cleanse the palate between bites.
Debunking Common Myths
You might hear that raw vegetables are always healthier. While you lose a tiny bit of Vitamin C during cooking, searing actually makes certain nutrients in the peppers and zucchini easier for your body to absorb. Plus, the flavor is far superior.
Another myth is that you need a fancy panini press to get a "professional" sandwich. A simple cast iron skillet and a heavy pot placed on top of the sandwich will give you the same compressed, crispy result without spending $50 on a gadget.
Right then, you're all set. This Summer Veggie Sandwich is all about the balance of heat and freshness. Once you start using the fat barrier method, you'll never go back to raw veggie stacks again. Enjoy the crunch!
Recipe FAQs
How to make a summer veggie sandwich?
Sauté zucchini, bell peppers, and red onions in olive oil for 5 7 minutes until charred. Toast buttered ciabatta rolls, then layer hummus, pesto, the charred vegetables, feta, cucumber, tomato, and baby arugula.
What are the best fillings for a summer veggie sandwich?
Use a mix of charred and fresh vegetables for contrast. This recipe combines warm sautéed zucchini and peppers with crisp English cucumber and heirloom tomato. If you enjoy these flavor combinations, you might also like our sautéed zucchini as a side dish.
Is this a Mediterranean roasted vegetable sandwich?
Yes, it features classic Mediterranean ingredients. The use of hummus, basil pesto, and crumbled feta cheese provides the authentic salty and herbaceous profile typical of the region.
Is this summer veggie sandwich easy to make?
Yes, it requires only 25 minutes of total time. Most of the process involves simple sautéing and assembling fresh ingredients.
Is this a healthy summer veggie sandwich?
Yes, it is loaded with fresh, nutrient dense produce. It relies on heart healthy olive oil and a variety of raw and lightly cooked vegetables.
Can I make this grilled veggie sandwich Indian style?
No, this recipe is specifically designed for Mediterranean flavors. To maintain the intended taste, stick to the hummus and pesto combination rather than adding different spice profiles.
Can I store the assembled sandwich overnight?
No, the moisture from the vegetables will make the bread soggy. Store your charred vegetables in an airtight container for up to 4 days and assemble the sandwich fresh.
Summer Veggie Sandwich