Ultimate Cheesy Ground Beef Melt: Crispy and Molten

- Time: 10 min active + 15 min cook = 25 min Total
- Flavor/Texture Hook: Shatter crisp bread with velvety, melted cheddar
- Perfect for: A high reward weeknight dinner or a late night craving
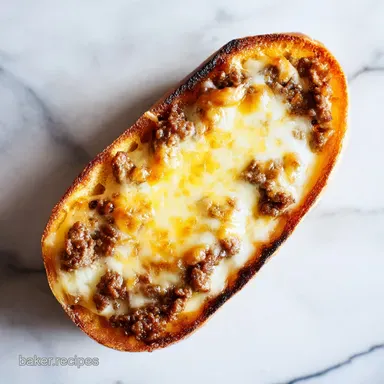
That specific sound of a metal spatula scraping against a cast iron skillet is basically my favorite song. There is nothing like the first time you flip a sandwich and see that deep, golden brown crust, knowing the cheese inside has turned into a molten lake of goodness.
I remember trying to make these on a whim during a rainy Tuesday when I was craving a diner style burger but couldn't be bothered to form individual patties.
I just tossed the beef into the pan, crumbled it up, and layered it between sourdough. The result was this beef and cheese melt that put every fancy burger I've ever bought to shame.
It's the kind of meal that makes your whole kitchen smell like a nostalgic roadside cafe, and honestly, once you try this version, you won't go back to the traditional patty style.
We are aiming for a specific result here: the ultimate cheesy ground beef melt. We aren't just making a grilled cheese with meat; we're building layers of flavor and texture. You'll get a crunch that actually shatters when you bite into it, followed by a velvety cheese pull and beef that's seasoned to be punchy and savory.
Trust me on this, the secret is in the prep and the pan heat.
Why This Sandwich Hits Different
I used to think any bread and any cheese would work, but I was wrong. There are a few reasons why this specific method produces a better result than just throwing everything in a pan.
Fat to Heat Ratio: Using 80/20 ground beef means there is enough rendered fat to brown the meat properly, creating those crispy, caramelized edges that add a ton of flavor. According to USDA FoodData, the fat content in 80/20 beef is what keeps the meat juicy even after it's been seared and then grilled again inside the sandwich.
The Mayo Trick: I use a combination of butter and mayonnaise on the outside of the bread. Mayo has a higher smoke point than butter, which means you can get a deeper brown color without the bread burning too quickly.
The Cheese Glue: By putting cheese on both the top and bottom slices of bread, the cheese acts as an adhesive. This keeps the crumbled beef from sliding out the sides while you're flipping it.
Sourdough Structure: Sourdough is sturdier than white bread. It doesn't get soggy from the beef juices, meaning you keep that crunch until the very last bite.
| Feature | Fresh Ground Approach | Shortcut Method (This Recipe) | Impact |
|---|---|---|---|
| Beef Prep | Hand forming patties | Crumbled and seared | Faster cook, more surface area for seasoning |
| Fat Source | Beef fat only | Butter + Mayo blend | More consistent mahogany crust |
| Bread Type | Basic White Bread | Sourdough | Better structural integrity; tangier flavor |
Breaking Down the Ingredients
Right then, let's look at what we're actually putting in the pan. Every single item here has a job to do. If you skip the Worcestershire or use low-fat cheese, you're leaving flavor on the table.
| Ingredient | Science Role | Pro Secret |
|---|---|---|
| 80/20 Beef | Flavor Base | Don't over work the meat or it gets tough |
| Sharp Cheddar | Binder/Fat | Grate it yourself for a faster, smoother melt |
| Sourdough | Vessel | Use thick cut slices to prevent sogginess |
| Worcestershire | Umami Boost | Adds a fermented depth that mimics aged beef |
The Shopping List
Grab these items before you start. I've listed the exact amounts we need for two sandwiches. If you're feeding a crowd, just double it, but remember to work in batches so you don't crowd the pan.
- 1/2 lb (225g) ground beef (80/20 blend) Why this? Ideal fat ratio for browning and juiciness
- 1 tbsp (15ml) olive oil Why this? High smoke point for the initial sear
- 1/4 tsp (1.5g) garlic powder Why this? Even distribution of flavor without burning garlic bits
- 1/4 tsp (1.5g) onion powder Why this? Adds a subtle sweetness and depth
- 1/2 tsp (3g) salt Why this? Essential for drawing out beef flavors
- 1/4 tsp (1.2g) black pepper Why this? Provides a necessary sharp contrast to the rich cheese
- 1 tsp (5ml) Worcestershire sauce Why this? The secret weapon for a "steakhouse" taste
- 4 slices (120g) sourdough bread Why this? Holds up to the weight of the beef
- 4 slices (80g) sharp cheddar cheese Why this? Strong flavor that doesn't get lost in the beef
- 2 tbsp (28g) unsalted butter, softened Why this? For that classic buttery aroma
- 1 tbsp (15g) mayonnaise Why this? Ensures a shatter crisp, golden exterior
Ingredient Swaps:
| Original Ingredient | Substitute | Why It Works |
|---|---|---|
| Sourdough Bread | Brioche | Richer and sweeter. Note: Burns faster, so lower the heat |
| Sharp Cheddar | Pepper Jack | Adds a spicy kick. Note: Slightly oilier melt |
| Worcestershire | Soy Sauce | Similar umami profile. Note: Saltier, so reduce added salt |
| Olive Oil | Avocado Oil | Very high smoke point. Note: Neutral flavor |
Tools You'll Need
You don't need a fancy kitchen setup for this. I'm all about minimal tools. Just a couple of basics and you're golden.
- 12 inch skillet: Cast iron is my go to because it holds heat so well, but a heavy stainless steel pan works too.
- Spatula: A sturdy metal or heat resistant silicone spatula for pressing the sandwich.
- Plate: To hold your cooked beef while you prep the bread.
Chef's Note: If you have a panini press, you can use it, but you'll miss out on that specific butter mayo sear that only a skillet provides. Stick to the pan for the ultimate cheesy ground beef melt.
Step-by-step Cooking Guide

Let's crack on. Follow these steps exactly, and you'll get that perfect diner result every time.
- Heat olive oil in a 12 inch skillet over medium high heat until shimmering. Note: This ensures the beef sears instead of steaming
- Add the ground beef to the skillet, breaking it into small crumbles with a spatula.
- Season the beef with garlic powder, onion powder, salt, and black pepper. Cook until browned and edges are slightly crisp.
- Stir in the Worcestershire sauce, cook for 1 additional minute, then remove the beef from the pan and set aside on a plate.
- Wipe the skillet clean. Note: Removing the loose beef bits prevents the bread from burning unevenly
- Spread a thin layer of softened butter on one side of each sourdough slice and a thin layer of mayonnaise on the non buttered side.
- Place two slices of bread butter side down in the skillet.
- Immediately top each slice with a slice of cheddar cheese, a generous scoop of the seasoned beef mixture, and another slice of cheese.
- Top with the remaining bread slices, butter side up.
- Cook over medium heat for 3–4 minutes per side, applying light pressure with a spatula, until the bread is mahogany colored and the cheese is melted.
Troubleshooting Common Issues
Even the best of us mess up a sandwich occasionally. Usually, it comes down to heat management. If your bread is black but the cheese is still a cold square, your pan was too hot. If the bread is pale and soft, you weren't using enough fat or the heat was too low.
| Issue | Solution |
|---|---|
| Why Bread Burns Early | This usually happens if the heat is on "High" instead of "Medium". The butter and mayo will scorch before the heat can penetrate the beef layer. Turn it down and give it more time. |
| Why Meat Falls Out | If you didn't use the "Double Cheese Shield" (cheese on both slices), there's nothing holding the crumbles in place. Always layer the cheese first. |
| Why Cheese Won't Melt | Sourdough can sometimes act as a heat shield. Use your spatula to press down firmly on the sandwich. This forces the bread into contact with the pan and pushes the heat into the center. |
Common Mistakes Checklist:
- ✓ Did you wipe the pan after cooking the beef?
- ✓ Is the butter spread edge to edge on the bread?
- ✓ Did you use medium heat instead of high?
- ✓ Did you press down with the spatula during the last minute?
- ✓ Is the beef broken into small crumbles rather than large chunks?
Customizing Your Melt
This is a great base recipe, but you can definitely tweak it. If you're feeling adventurous, try adding some diced jalapeños to the beef mixture for a spicy kick. For those wanting a different vibe, I've found that adding a teaspoon of Dijon mustard to the mayo layer adds a sophisticated tang that cuts through the richness.
If you want a lower carb version, you can swap the sourdough for a keto friendly almond flour bread. Just be careful, as these breads are more fragile and can't handle as much pressure from the spatula.
For a complete meal, this pairs great with something a bit lighter. While this is a heavy dish, serving it alongside a homemade green bean casserole provides a nice textural contrast. Or, if you want to go full Cajun style, try some Dirty Rice on the side.
Scaling the Recipe: - For 1 Person: Use 1/4 lb beef. Reduce the cooking time for the beef by about 20% since there's less volume in the pan. - For 4 People: Double the ingredients, but don't double the salt. Use 1.5x the salt and spices to avoid over seasoning.
Work in two batches of two sandwiches each; overcrowding the pan will lower the temperature and you'll lose that mahogany crust.
Storing and Saving Leftovers
I'll be honest, this sandwich is best eaten the second it leaves the pan. However, if you have leftovers, you can store them in the fridge for up to 3 days. Wrap them tightly in foil or place them in an airtight container.
Reheating Tips: Do not use the microwave. It will make the sourdough rubbery and the cheese greasy. Instead, put them back in a skillet over medium low heat with a tiny bit of butter.
Cover the pan with a lid for 2 minutes to help the cheese remelt, then remove the lid to crisp up the bread.
Zero Waste Ideas: If you have a bit of the beef mixture left over, don't toss it. It's incredible stirred into a bowl of mac and cheese or used as a topping for a baked potato.
If you have sourdough scraps, toss them in olive oil and garlic powder and bake them at 350°F for 10 minutes to make quick croutons for a side salad.
The Best Side Dishes
Because the ultimate cheesy ground beef melt is so rich, you need sides that provide balance. I usually go one of two ways: the "Diner Classic" or the "Fresh Balance".
The Classic Diner Combo Think thick cut steak fries and a cold milkshake. This is the ultimate comfort food route. The saltiness of the fries complements the sharp cheddar, and the sweetness of the shake cuts through the savory beef.
The Fresh Balance A crisp arugula salad with a lemon vinaigrette is the way to go here. The peppery greens and the acidity of the lemon act as a palate cleanser, making every bite of the beef melt taste just as impactful as the first. For another hearty but balanced option, you might consider a creamy spinach artichoke lasagna for a family dinner where the melt serves as a side appetizer.
Right then, you've got everything you need to nail this. Just remember: don't rush the browning of the beef, and don't be afraid to press down on that bread. Your kitchen is about to smell incredible. Let's get cooking!
High in Sodium
960 mg 960 mg of sodium per serving (42% 42% of daily value)
The American Heart Association recommends a limit of 2,300 mg of sodium per day for most adults to lower the risk of cardiovascular disease.
Tips to Reduce Sodium in Your Recipe
-
Reduce Added Salt-25%
Eliminate or significantly reduce the 1/2 tsp of salt; the cheese and Worcestershire sauce already provide substantial saltiness.
-
Low-Sodium Sauce-20%
Replace the standard Worcestershire sauce with a low-sodium version or use a splash of balsamic vinegar for similar depth.
-
Switch the Cheese-15%
Swap the sharp cheddar for low-sodium Swiss cheese or a fresh mozzarella to cut down on processed sodium.
-
Low-Sodium Bread-15%
Choose a low-sodium sourdough or a sprouted grain bread to reduce the salt typically found in commercial bakery products.
-
Creamy Alternative-10%
Replace the mayonnaise with mashed avocado for a creamy spread that contains naturally low levels of sodium.
-
Enhance with Aromatics
Increase the garlic and onion powder or add smoked paprika to boost the flavor profile without adding any sodium.
Recipe FAQs
How to reheat leftover beef melts?
Heat in a skillet over medium low with a bit of butter. Cover with a lid for 2 minutes to remelt the cheese, then remove the lid to crisp the bread. Avoid the microwave to prevent the sourdough from becoming rubbery.
Why did my bread burn before the cheese melted?
Your pan was likely set to "High" instead of "Medium". This causes the butter and mayo to scorch before the heat can penetrate the beef layer. Lower the temperature and give the sandwich more time in the pan.
How to ensure the beef sears instead of steaming?
Heat the olive oil until it is shimmering before adding the ground beef. This high initial temperature ensures the meat browns and the edges get slightly crisp.
Is it true that using only butter on the bread is enough for a golden crust?
No, this is a common misconception. Applying both softened butter and mayonnaise creates a superior mahogany color and a crispier texture than butter alone.
How to prevent the meat from falling out of the sandwich?
Place a slice of cheddar both above and below the beef. This double layer of cheese acts as an adhesive that locks the seasoned beef mixture in place as it melts.
Is it true I should cook the sandwich on medium high heat?
No, this is a common misconception. You must use medium heat for 3 4 minutes per side to prevent the bread from burning before the cheese is fully melted.
What should I serve with these cheesy melts?
Pair them with a tangy sauce or a fresh side. If you enjoyed the savory depth of the Worcestershire sauce here, you will appreciate the bold flavor profile in our homemade BBQ sauce.
Ultimate Cheesy Ground Beef Melt