3 Ingredient Peppermint Bark: Perfectly Tempered
- Time: Active 15 minutes, Passive 60 minutes, Total 75 minutes
- Flavor/Texture Hook: Cooling peppermint crunch with a clean chocolate snap
- Perfect for: Holiday gift tins or a low stress weekend project
- Making This 3 Ingredient Peppermint Bark Recipe
- Why We Love This Bark
- Why the Layers Bond Perfectly
- Ingredient Deep Dive
- Only Three Simple Ingredients
- Simple Tools for Smooth Results
- Easy Steps for Better Bark
- Fixing Common White Chocolate Issues
- Simple Tweaks for Variety
- Storing Your Peppermint Bark Safely
- Serving and Cracking Tips
- Recipe FAQs
- 📝 Recipe Card
Making This 3 Ingredient Peppermint Bark Recipe
The first time I tried making bark, I ended up with a disaster that looked like a tectonic plate shift. I had waited too long for the dark chocolate to dry, and when I broke it into pieces, the white chocolate just slid right off. It was frustrating because the flavors were there, but the "snap" was a mess.
I realized then that peppermint bark isn't just about melting stuff, it's about catching that sweet spot of "tackiness" where the two layers actually become one.
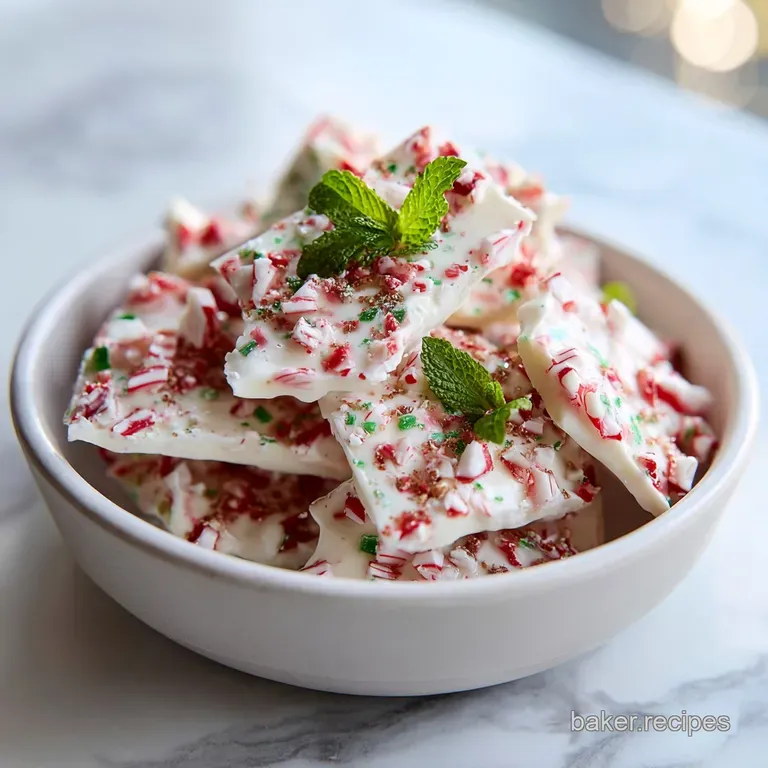
When you hear that distinct, sharp crack as you break the set bark, you know you've done it right. Discover the magic of this simple yet spectacular 3 Ingredient Peppermint Bark Recipe with White Chocolate.
It’s the kind of treat that makes the kitchen smell like a candy shop, and honestly, it’s far better than the overpriced tins you see in the mall. There’s something so satisfying about hitting a candy cane with a rolling pin and seeing those "jewels" sparkle against the white chocolate layer.
We are keeping things very simple today. No fancy thermometers or tempering machines required, just a few bowls and a bit of patience. I've found that using dark chocolate with at least 70% cocoa provides the best contrast to the sweet white chocolate.
It balances the sugar so you aren't just eating a block of sweetness. Let's get into how we make this actually stay together and taste like a pro made it.
Why We Love This Bark
I chose dark chocolate as the foundation because it has a higher fat stability than milk chocolate, which helps the bark keep its shape at room temperature. Many people reach for "candy melts," but they often lack that rich mouthfeel that real cocoa butter provides.
Discovering that white chocolate needs to be high-quality was the turning point for me; if it doesn't list cocoa butter as a main ingredient, it won't melt into that silky, pourable dream we need.
This 3 Ingredient Peppermint Bark Recipe works because of the physical bond created between the layers. We aren't just stacking them; we are scuffing the surface and using "peppermint dust" as a bridge.
This tiny bit of grit helps the white chocolate grab onto the dark base, ensuring that when you bite down, you get both flavors in every single shard.
Why the Layers Bond Perfectly
- Mechanical Grip: Scuffing the matte dark chocolate creates tiny grooves for the white layer to settle into.
- Thermal Balance: Pouring warm white chocolate over slightly cooled dark chocolate allows the surfaces to fuse without fully mixing.
- Fat Compatibility: Using chocolates with similar cocoa butter contents ensures they shrink and expand at the same rate while setting.
| Thickness | Cooling Method | Set Time | Visual Cue |
|---|---|---|---|
| 1/4 inch | Room Temp | 60 minutes | Surface is dull and firm |
| 1/2 inch | Room Temp | 90 minutes | Edges pull away from paper |
| 1/4 inch | Fridge (Rapid) | 20 minutes | Chocolate feels ice cold |
Melting chocolate is more about controlled heat than high heat. If the bowl gets too hot, the chocolate loses its shine and becomes brittle, which is why the double boiler is our best friend for this 3 Ingredient Peppermint Bark.
Ingredient Deep Dive
| Ingredient | Science Role | Pro Secret |
|---|---|---|
| Dark Chocolate | Structural base | Use 70% cocoa for a clean snap and less sugar migration |
| White Chocolate | Flavor carrier | Ensure it contains real cocoa butter to avoid "waxy" texture |
| Peppermint Canes | Texture & Volatiles | Sift the dust to flavor the chocolate and save chunks for the top |
Only Three Simple Ingredients
- 12 oz dark chocolate (70% cocoa): This provides the "snap." Why this? High cocoa content ensures the bark stays firm and contrasts the sweet topping.
- Substitute: Semi sweet chocolate chips (note: will be softer and sweeter).
- 12 oz white chocolate (containing cocoa butter): The creamy top layer. Why this? Real cocoa butter allows for a velvety melt that doesn't seize easily.
- Substitute: White vanilla baking chips (note: often contains palm oil, resulting in a waxier finish).
- 0.5 cup peppermint candy canes, crushed: The signature crunch. Why this? Provides both a visual "jewel" effect and essential mint oils.
- Substitute: Hard peppermint round candies (note: same flavor, slightly different red/white pattern).
Simple Tools for Smooth Results

You don't need a pantry full of gadgets to get this done. A heavy duty freezer bag is essential for crushing the canes without making a mess. For the melting process, a glass or stainless steel bowl that fits snugly over a saucepan works perfectly as a makeshift double boiler.
Just make sure the bottom of the bowl doesn't touch the water, or you'll scorch the chocolate.
An offset spatula is my favorite tool for spreading the layers evenly. It gives you way more control than a regular knife, helping you get that 1/4 inch thickness that is the sweet spot for snacking.
If you don't have one, the back of a large spoon works in a pinch, but you'll have to be a bit more patient to get it level.
Easy Steps for Better Bark
- Prep the mint. Place candy canes in a heavy duty freezer bag and crush with a rolling pin.
- Sift the pieces. Strain the mixture through a fine mesh strainer, reserving the fine "peppermint dust" and the larger "jewel" pieces in separate bowls. Note: The dust flavors the white chocolate layer throughout.
- Melt the base. Melt the dark chocolate using a double boiler method over barely simmering water until smooth and glossy.
- Spread the foundation. Pour onto a parchment lined tray and spread to 1/4 inch thickness using an offset spatula.
- Wait for matte. Allow the dark chocolate to sit at room temperature for 10–12 minutes until the surface appears matte but is not fully hardened.
- Create the grip. Lightly scuff the surface of the dark chocolate with a fork. Note: This prevents the layers from delaminating later.
- Melt the top. Melt the white chocolate using the same double boiler method. Once smooth, stir in the reserved peppermint dust.
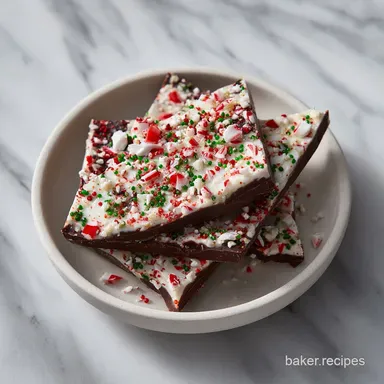
- Layer the flavors. Carefully pour the white chocolate over the dark chocolate layer. Spread gently until the dark layer is completely covered.
- Add the crunch. Immediately sprinkle the larger peppermint pieces over the top.
- Set the bark. Allow the bark to set completely at room temperature for at least 1 hour until it is hard enough to shatter.
Fixing Common White Chocolate Issues
Why Your Bark Layers Separated
If your layers come apart, it's usually because the dark chocolate was too cold when you added the white chocolate. If the base layer is completely hard and smooth, the top layer has nothing to grab onto.
Scuffing the surface with a fork is the best way to fix this, as it creates physical "anchors" for the white chocolate.
Why is my chocolate grainy?
Graininess happens when a tiny bit of moisture gets into the bowl, causing the chocolate to "seize." This can even happen from the steam rising from your double boiler. Always make sure your bowls and spatulas are bone dry before you start.
If it's already grainy, sometimes stirring in a teaspoon of neutral oil can smooth it out, but it will change the final snap of the bark.
| Problem | Root Cause | Solution |
|---|---|---|
| Chocolate Seized | Water droplets in bowl | Keep all tools bone dry; avoid steam contact |
| Layers Sliding | Dark layer too cold/smooth | Scuff the surface and pour while dark layer is still "tacky" |
| Soft Bark | Improper cooling | Ensure it sets at room temp before moving to fridge |
Common Mistakes Checklist:
- ✓ Never let the water in the double boiler touch the bottom of your bowl.
- ✓ Pat the candy canes dry if they feel sticky before crushing.
- ✓ Avoid using the microwave for white chocolate as it burns in seconds.
- ✓ Don't skip the sifting step; the dust is what gives the white layer its flavor.
- ✓ Use a heavy duty bag for crushing to avoid plastic shards in your candy.
Simple Tweaks for Variety
If you want to change things up, you can easily swap the dark chocolate for a milk chocolate base, though it will be much sweeter. Some people like to add a tiny pinch of flaky sea salt to the dark chocolate layer to make the peppermint pop even more. I've also seen people use the same technique for my Homemade Whipped Cream Recipe as a topping for hot cocoa, serving a shard of this bark on the side for a full cafe experience at home.
For a more intense flavor, try adding a half teaspoon of peppermint extract to the dark chocolate as it melts. Just be careful, because some extracts are water based and can cause the chocolate to seize. Always use oil based flavorings for chocolate. If you're making this as part of a big holiday spread, it pairs surprisingly well with savory items like a Homemade Breakfast Sausage brunch the mint clears the palate perfectly.
Storing Your Peppermint Bark Safely
Peppermint bark is quite hardy. You can store it in an airtight container at room temperature for up to 2 weeks. If your kitchen is very warm, the fridge is a better bet, where it will stay fresh for about 3 weeks.
Just be aware that the red dye from the candy canes can sometimes start to "bleed" into the white chocolate if there is too much humidity in the fridge.
To freeze, wrap the bark shards in parchment paper and place them in a freezer safe bag. It stays good for up to 3 months. When you're ready to eat it, let it thaw at room temperature while still in the bag to prevent condensation from forming directly on the chocolate, which can make it look dull or chalky.
Serving and Cracking Tips
When it comes to breaking the bark, I prefer the "rustic" look. You can use a sharp knife to cut clean squares, but there’s something festive about just using your hands to snap it into irregular shards. If you use a knife, run it under hot water and wipe it dry between cuts to get the cleanest edges possible.
The "Midnight" Twist
If you really want to go bold, try a triple layer. Use a thin layer of dark, a thin layer of milk, and then the white chocolate on top. It looks stunning when stacked in a clear glass jar.
The Mocha Infusion
A teaspoon of very finely ground espresso powder mixed into the dark chocolate layer creates a mocha peppermint flavor that is incredibly sophisticated. It’s a great way to use up those last few coffee beans in the grinder.
| Method | Time | Texture | Best For |
|---|---|---|---|
| Stovetop | 10 mins | Very smooth | Precision layering |
| Microwave | 3 mins | Can be grainy | Quick batches |
| Slow Cooker | 60 mins | Consistent | Large parties |
Don't believe the myth that you need to temper chocolate for a simple bark. While tempering gives a professional shine, the sugar in the peppermint and the layering process makes "cheating" with a double boiler perfectly acceptable for home cooks.
Searing the chocolate with high heat is the only real way to ruin it, so keep that flame low and stay patient!

Recipe FAQs
Is it true I must use a double boiler for melting chocolate?
No, this is a common misconception. While the double boiler method ensures a gentle, even melt, you can successfully achieve the same smooth texture in the microwave at 50% power using short, consistent intervals.
How to ensure the chocolate layers stay bonded?
Lightly scuff the surface of the dark chocolate with a fork before adding the white layer. This creates texture that allows the two types of chocolate to grip each other once they set, preventing them from separating into distinct slabs.
How to achieve the perfect peppermint flavor throughout the bark?
Sift your crushed candy canes to separate the fine dust from the larger shards. By stirring the fine peppermint dust directly into the white chocolate, you infuse the flavor into every bite, while reserving the larger pieces adds a necessary textural crunch.
Why is my bark blooming or losing its shine?
You likely allowed water or steam to touch the chocolate during the melting process. Even a single drop of moisture will cause the cocoa butter to seize, resulting in a grainy or dull finish rather than the glossy, smooth snap you want for a professional result.
How to store peppermint bark to prevent the candy from bleeding?
Keep the bark in an airtight container at room temperature to avoid humidity. If you live in a very warm climate and must refrigerate it, be prepared for potential color bleeding from the candy canes due to the moisture heavy environment.
How to slice the bark without shattering it into uneven pieces?
Allow the bark to set for at least one full hour at room temperature before handling. If you enjoyed mastering the temperature sensitive setting process here, you can apply similar patience to the cooling stages of our chewy peanut butter cookies to ensure they hold their shape perfectly.
Can I freeze this dessert for later?
Yes, wrap the shards in parchment paper and place them in a freezer safe bag. This method keeps the bark fresh for up to three months, provided you allow it to thaw completely at room temperature before serving to avoid condensation.
3 Ingredient Peppermint Bark
Ingredients:
Instructions:
Nutrition Facts:
| Calories | 156 kcal |
|---|---|
| Protein | 1.7 g |
| Fat | 9.1 g |
| Carbs | 17.3 g |
| Fiber | 1.3 g |
| Sugar | 13.0 g |
| Sodium | 15 mg |
