Homemade Apple Fritters: Crispy and Spiced
- Time: Active 20 minutes, Passive 15 minutes, Total 35 minutes
- Flavor/Texture Hook: A shatter crisp glaze over a warm, cinnamon spiced crumb filled with tart apple chunks.
- Perfect for: Cozy weekend mornings or a seasonal harvest celebration with friends.
- Master the Art of Orchard Fresh Apple Fritters
- Why This Works
- Essential Timing for Golden Fritter Success
- Selecting Your Seasonal Orchard Ingredients
- Reliable Tools for Precise Home Frying
- Crafting Your Fritters from Orchard to Plate
- Resolving Common Fritter Fails and Texture Issues
- Adjusting the Recipe for Large or Small Batches
- Creative Twists for Your Spiced Apple Batter
- Debunking Kitchen Myths
- Preserving Freshness and Reheating for Later
- Simple Pairings for a Seasonal Feast
- Recipe FAQs
- 📝 Recipe Card
Master the Art of Orchard Fresh Apple Fritters
Forget everything you have been told about needing yeast and hours of rising time to achieve that iconic bakery style texture. Most people assume that the airy, pillowy crunch of a classic fritter requires a complex fermented dough, but honestly, that is a total misconception.
I used to think the same until I realized that a chemical leavener combined with the right moisture control actually creates a much more interesting, craggy surface that traps more glaze in every single nook.
When the scent of bubbling oil meets the sharp, woody aroma of ground cinnamon and nutmeg, my kitchen transforms into a literal orchard stall. There is something truly therapeutic about dicing up farm fresh apples and watching them release their juices into a shimmering, spiced syrup.
You do not need professional equipment or a culinary degree to master this. All you need is a heavy pot, a reliable thermometer, and the willingness to let the batter be a little bit messy.
We are going after that specific sensory experience where the first bite offers a loud, sugary crackle, followed immediately by the velvety warmth of a spiced cake. If you have ever felt intimidated by deep frying, I am here to tell you that these are the most forgiving treats you can make.
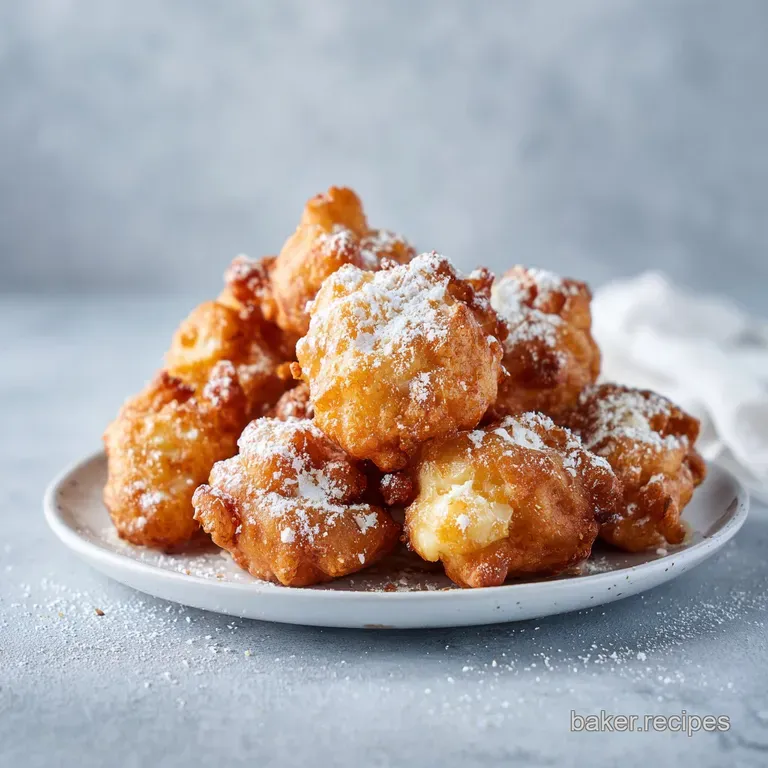
The goal isn't a perfect circle, it is a glorious, irregular shape with plenty of "crags" to hold onto that sweet vanilla milk glaze. Trust me, once you see that first golden brown fritter emerge from the oil, you will never look at a store-bought donut the same way again.
Why This Works
To understand why this recipe succeeds where others fail, we have to look at how we handle the fruit and the heat. It is not just about throwing things in a bowl, it is about managing the water content so the batter fries instead of steams.
- Osmotic Maceration: Tossing the apples in sugar and lemon juice draws out excess water before they hit the batter, which prevents the center from becoming a soggy, undercooked mess.
- Baking Powder Power: A generous tablespoon of baking powder creates an immediate reaction with the heat of the oil, forcing the batter to puff outward and create those jagged, crispy edges.
- Sugar Synergy: Using a mix of granulated and dark brown sugar provides both a crisp structure and a deep, molasses rich moisture that keeps the crumb tender.
- Fat Temperature Control: Frying at exactly 350°F ensures the outside browns at the same rate the interior cooks, preventing a greasy finish or a raw middle.
Below is a quick guide to help you decide on your frying approach and timing based on how you like your treats finished.
| Fritter Thickness | Oil Temperature | Cook Time | Visual Doneness Cue |
|---|---|---|---|
| 1/2 inch (Standard) | 350°F | 2-3 minutes per side | Deep mahogany brown with visible crisp ridges |
| 1/4 inch (Extra Crispy) | 350°F | 1.5-2 minutes per side | Dark gold and very firm to the touch |
| 3/4 inch (Cakey) | 340°F | 4 minutes per side | Uniform brown; toothpick comes out clean |
Choosing the right apple is just as important as the technique itself. While some people grab whatever is in the fruit bowl, a firm, tart variety like the Granny Smith is the gold standard here because it maintains its shape and provides a sharp contrast to the sweet glaze.
Essential Timing for Golden Fritter Success
When you are working with a recipe that moves as fast as this one, having your timing down is the difference between a relaxing morning and a chaotic kitchen. We are looking at a total of 35 minutes from the moment you peel that first apple to the moment you are dipping the warm pastry into the vanilla glaze.
It is important to remember that frying is a high speed sport. You want your oil to be at the target temperature before you even think about mixing the wet and dry ingredients. If the batter sits too long, the baking powder will lose its "oomph," and you will end up with flat, dense pucks rather than airy fritters.
I always set my oil to heat on medium low while I am dicing the fruit.
| Feature | Fresh From Scratch | Grocery Store Shortcut |
|---|---|---|
| Texture | Shatter crisp exterior with distinct fruit chunks | Often spongy or bread like with apple "puree" |
| Aroma | Heady cinnamon, nutmeg, and real vanilla bean | Artificial spice and heavy oil scent |
| Customization | Can adjust spices and fruit to batter ratio | One size fits all sweetness levels |
The beauty of making these at home is that you control the "crag" factor. store-bought versions are often too uniform because they are made by machines. At home, we use a 1/4 cup scoop and a spoon to flatten them out, creating those beautiful, irregular shapes that are the hallmark of a truly great apple fritter.
Selecting Your Seasonal Orchard Ingredients
Every ingredient in this list serves a specific purpose in the architecture of the fritter. We aren't just looking for flavor, we are looking for structural integrity. For example, the dark brown sugar isn't just for sweetness, the acidity in the molasses actually helps activate the baking powder for a better rise.
| Ingredient | Science Role | Pro Secret |
|---|---|---|
| Granny Smith Apples | Structure and Acidity | Dice them small (1/4 inch) so they soften at the same rate the batter cooks. |
| Baking Powder | Rapid Leavening | Ensure it is fresh by checking if it fizzes in hot water; it is responsible for the entire "puff." |
| Vanilla Bean Paste | Flavor Depth | The tiny black specks add a premium look and a more intense, floral aroma than extract. |
| Whole Milk | Hydration and Fat | The fat in whole milk creates a richer, more velvety crumb compared to skim or 2% milk. |
Beyond the science, there is the soul of the dish. I highly recommend using the best cinnamon you can find. A Vietnamese or Saigon cinnamon has a much higher oil content and a more aggressive "red hot" flavor that stands up beautifully to the frying process.
The Component List
- 2 large Granny Smith apples: Peeled and finely diced. You need about 350g total.
- 1 tbsp lemon juice: This prevents browning and balances the sugars.
- 1 tsp ground cinnamon: The primary aromatic.
- 1/4 tsp ground nutmeg: Adds that "bakery" mystery note.
- 2 cups all purpose flour: The structural foundation.
- 1/4 cup granulated sugar: For the crisp edges.
- 1/4 cup dark brown sugar: For the soft, moist center.
- 1 tbsp baking powder: Our lifting agent.
- 1 tsp kosher salt: Essential to balance the sugar.
- 2 large eggs: Room temperature is best for a smooth batter.
- 3/4 cup whole milk: The liquid base.
- 2 tbsp unsalted butter: Melted and cooled so it doesn't scramble the eggs.
- 1 tsp vanilla bean paste: For those gorgeous specks.
- 2 cups neutral oil: Canola or vegetable oil works best for frying.
- 2 cups powdered sugar: The base of our signature glaze.
- 1/4 cup whole milk: For thinning the glaze.
- 1/2 tsp vanilla extract: For the glaze's finishing touch.
- 1 pinch salt: To make the glaze flavors pop.
| Original Ingredient | Substitute | Why It Works |
|---|---|---|
| Granny Smith Apples | Honeycrisp | Sweeter and juicier, but still holds its shape well during frying. |
| Dark Brown Sugar | Light Brown Sugar | Similar moisture, but you will lose a tiny bit of that deep caramel note. |
| Whole Milk | Buttermilk | Adds a lovely tang. Note: Batter may be slightly thicker; add 1 tbsp extra milk if needed. |
| Vanilla Bean Paste | Vanilla Extract | Same flavor profile, though you won't see the dark vanilla bean specks. |
Reliable Tools for Precise Home Frying
You don't need a fancy deep fryer to make these, but there are two things I absolutely insist on: a heavy bottomed pot and a thermometer. A Dutch oven is my tool of choice because the thick cast iron walls hold heat like a champ. When you drop cold batter into hot oil, the temperature naturally dips.
A heavy pot minimizes that dip, ensuring your fritters don't end up greasy.
You will also want a wire cooling rack set over a parchment lined baking sheet. Never drain fried foods on paper towels alone. While it seems intuitive to soak up the grease, sitting on a flat, oil soaked towel actually makes the bottom of the fritter soggy.
A wire rack allows air to circulate all the way around, keeping that crust shatter crisp as it cools.
Chef's Tip: If you don't have a 1/4 cup scoop, use two large spoons. One to scoop the batter and the other to scrape it into the oil. To get those "craggy" edges, don't try to make a perfect ball. Let the batter drip and drape as it hits the oil.
Finally,, make sure you have a "spider" or a slotted spoon. This allows you to lift the fritters out while letting the excess oil drain back into the pot immediately. Precision here means a cleaner kitchen and a better tasting pastry.
Crafting Your Fritters from Orchard to Plate
This process is all about the "scent cues." As you work through these steps, pay attention to how the kitchen begins to smell. It should evolve from the bright, sharp scent of fresh lemons and apples to the deep, toasted aroma of browning butter and spices.
- Macerate the apples: In a small bowl, toss your finely diced apples with the lemon juice, cinnamon, and nutmeg. Let this mixture sit for 10 minutes. Note: This draws out the juices, creating a spiced syrup that will flavor the entire batter.
- Whisk the dry base: In a large mixing bowl, combine the flour, both sugars, baking powder, and kosher salt. Use a whisk to ensure there are no large clumps of brown sugar.
- Prepare the wet components: In a separate measuring cup or bowl, whisk together the eggs, milk, melted (but cooled) butter, and vanilla bean paste until completely smooth.
- Combine carefully: Gently fold the wet ingredients into the dry ingredients. Use a spatula and stop as soon as you see no more streaks of flour.
- Fold in the fruit: Add the macerated apples along with every drop of that accumulated spiced liquid. The batter will be thick, lumpy, and look almost like there are too many apples that is exactly what we want.
- Heat the oil: Pour your oil into the pot until it is about 2 inches deep. Bring it to 350°F. You should hear a faint sizzle if you drop a tiny pinch of flour in.
- Fry the first batch: Drop 1/4 cup portions of batter into the hot oil. Only do 3 or 4 at a time to avoid crowding. Press down slightly with the back of a spoon to flatten them.
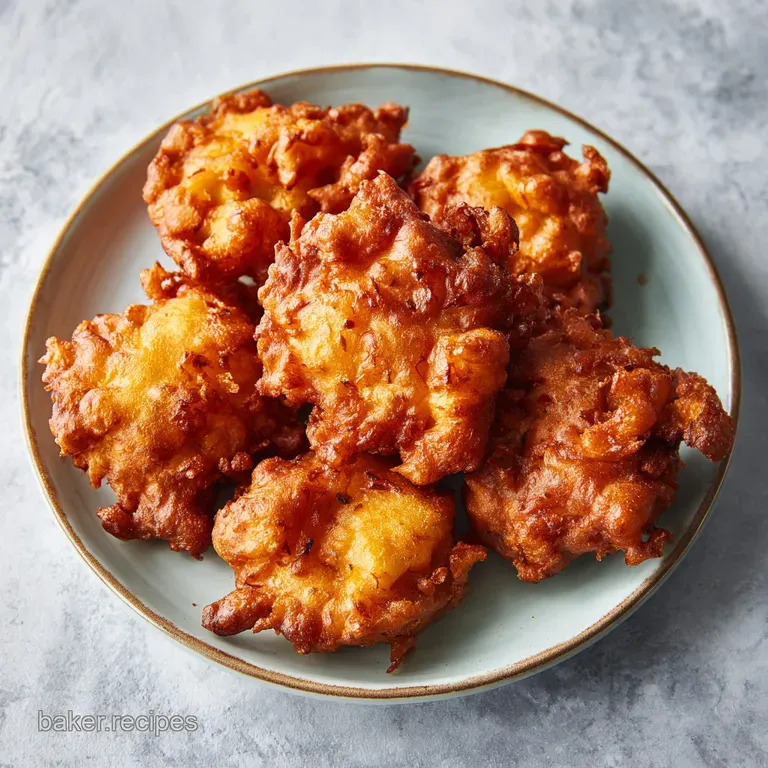
- Monitor the color: Fry for 2-3 minutes per side. Look for a deep, mahogany gold color and a firm exterior.
- Drain and cool: Move the finished fritters to your wire rack. Let them sit for about 5 minutes before glazing.
- Apply the glaze: Whisk the powdered sugar, milk, vanilla, and salt. Dip each warm fritter into the glaze, turning to coat both sides, then let the excess drip off back on the rack.
Resolving Common Fritter Fails and Texture Issues
Frying can be temperamental, especially if your stove isn't consistent. The most common heartbreak is a fritter that looks beautiful on the outside but is still gooey and raw in the middle. This almost always happens because the oil was too hot, causing the exterior to brown before the heat could penetrate the center.
Why Your Fritters Are Greasy
If your pastry feels heavy and oily rather than light and crisp, your oil temperature likely dropped below 325°F. When the oil isn't hot enough to create an immediate steam barrier, the fat soaks into the batter instead of searing the outside.
Always wait for the oil to come back up to 350°F between batches.
Why Your Fritters Stay Raw
As mentioned, this is the "Too Much Heat" syndrome. If you find this happening, turn your burner down slightly and aim for the 340°F to 350°F range. You can also flatten the batter more when you drop it in the oil. A thinner fritter cooks more evenly than a thick, round ball.
| Problem | Root Cause | Solution |
|---|---|---|
| Fritters are falling apart | Batter is too thin or apples were too wet | Add 2 tbsp of flour to the remaining batter to tighten it up. |
| Glaze is disappearing | Fritters were too hot when dipped | Wait until they are warm to the touch, not piping hot, before glazing. |
| Outside is burnt, inside raw | Oil temperature is exceeding 375°F | Lower heat and use a thermometer to maintain a steady 350°F. |
Common Mistakes Checklist
- ✓ Pat your diced apples with a paper towel if they seem excessively juicy before macerating.
- ✓ Never skip the thermometer; "guessing" oil temp is the leading cause of fried food failure.
- ✓ Don't overmix the batter; a few lumps are much better than a tough, rubbery fritter.
- ✓ Use a neutral oil with a high smoke point, like canola or peanut oil, to avoid a burnt taste.
- ✓ Ensure your eggs and milk are at room temperature to prevent the melted butter from seizing up.
Adjusting the Recipe for Large or Small Batches
If you are cooking for a crowd or just for two, scaling this recipe is quite simple. Because this is a chemical leavened batter and not a yeast dough, the math is straightforward. However, frying in batches is non negotiable regardless of how much batter you have.
For a half batch (6 servings), simply cut everything in half. For the egg, whisk one large egg in a small bowl and use approximately 2 tablespoons of it. You should still use a full sized pot for frying to maintain heat stability, even if you are only making a few.
When doubling or tripling the recipe for a big harvest party, I suggest only mixing the wet and dry ingredients in smaller increments. If a huge bowl of batter sits on the counter for an hour while you fry 36 fritters, the baking powder will eventually give up, and the last batch won't be as fluffy as the first. Keep the dry mix and the wet mix separate, and only combine what you can fry in about 20 minutes. For another great crowd pleaser, you might consider how my Apple Biscuits recipe could work as a non fried alternative on your dessert table.
Creative Twists for Your Spiced Apple Batter
While the classic version is hard to beat, there are several ways to adapt this recipe to fit different dietary needs or flavor preferences. The "orchard" theme is very flexible.
For a Guilt Free Air Fryer Version
You can actually make these in the air fryer, though the texture will be more "muffin like" than "fried pastry." Line your air fryer basket with parchment paper. Drop dollops of batter and flatten them. Air fry at 375°F for about 8-10 minutes, flipping halfway through.
They won't have that iconic craggy crunch, but once you hit them with the glaze, they are still quite satisfying.
Baked Apple Fritters
If you prefer the oven, you can bake these in a heavily greased muffin tin or as "drop cakes" on a baking sheet. Bake at 400°F for 12-15 minutes.
Again, the texture is different more like a dense apple cake but it is a great way to avoid the oil if you are in a rush.
| Feature | Deep Fried (Classic) | Air Fryer (Modern) | Baked (Simple) |
|---|---|---|---|
| Texture | Crispy, craggy, decadent | Soft, slightly chewy | Cake like, soft crumb |
| Ease of Clean up | High (oil disposal) | Low (minimal mess) | Lowest (one pan) |
| Flavor Profile | Toasted, rich | Bright apple forward | Bready and sweet |
Debunking Kitchen Myths
One of the biggest myths is that you have to use "frying oil" specifically. People often think they need a specialized, expensive brand. In reality, any neutral oil with a high smoke point works. I usually just use a big bottle of vegetable oil from the supermarket.
The flavor comes from the butter and spices in the batter, not the frying medium.
Another common misconception is that adding more baking powder will make them "airier." In reality, too much leavening will cause the fritter to expand so quickly that it loses its structural integrity and falls apart in the oil. It can also leave a metallic aftertaste.
Stick to the tablespoon; it is the scientifically tested "sweet spot" for this amount of flour.
Finally,, some say the glaze must be applied while the fritter is boiling hot to "seal it." This is actually counterproductive. If the pastry is too hot, the glaze will melt completely and run off, leaving you with a sticky mess on your tray instead of a beautiful white coating.
Wait for that five minute cooling window for the best results.
Preserving Freshness and Reheating for Later
Apple fritters are undeniably at their peak about ten minutes after they have been glazed. However, if you find yourself with leftovers, you don't have to toss them. You can store them in an airtight container at room temperature for up to 2 days, or in the fridge for 4 days.
To bring back that "just fried" texture, avoid the microwave at all costs. The microwave will turn the sugar glaze into a sticky syrup and make the dough rubbery. Instead, pop them into a 350°F oven or air fryer for 3-5 minutes.
This crisps up the exterior and warms the apples through without ruining the structure.
Zero Waste Tip: If you have apples that are starting to look a little wrinkled or soft, those are actually the best ones for fritters! They have a lower water content and a more concentrated sugar level. Also, don't throw away the apple peels.
Toss them with a little cinnamon sugar and bake them at 300°F until crispy for a quick "apple skin chip" snack.
Simple Pairings for a Seasonal Feast
Serving these fritters is all about leaning into that cozy, orchard vibe. I love placing a big platter of these in the center of the table alongside a pot of hot coffee or a jug of cold milk. The bitterness of a dark roast coffee cuts through the intense sweetness of the glaze perfectly.
If you are hosting a larger harvest brunch, these pair beautifully with savory items like thick cut bacon or a sharp cheddar cheese omelet. The saltiness of the meat or cheese acts as a foil to the warm spices in the batter. For those who really want to go all out on the apple theme, you might also enjoy my easy Apple Cobbler recipe as a warm evening alternative to these morning treats.
Whether you are eating them standing over the cooling rack or sitting down for a proper meal, the key is the atmosphere. Light a candle that smells of woodsmoke, put on some folk music, and enjoy the fruits of your labor.
There is truly no better way to celebrate the changing seasons than with a warm, craggy, homemade apple fritter.

Recipe FAQs
What are the ingredients in apple fritters?
Use fresh apples, flour, sugars, and leavening. You will need 2 large Granny Smith apples, 1 tablespoon lemon juice, 1 teaspoon ground cinnamon, 1/4 teaspoon nutmeg, 2 cups all-purpose flour, 1/4 cup each of granulated and dark brown sugar, 1 tablespoon baking powder, 1 teaspoon kosher salt, 2 eggs, 3/4 cup whole milk, 2 tablespoons melted butter, and 1 teaspoon vanilla bean paste.
The glaze requires 2 cups powdered sugar, 1/4 cup milk, 1/2 teaspoon vanilla extract, and a pinch of salt.
What is the secret to making good fritters?
Maintain precise oil temperature. Use a deep fry thermometer to keep the 2 inches of neutral oil steady at 350°F (175°C). If you enjoyed mastering the sensory doneness cues here, apply them to our crispy fried corn fritters for equally perfect results.
Are two-ingredient fritters possible?
No, this is a common misconception. A proper fritter requires flour, baking powder, and liquids to create a stable, cake like structure that holds the apples together during frying.
What are some common mistakes when making fritters?
Overmixing the batter and guessing the oil temperature are the most frequent errors. Fold the wet and dry ingredients just until combined to keep the fritters light; overmixing results in a rubbery texture. Always use a thermometer, as guessing the heat often leads to raw centers or burnt outsides.
How to keep the fritters from becoming greasy?
Drain the fried fritters on a wire rack immediately. Placing them on a solid plate traps steam, which makes them soggy, so a rack allows airflow on all sides to maintain that crisp exterior.
How to achieve the perfect apple texture inside?
Macerate the diced apples for exactly 10 minutes. Toss them with lemon juice, cinnamon, and nutmeg; this step draws out moisture to create a concentrated spiced syrup, ensuring the apples soften perfectly while the outside cooks.
How to handle the batter for best results?
Drop 1/4 cup portions into the oil and flatten them slightly with a spoon. This technique increases the surface area and creates the signature craggy, crisp edges that define a quality fritter.
Homemade Apple Fritters
Ingredients:
Instructions:
Nutrition Facts:
| Calories | 313 kcal |
|---|---|
| Protein | 3.8 g |
| Fat | 11.5 g |
| Carbs | 49.2 g |
| Fiber | 1.1 g |
| Sugar | 31.8 g |
| Sodium | 233 mg |
