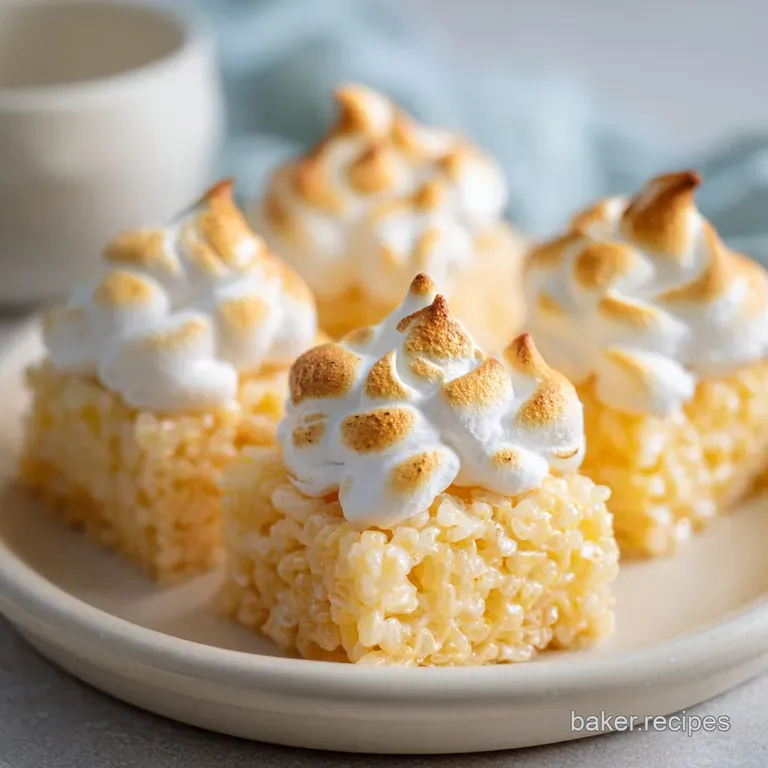
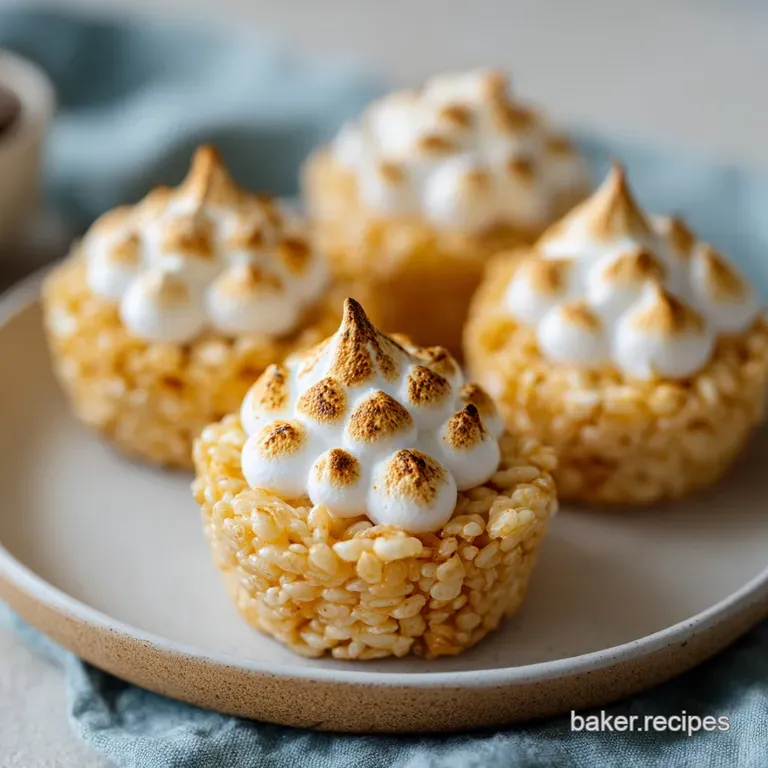
Lemon Meringue Rice Krispie Treat: Zesty and Toasted
- Time:15 minutes prep + 10 minutes cook = Total 25 minutes
- Flavor/Texture Hook: Zesty, buttery base with a shatter crisp toasted meringue top
- Perfect for: A bright spring dessert or a crowd-pleasing party platter
Bright Lemon Meringue Rice Krispie Treat
That smell of toasted sugar and fresh lemon zest hitting the air is honestly the best part of this whole process. I remember the first time I tried to make a "fancy" version of a cereal treat, and it was a total disaster.
I just dumped lemon juice into the marshmallows, and the whole thing turned into a sticky, weeping mess that wouldn't set. It was like trying to eat a sweet, citrus flavored sponge.
The problem with most "upgraded" treats is that they forget about the structural integrity of the marshmallow. You can't just add liquids without understanding how they fight the sugar. Learn how to make the ultimate Lemon Meringue Rice Krispie Treat with Toasted Meringue.
This version fixes the sogginess by introducing the acid at the exact right moment and topping it with a stable, torched meringue that adds a completely different dimension.
You're getting a treat that hits every note. You've got the nostalgic chew of the cereal, the bright zip of the lemon, and that velvety, cloud like meringue on top. It's a contrast of textures that makes it feel less like a snack and more like a real dessert.
Let's get into how to actually pull this off without the sticky heartbreak.
Reasons This Version Works
Acid Timing: Adding lemon juice after the marshmallows melt prevents the mixture from breaking down too early, which keeps the treats from becoming runny.
Protein Stability: The cream of tartar acts as a stabilizer for the egg whites, creating a structural web that holds the air bubbles in place so the meringue doesn't collapse.
Sugar Balance: The salt and lemon zest cut through the cloying sweetness of the mini marshmallows, creating a balanced profile that doesn't leave you feeling sugar overloaded.
Heat Contrast: Torching the meringue creates a thin, caramelized shell that shatters when you bite into it, contrasting with the soft, chewy base.
| Method | Time | Texture | Best For |
|---|---|---|---|
| Kitchen Torch | 2 mins | Precise, mahogany spots | Detailed peaks |
| Oven Broiler | 2 mins | Even, golden brown | Large batches |
| No Toasting | 0 mins | Soft, marshmallowy | Kids' parties |
This comparison shows that while the broiler is faster for the whole pan, the torch gives you that professional, spotted look. Personally, I love the torch because you can see the sugar caramelize in real time.
Essential Component Breakdown
| Ingredient | Science Role | Pro Secret |
|---|---|---|
| Unsalted Butter | Fat & Mouthfeel | Use a low heat to avoid separating the milk solids |
| Egg Whites | Structure/Air | Ensure the bowl is bone dry and grease free |
| Cream of Tartar | pH Balance | Just a pinch keeps the meringue from "weeping" |
| Lemon Zest | Essential Oils | Rub the zest into the sugar for a deeper citrus hit |
The Master Ingredient List
For the lemon base, you'll need: - 4 tbsp (57g) unsalted butter Why this? Provides the rich, velvety base that carries the lemon flavor - 10 oz (283g) mini marshmallows Why this? Melts more evenly than large ones for a smoother bind - 6 cups (approx.
450g) crispy rice cereal Why this? The classic crunch that anchors the dessert - 1 tbsp (6g) fresh lemon zest Why this? Concentrated citrus oils for an aromatic punch - 1 tbsp (15ml) fresh lemon juice Why this? Bright acidity to cut the sugar - 1/4 tsp (1.5g) salt Why this? Enhances all other flavors and balances sweetness
For the toasted meringue: - 2 large (60g) egg whites, room temperature Why this? Room temp whites whip to a higher volume - 1/2 cup (100g) granulated sugar Why this? Stabilizes the egg foam into a stiff peak - 1/8 tsp (0.5g) cream of tartar
Why this? Prevents the foam from collapsing - 1/2 tsp (2.5ml) pure vanilla extract Why this? Adds a warm, floral note to the citrus
Substitution Options:
| Original Ingredient | Substitute | Why It Works |
|---|---|---|
| Unsalted Butter | Coconut Oil | Similar fat content. Note: Adds a slight coconut flavor |
| Granulated Sugar | Caster Sugar | Finer grains dissolve faster in the egg whites |
| Crispy Rice Cereal | Puffed Corn | Similar crunch. Note: Slightly cornier, less neutral taste |
Trust me, don't skip the cream of tartar. It's the difference between a fluffy cloud and a sugary puddle. If you're out, a tiny bit of lemon juice in the whites works, but the powder is the gold standard here.
Step by step Assembly
Phase 1: Crafting the Zesty Base
- Melt the butter over low heat in a large pot or Dutch oven. Note: Keep the heat low so the butter doesn't brown
- Add the mini marshmallows, stirring constantly until they become a smooth, glossy pool of liquid.
- Remove the pot from heat and immediately stir in the lemon zest, lemon juice, and salt. Note: Adding these off heat prevents the marshmallow from seizing
- Gently fold in the crispy rice cereal until every piece is evenly coated in the lemon marshmallow mixture.
- Press the mixture lightly into a parchment lined 9x9 inch baking pan using a greased spatula. Note: Don't pack it too tight or the bars will be rock hard
Phase 2: Whipping the Meringue Peaks
- In a clean bowl, beat the egg whites and cream of tartar on medium speed with an electric mixer until soft peaks form.
- Gradually add the granulated sugar one tablespoon at a time, increasing the mixer speed to high, and beat until the mixture is stiff, glossy, and holds sharp peaks.
- Gently fold in the vanilla extract. Note: Use a spatula here to avoid deflating the air you just whipped in
Phase 3: The Final Toast
- Spread the meringue evenly over the cooled cereal base, using a spoon to create decorative swirls and peaks.
- Brown the peaks of the meringue using a kitchen torch until a deep mahogany color is reached, or place under an oven broiler for 1-2 minutes, watching closely to prevent burning.
Fixing Common Texture Issues
The Meringue Collapsed
This usually happens if there was a tiny bit of fat or egg yolk in the bowl. Even a smudge of grease prevents the protein bonds from forming. You'll see the mixture stay liquidy or look grainy instead of glossy.
The Base Is Too Hard
Over pressing the cereal into the pan is the main culprit. When you pack the treats too tightly, you remove the air pockets, turning a chewy treat into a brick.
The Lemon Flavor Is Weak
This happens when using bottled juice or skipping the zest. The zest contains the oils that provide the "smell" of lemon, while the juice provides the "taste". You need both for a real impact.
| Problem | Root Cause | Solution |
|---|---|---|
| Weeping Meringue | Sugar not fully dissolved | Beat longer until peaks are very stiff |
| Gummy Base | Overcooking marshmallows | Remove from heat as soon as they melt |
| Burnt Tops | Broiler too hot/too close | Move rack to the middle and watch every second |
Common Mistakes Checklist:
- ✓ Use a completely grease free bowl for egg whites (wipe with vinegar if unsure)
- ✓ Ensure egg whites are room temperature for maximum volume
- ✓ Press the base lightly - leave some air in there!
- ✓ Stir in the lemon juice only after removing the pot from the heat
- ✓ Watch the broiler constantly; meringue goes from gold to black in seconds
Fun Flavor Variations
If you want a different vibe, you can easily swap the citrus. A lime version works brilliantly, just swap the lemon for lime zest and juice. For something a bit more autumnal, try adding a pinch of cinnamon to the base and using orange zest.
If you love a more classic, gooey texture, you might enjoy my Gooey S'mores Treats recipe, which focuses more on that melted chocolate pull than the zesty brightness of this one.
For a berry twist, you can swirl a little bit of raspberry jam into the cereal base before pressing it into the pan. The tartness of the berries plays perfectly with the toasted meringue. Just make sure the jam is slightly warmed so it blends in without creating huge clumps.
Scaling Your Batch:
- Scaling Down (½ Batch): Use a 4x4 or small loaf pan. Reduce the cook time for the meringue by about 20% if using a broiler. Beat one egg, then use a kitchen scale to pour out exactly 30g of white.
- Scaling Up (2x Batch): Use a 9x13 inch pan. Only increase the salt and lemon zest to 1.5x to avoid overpowering the treat. Work in batches if your mixer bowl can't handle 4 egg whites comfortably.
- Baking Tip: If you're doubling the meringue and using the oven, lower the broiler temperature slightly and extend the time by a minute to ensure the middle is toasted as well as the edges.
Storage And Freshness Tips
Store these in an airtight container in the fridge for up to 3 days. The meringue stays surprisingly stable, but the fridge keeps the buttery base from getting too soft in warm weather.
If you're planning to freeze them, I recommend freezing the cereal base first, then adding the meringue and torching them just before you serve. Frozen meringue can sometimes get a bit "beady" or weep when it thaws.
For zero waste, if you have leftover egg whites, you can freeze them in ice cube trays. Use them later for a healthy omelet or another batch of meringues. If you have leftover lemon zest, mix it into some softened butter for a quick citrus spread on toast.
When you're putting together a dessert platter, these pair beautifully with something rich. I often serve them alongside a scoop of Banana Pudding to provide a creamy, mellow contrast to the sharp, zesty snap of the treats.
The Best Serving Pairings
To make this feel like a full experience, serve these bars with a cold glass of sparkling water with a mint leaf. The bubbles cleanse the palate between the rich butter and the sugary meringue.
For a more indulgent pairing, a dollop of fresh whipped cream or a few fresh raspberries on the side adds a fresh, tart element that complements the toasted sugar.
If you're serving these at a brunch, they go great with a strong cup of black coffee. The bitterness of the coffee cuts right through the sweetness of the marshmallow, making the lemon notes pop even more.
Recipe FAQs
Can I use bottled lemon juice instead of fresh?
No, stick with fresh. Bottled juice lacks the brightness and potency needed to properly balance the sweetness of the marshmallows.
How to brown the meringue topping?
Use a kitchen torch or an oven broiler. Torch the peaks until they reach a deep mahogany color, or broil for 1-2 minutes while watching closely to prevent burning.
How to achieve stiff, glossy meringue peaks?
Beat egg whites with cream of tartar until soft peaks form. Gradually add granulated sugar one tablespoon at a time on high speed until the mixture is stiff and holds sharp peaks.
Is it true I need to bake the treats to make them firm?
No, this is a common misconception. The buttery marshmallow base sets naturally as it cools in the parchment lined pan.
Can I freeze the completed treats?
Yes, but with a caveat. Freeze the cereal base first, then add and torch the meringue just before serving to prevent the topping from becoming beady or weeping.
How to store these to keep them fresh?
Keep them in an airtight container in the fridge. This keeps the base firm and the meringue stable for up to 3 days.
Do the lemon flavor principles work for other recipes?
Yes, acid balancing is a universal skill. If you loved the sweet tart balance here, see how we use the same acid technique in our lemon butter sauce.
Lemon Meringue Rice Krispie Treats

