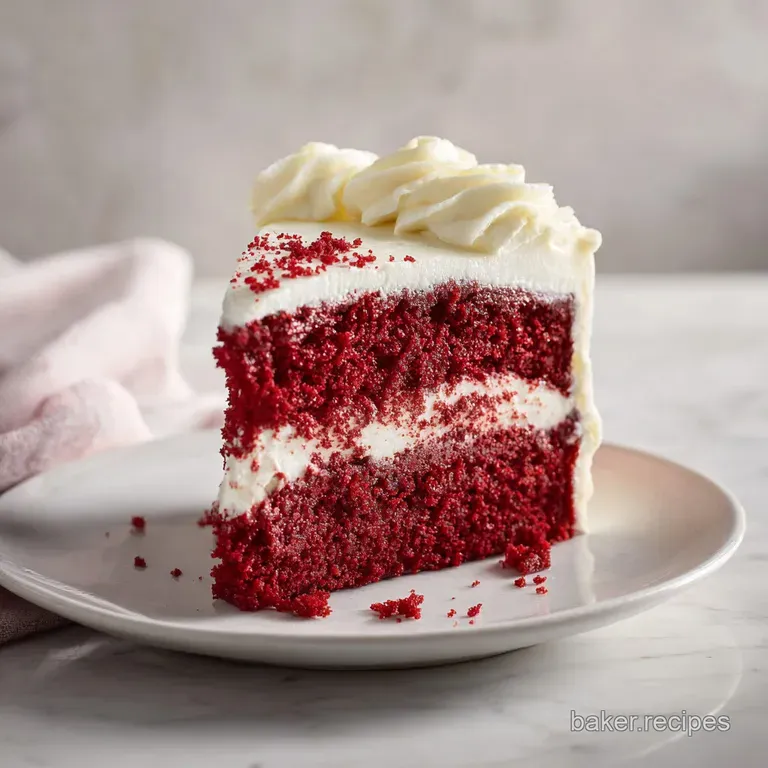
The Best Red Velvet Cake: Silky and Moist
- Time: Active 25 minutes, Passive 35 minutes, Total 60 minutes
- Flavor/Texture Hook: Tangy, velvety crumb with a silky finish
- Perfect for: Anniversary celebrations, holiday gatherings, or a weekend project
- Baking the best red velvet cake
- Mastering Essential Velvet Techniques
- Key Specs for Your Bake
- Sourcing Your Quality Ingredients
- The Essential Home Baker Toolkit
- Step by Step Method Guide
- Solving Your Common Baking Issues
- Creative Variations for This Cake
- Debunking Kitchen Myths
- Storage and Zero Waste Tips
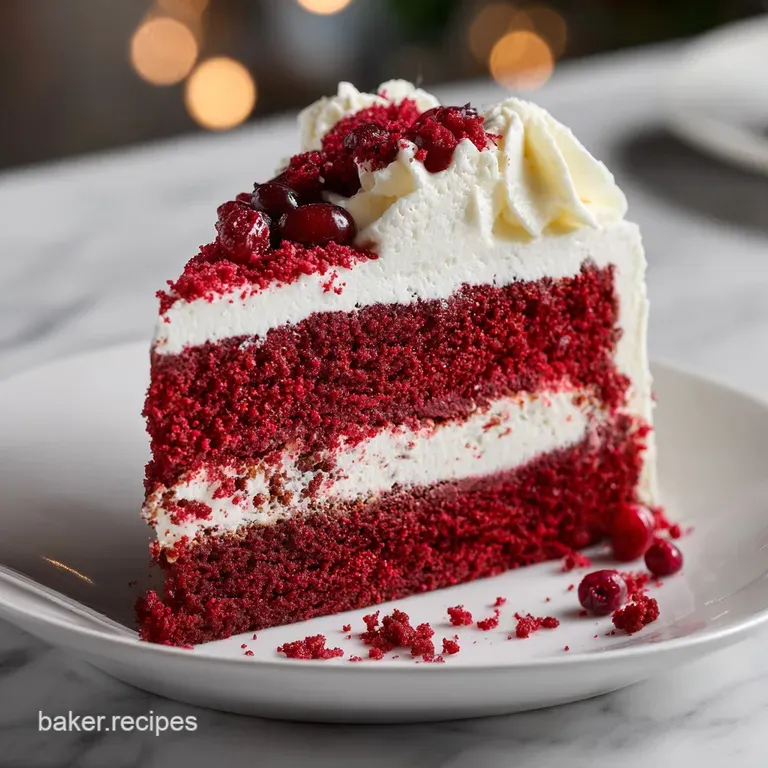
- Best Serving and Pairing Ideas
- Recipe FAQs
- 📝 Recipe Card
Baking the best red velvet cake
I still remember the first time I pulled a red velvet cake out of the oven. It was for my sister's graduation, and I was so nervous about that specific shade of crimson. The kitchen smelled like a strange, lovely mix of faint cocoa and the sharp, clean tang of buttermilk.
When I sliced into it, the contrast between the snow white cream cheese frosting and the deep red interior was so striking that nobody wanted to be the first to take a bite. But once we did, it was over. That texture, which is somewhere between a pound cake and a cloud, changed how I thought about dessert forever.
We've all had those dry, flavorless red cakes from grocery stores that just taste like food coloring and regret. This isn't that. We are making a cake that honors the Southern tradition while leaning into some modern pastry tricks to keep it foolproof.
It's about that specific "velvet" feel, which comes from the way the acid in the vinegar and buttermilk breaks down the flour's gluten. It’s a bit of a kitchen science experiment that results in something truly sophisticated.
If you are looking for a showstopper that actually tastes as good as it looks, you've found it. We're going to talk about why the oil matters, why we use a specific type of flour, and how to get that frosting to stay perfectly swoopy without sliding off the sides.
It's a journey into the heart of comfort baking, with a little bit of flair. Let's get into the details of what makes this specific version the one you'll keep in your recipe box forever.
Mastering Essential Velvet Techniques
The Acid Trigger: The combination of buttermilk and distilled white vinegar reacts with the baking soda to create immediate carbon dioxide bubbles, giving the cake its signature light lift without a heavy "bready" feel.
Gluten Management: Using cake flour instead of all purpose flour provides a lower protein content, which means less gluten is formed during mixing, ensuring the crumb remains tender and "velvety" rather than chewy.
Moisture Retention: Vegetable oil stays liquid at room temperature and even when chilled, unlike butter which solidifies. This ensures the cake feels moist and soft on the tongue every single time you take a bite.
The Cocoa Bloom: While there isn't much cocoa powder, its interaction with the acidic ingredients creates a subtle flavor depth that bridges the gap between a vanilla cake and a chocolate one.
| Thickness | Internal Temp | Rest Time | Visual Cue |
|---|---|---|---|
| 2 inch layer | 205°F (96°C) | 10 minutes | Edges pull away from pan |
| 1 inch layer | 200°F (93°C) | 5 minutes | Toothpick comes out clean |
| Cupcake | 205°F (96°C) | 5 minutes | Top springs back when touched |
Most people think red velvet is just chocolate cake with a bottle of red dye tossed in, but the real magic is in the chemistry of the crumb. When the buttermilk hits that baking soda, it’s like a tiny engine starting up in your batter. If you find this texture dreamy, you might also love the milk soaked richness of my Authentic Tres Leches Cake. Both recipes focus heavily on moisture, though they achieve it through very different scientific methods.
Key Specs for Your Bake
| Component | Science Role | Pro Secret |
|---|---|---|
| Buttermilk | Provides acidity for lift and tenderizes the crumb | Use full fat for a richer mouthfeel |
| Vegetable Oil | Keeps the cake moist for days | Use a neutral oil like canola or grapeseed |
| Cake Flour | Low protein for a delicate structure | Always sift to avoid lumps in the batter |
| Red Gel Color | Provides the iconic vibrant hue | Gel is more concentrated than liquid, so it won't thin the batter |
The weight of your flour is perhaps the most critical part of this entire process. If you scoop your flour with a measuring cup, you might end up with way too much, leading to a heavy, dense brick.
Weighing out 375g of cake flour ensures that the ratio of liquid to dry stays exactly where it needs to be for that airy finish.
Sourcing Your Quality Ingredients
- 375g cake flour: This is non negotiable for the texture. Why this? It has lower protein (8%) compared to AP flour (11%), ensuring maximum tenderness.
- Substitute: 320g all purpose flour mixed with 55g cornstarch.
- 400g granulated sugar: Provides sweetness and helps with moisture retention. Why this? Sugar is a liquefier in baking, helping to keep the crumb soft.
- Substitute: Caster sugar works just as well for an even finer melt.
- 15g unsweetened cocoa powder: Gives the classic "hint of chocolate" flavor. Why this? Too much cocoa would make the cake brown; this amount is perfect for the red hue.
- Substitute: Dutch processed cocoa, though it may result in a slightly darker red.
- 6g baking soda: Our primary leavening agent. Why this? It reacts specifically with the acid in the buttermilk and vinegar.
- Substitute: There is no direct substitute for baking soda in this specific chemical reaction.
- 240ml buttermilk: Adds tang and activates the leavening. Why this? The high acidity is what makes red velvet "velvet."
- Substitute: 230ml milk plus 10ml lemon juice, let sit for 5 minutes.
- 360ml vegetable oil: Ensures the cake is never dry. Why this? Oil coats flour proteins more effectively than butter, preventing gluten development.
- Substitute: Melted coconut oil (will add a slight coconut flavor).
- 2 large eggs: Bind the ingredients together and provide structure. Why this? Eggs provide the necessary protein to hold the bubbles created by the soda.
- Substitute: Flax eggs for a vegan version, though the lift will be different.
- 2 tbsp red gel food coloring: For that iconic look. Why this? Gel provides a deep color without adding excess liquid.
- Substitute: Beet powder for a natural (though slightly earthy and less vibrant) look.
- 5ml distilled white vinegar: The final acid boost. Why this? It ensures the baking soda fully reacts at the last second.
- Substitute: Apple cider vinegar.
- 450g full fat cream cheese: The base of our frosting. Why this? The tanginess balances the sweet cake perfectly.
- Substitute: Mascarpone for a richer, less tangy finish.
The Essential Home Baker Toolkit
You don't need a professional bakery to pull this off, but a few specific tools make the job much easier. First, a sifter or a fine mesh sieve is your best friend. Cake flour is notoriously clumpy, and since we want a "velvety" finish, those lumps have to go.
Sifting the flour and cocoa together not only removes lumps but also aerates the mixture, giving the baking soda less work to do.
A stand mixer or a sturdy hand mixer is also vital, especially for the frosting. Getting 450g of cream cheese and 115g of butter to emulsify into a cloud like state takes some mechanical power.
If you try to do it by hand, you'll likely end up with small bits of butter that won't disappear, which shows up as spots on your beautifully frosted cake. An offset spatula is my other "secret weapon" for that professional, swoopy look on the sides.
step-by-step Method Guide
- Preheat and prep. Set your oven to 175°C (350°F). Grease two 9 inch round pans and line the bottoms with parchment paper. Note: Parchment is essential because this cake is very tender and prone to sticking.
- Sift dry ingredients. In a large bowl, sift together the 375g cake flour, 15g cocoa powder, 6g baking soda, and 3g salt.
- Mix wet ingredients. In your mixer, whisk the 240ml buttermilk, 360ml oil, 2 eggs, 2 tbsp red gel, 5ml vinegar, and 10ml vanilla until the color is uniform and vibrant.
- Combine carefully. Gradually add the dry mixture into the wet on low speed. Stop mixing as soon as the last streak of flour vanishes. Note: Overmixing will lead to a tough, rubbery cake.
- Divide and bake. Pour the batter into your pans equally. Bake for 35 minutes until a toothpick comes out clean and the center feels springy.
- Initial cool. Let the cakes sit in the pans for 10 minutes until they start to pull slightly away from the edges.
- Final cool. Transfer to a wire rack to cool completely. Wait until they are cold to the touch before even thinking about frosting.
- Whip the frosting. Beat 450g cream cheese and 115g butter until silky and pale. Add 500g powdered sugar, 15ml cream, and salt. Beat on high for 2 minutes until light and fluffy.
- Assemble the layers. Place one cake on a plate, spread a generous layer of frosting, then top with the second cake.
- Final finish. Cover the top and sides with the remaining frosting, using an offset spatula to create texture.
Solving Your Common Baking Issues
Why Your Cake Sinks in the Middle
This usually happens for two reasons: either the oven door was opened too early, causing a temperature drop that collapsed the air bubbles, or the cake was underbaked. The structure of a red velvet cake is very delicate until the very end of the baking process.
If the internal temperature doesn't reach about 96°C, the "scaffolding" of the cake isn't strong enough to support its own weight once it leaves the heat.
The Color Turned Brown or Dark
If your cake looks more like a muddy brick than a ruby jewel, your cocoa powder might be the culprit. Using a very high-quality, dark Dutch processed cocoa can sometimes overpower the red dye.
Plus,, if the batter sits too long before going into the oven, the pH balance can shift, affecting how the red pigment holds up under heat. Always get your pans into the oven immediately after mixing the vinegar and soda.
| Problem | Root Cause | Solution |
|---|---|---|
| Dry Crumb | Too much flour or overbaked | Weigh ingredients and check doneness 5 mins early |
| Runny Frosting | Butter or cream cheese was too warm | Chill ingredients slightly before beating |
| Coarse Texture | Overmixed batter | Mix only until flour is incorporated |
Common Mistakes Checklist
- ✓ Never skip sifting the cake flour; it prevents dense, floury pockets.
- ✓ Ensure eggs and buttermilk are at room temperature to avoid curdling the batter.
- ✓ Do not overbeat the batter after adding the flour; this keeps the gluten low.
- ✓ Wait for the cake to be 100% cold before frosting, or the cream cheese will melt.
- ✓ Use gel food coloring, not liquid, to maintain the correct batter consistency.
Creative Variations for This Cake
If you're looking for a bit of a twist, you can easily adapt this recipe. For a "Naturalist Twist," replace the red gel with 30g of beet powder. The color will be more of a deep maroon or earthy red, and it adds a very subtle richness that pairs beautifully with the cream cheese. For another decadent treat with a different profile, try my Chocolate Chip Cookies as a side project while the cake cools.
For those who want a "Texture Upgrade," try adding 100g of finely chopped pecans to the frosting. The crunch against the velvety cake is a classic Southern addition that never fails to please a crowd.
You can also turn this into the "best red velvet cupcake recipe" by reducing the bake time to 18-22 minutes.
| Method | Time | Texture | Best For |
|---|---|---|---|
| Oven (Traditional) | 35 minutes | Uniform, soft crumb | Celebration cakes |
| Cupcakes | 20 minutes | High surface to frosting ratio | Parties and kids |
| Stovetop (Steamed) | 45 minutes | Extremely moist, dense | Small kitchens without ovens |
Debunking Kitchen Myths
"Red velvet is just chocolate cake." This is actually a huge misconception. While there is cocoa in it, the primary flavor profile comes from the buttermilk and vinegar. A true chocolate cake relies on a much higher ratio of cocoa and often uses boiling water to bloom the chocolate, whereas red velvet is an acidic, oil based cake with a completely different crumb structure.
"The red color originally came from a chemical reaction." This one is actually true! Back in the day, non alkalized cocoa powder would react with acidic ingredients like buttermilk and vinegar, turning a reddish brown.
Today’s cocoa is usually processed in a way that prevents this, which is why we use food coloring to mimic that historical look.
Storage and Zero Waste Tips
The beauty of the vegetable oil in this recipe is that it keeps the cake moist in the fridge for much longer than a butter based cake. You can store the frosted cake in an airtight container for up to 5 days.
If you want to freeze it, I recommend freezing individual slices on a baking sheet before wrapping them in plastic wrap. This prevents the frosting from being crushed and lets you grab a single piece whenever the craving hits.
To reduce waste, don't throw away the domes if you have to level your cakes. Crumble those scraps up! You can mix the crumbs with a little leftover frosting to make red velvet cake balls, or simply toast the crumbs in a low oven and use them as a "red velvet sand" garnish for the top of your cake.
Even the leftover buttermilk can be used in pancakes or biscuits the next morning.
Best Serving and Pairing Ideas
When you're ready to serve, a sharp, thin knife dipped in hot water and wiped dry between each cut will give you those perfectly clean, professional looking slices. Because this cake is so rich and tangy, it pairs beautifully with a sharp espresso or a cold glass of whole milk.
The contrast between the bitter coffee and the sweet, creamy frosting is something quite special.
If you are hosting a larger party and want a spread of various textures, this cake sits beautifully alongside something fruity. For another decadent treat, try Vanilla Cake with Fruit, which offers a lighter, more seasonal contrast to the deep, rich notes of the red velvet. Whether it's a holiday or just a Tuesday that needs a little color, this recipe always delivers on that promise of a perfect, velvety bite.

Recipe FAQs
What is the secret to a good red velvet cake?
Sifting your dry ingredients is non-negotiable. Sifting the cake flour, cocoa powder, baking soda, and salt ensures a light, airy crumb and prevents dense, floury pockets that ruin the texture.
Which brand is best for red velvet cake?
Professional results rely on gel food coloring, not a specific cake brand. Using 2 tablespoons of high-quality red gel coloring instead of liquid drops maintains the correct batter consistency and produces the iconic vibrant color.
What is Oprah's favorite red velvet cake?
Oprah has famously endorsed various commercial red velvet cakes over the years. However, baking from scratch at home allows you to control the quality of the cream cheese frosting and the moisture levels for a superior result.
Which red velvet cake is better, Betty Crocker or Duncan Hines?
Homemade recipes outperform boxed mixes in both flavor and structure. By following the steps provided, you achieve a depth of flavor from the cocoa powder and tang from the buttermilk that store-bought mixes simply cannot replicate.
How to keep the cake from drying out?
Measure the vegetable oil accurately and avoid overmixing the batter. The oil keeps the crumb tender for days, and if you enjoyed mastering this delicate crumb structure, you will find that the same light handed folding technique applies to all of our classic dessert recipes.
Is it true I can use melted butter instead of vegetable oil?
No, this is a common misconception. Vegetable oil is specifically chosen for this recipe because it remains liquid at cooler temperatures, ensuring your cake stays moist and soft even after refrigeration.
How to frost the cake without the cream cheese melting?
Wait for the cake layers to cool completely before applying any frosting. Even a slightly warm cake will soften the cream cheese and butter, causing the layers to slide and the frosting to lose its light, fluffy texture.
The Best Red Velvet Cake
Ingredients:
Instructions:
Nutrition Facts:
| Calories | 749 kcal |
|---|---|
| Protein | 5.9 g |
| Fat | 42.7 g |
| Carbs | 87.9 g |
| Fiber | 0.6 g |
| Sugar | 65.2 g |
| Sodium | 321 mg |
